Handy hints and tips from fellow
readers
Create better mail merge documents
When creating a mail merge document in
OpenOffice or LibreOffice, it is often easier to avoid the wizard as far as
possible. I keep my address list in a Calc spreadsheet and use a Writer
document for the merge, though I also use the database part of LibreOffice,
Base. Start Base. Select 'Connect to an existing database', then Spreadsheet
from the dropdown menu and click Next. Click the Browse button and find your
spreadsheet. Click Next. Leave the settings as they are and click Finish. Save
and close the database.

It’s
often easier to avoid using the wizard when creating a mail merge
Start Writer and press F4 to show available
data sources. Click the plus next to the name of your address list file and
then the one next to Tables. Click the sheet with the addresses, most likely
Sheet1. The main part of the Data window will now show the information
contained in the address list. It will look a lot like the spreadsheet but the
first row is now the title row. To add one of these fields to your Writer
document, simply drag and drop the title into your document. Fields can be
added as many times as required.
You can print this document right away, but
if you want a saved version of the merged document you will need to use the
Mail Merge Wizard. Click Tools, then Mail Merge Wizard. Click Next through all
the wizard options up to Step 8. Select 'Save merged document', choose whether
to save as one big file or several, and click Save Documents.
Windows 7 and 8
Restoring the default printer
Checking the default printer in Windows
often solves printing problems. In Windows 7, click the Start Button, then
'Devices and Printers'. To find this tool in Windows 8, reveal the Charms and
click Search, Type devices and printers and click Settings
in the right- hand column. Click 'Devices and Printers' in the main part of the
screen. Right-click the printer that you want to use and click 'Set as default
printer'.
Windows (all versions)
Save space by moving your documents
folder
It's becoming more common for computers to
be supplied with a Solid State Disk (SSD) and a conventional hard disk (HD).The
SSD offers fast performance and the HD lots of space for documents.
Unfortunately, Windows will often ignore the HD and SSDs quickly run out of
space. The solution is to tell Windows to move your Documents folder onto the
HD.

Save
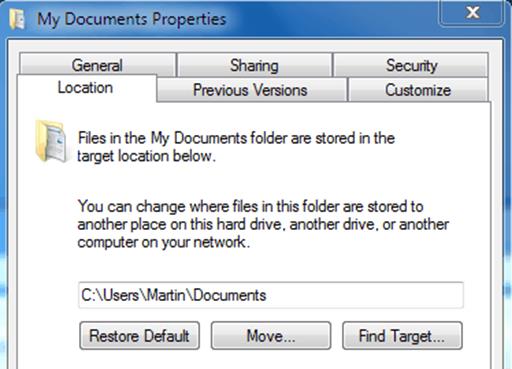
space by moving your documents folder
Open Windows Explorer and click Desktop in
the left column. Double-click your user folder (for example, mine is Colin
Gray, System Folder). Right-click My Documents, click Properties and then click
the Location tab. Click the Move button and select a new location for your
files on the conventional hard disk (probably D: but it may differ depending on
your computer), The Move operation may take a few minutes depending on how big
your Documents folder is.
Jing
Send screen grabs to Flickr
The free program Jing Is one of the easiest
ways to capture screenshots and share them online. If you want to Include grabs
on forums (such as from http://forums. computeractive.co.uk). It's helpful to
set Jing to upload grabs directly to Flickr.
Move the cursor over the yellow Jing
semi-circle at the top to the screen to reveal three options. Click the right
option for More, then click the middle button to open Preferences and
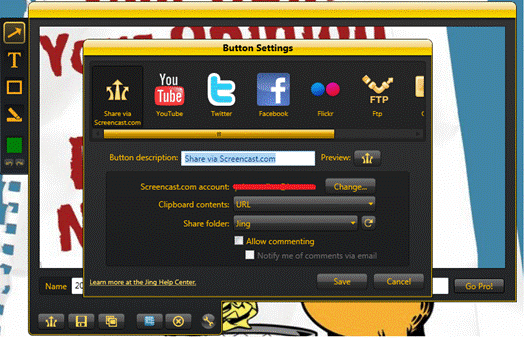
'Customize buttons'. Now click the New option surrounded by the dashed line.

Send
screen grabs to Flickr
Next, click the Flickr Icon at the top. You
can change the 'Button description' If you want and then click the Authorize
button. Click Start Authorization and sign into Flickr If you haven't already.
Confirm that you followed a link you trust and then click 'OK, I'll authorize
it' having read what you're giving Jing permission to do with your account.
Close the browser window, return to Jing and click the Finish button. Create a
set name in the 'Add to set' text box as this will make It easier to keep grabs
separate from other pictures. Make sure they are set to share with anyone and
select 'Embed code' in the dropdown menu below as this will give you the direct
link to the Image file. Click Save and close the remaining Jing windows.
Now, when you capture an Image in Jing, a
Flickr button will appear at the bottom of the Edit window. Click this to
upload the grab to Flickr and copy the link to the clipboard.
Audacity
Split imported
audio into separate tracks
Splitting audio recorded into Audacity from
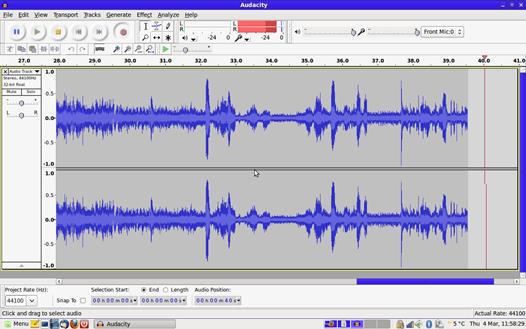
an LP or cassette is easy. If not obvious. Click the 'Skip to Start' Icon (two
arrows pointing left) to go to the beginning of the recording. Click Tracks,
then Add Label at Selection, Type the name of the track and press Enter. Click
with the Selection tool (F1) at the beginning of the next track and repeat. You
may find it quicker to press Ctrl and B to Insert a new marker.

Split
imported audio into separate tracks
Once you have finished marking the tracks,
click the File menu, then Export Multiple. Choose an export format and a
location to save the files. Make sure 'Split files based on:' is set to Labels.
Click Export. You can review and edit the metadata for each track. The tracks
will be exported as separate files.
Newsletters
Free email templates from MailChimp
You can get started making email
newsletters using the free templates from www.Mailchimp.com. You don't have to
use them with a MailChimp account or even sign up. Go to www.snipca.com/8974 and click the
Download button. The next page is a little complicated. Click the button that
says ZIP with a picture of a cloud and a downward pointing arrow. Save the file
to your computer and extract the contents. These templates can now be used with
any web editor.
Gimp
Add borders to images in Gimp
A good way of making text stand out in
pictures is to add a border. There isn’t an option for this In Gimp's text
tool, but learning to do this with the Selection tool means that you can then
add a border to any shape you want.

Add
borders to images in Gimp
Create a new document and press t to select
the text tool. Enter some text and set the style. Open the Layers tool by pressing
Ctrl and L. Right-click the text layer and select 'Alpha to Selection'. Press
Ctrl, Shift and N to create a new layer. Select Transparency in Layer Fill Type
and click OK. Click Select and then Grow. Enter the number of pixels you want
the border to be and click OK. Press Shift and B to select the Bucket Fill
tool. Select a color to use for the border In the Change Foreground Color
window (double-click the foreground color -black by default) and fill the
selection with this color. Return to the Layer tool and drag this new layer
below the text layer.
Windows mail
Two-step verification
If you have set up two-step verification
for your Microsoft account, you'll need to log into programs such as Windows
Mail differently because Mall can't prompt for a second code. Sign into
Outlook.com, Click your name at the top right and then click 'Account
settings'. Click 'Security info' on the left and scroll down to the 'App
passwords' section. Click 'Create a new app password'. Copy and paste this
password into Windows Mall when prompted.