Fancy becoming a world-wide video
phenomenon? Here’s our guide to getting your masterpiece on YouTube
YouTube has turned some ‘ordinary’ people
into household names; bringing fame, fortune and popularity with it. It’s also
been the ruin of others, but we won’t concern ourselves with the negative for
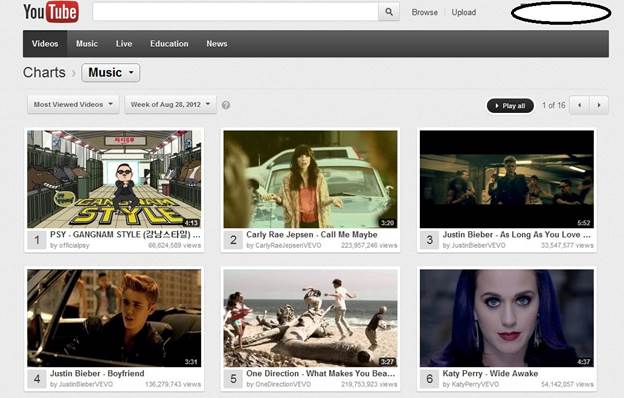
the moment... As we’ve seen in recent months, in particular with Gangnam Style,
if you create something that’s ‘catchy’ in some way or another, it’s possible
to attract a of millions (if not billions) with a little bit of savvy
marketing.
YouTube
has turned some ‘ordinary’ people into household names; bringing fame, fortune
and popularity with it
However, for most people, YouTube is for
their family, to share videos of the kids as they grow up or a selection of
stills from the previous year; the usual, normal stuff that connects families
across the globe. As it turns out, it’s a surprisingly easy thing to do:
Step 1
This is probably the most difficult of the
steps as it relies on you having or making a video. Regardless of whether it’s
going to be the next big thing or just something to show the relations in
Australia, we’re going to assume you’ve already got the content onto your
computer via the USB cable from your camera, phone or other device.
Step 2
The next step is to actually create a
YouTube account. Easy if you already have a Google account, just login with the
same username and password combo you use for that. Otherwise, browse on over to
either YouTube or Google and create an account; both will lead you to the same
location so there’s no need to worry too much about having multiple accounts.
Step 3
Once you login to YouTube you’ll be shown a
very basic setup, with some recommended selections based on what you’ve browsed
previously or a selection of top videos if you’re completely new to YouTube.
Assuming the video in question is located
on the hard drive of the computer you’re using to login to YouTube with, click
on the ‘Upload’ button located at the top center of the screen, next to the
YouTube search bar.
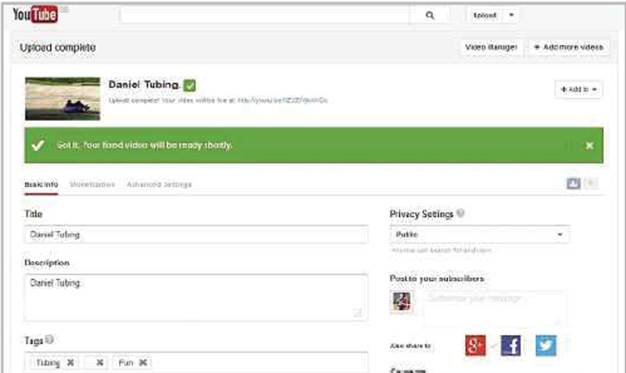
Upload
your video and take time to look at all the options available
Step 4
This next screen is where all the editing
action takes place and where you can set various permissions for who gets to
view the final product.
First, you can either click on the big red
icon in the ‘Select Files to Upload’ window or you can drag and drop a video
file from your PC onto the Window. YouTube will now upload and process the
video ready for viewing on the internet.
When the processing is complete you’ll be
presented with a number of options. The first being the blue bar under the
‘Upload complete’ message; this usually appears if the video in question is a
bit shaky, with this option YouTube will offer to stabilize the video which
sometimes works, but not all that often.
The next setting to look for is the under
the ‘Privacy Settings’ where a drop down box will off you the following
options: Public, Private, Unlisted and Scheduled. The definition of each is
relatively self-explanatory, but in brief: a Private video will only be seen by
you and up to 50 people you invite. Unlisted means that only the people who
have a link will be able to see it. Public means anyone will be able to view it
and Scheduled is for when you want to promote and advertise a release and
schedule it like a TV slot.
You can now enter a description in the
appropriate box and enter a few Tags that may bring searchers to your video or
highlight it above all others. And finally, choose a category that’s relevant
for the video and tick which of the social networks you want to share the video
on.
Stats,
stats and more stats, with graphs
Step 5
If everything looks okay, then - for the
sake of getting up and running fast - that’s basically it. Your new YouTube video
will be live at the address that’s displayed next to the title, which you can
then right-click and open in a new window if you like. However, there’s a bit
more going on behind the scenes which may prove to be useful if you take the
time have a look around.
For starters, there are three tabs in the
video editing and upload window: Basic Info, which is where you currently are,
then Monetization and Advanced Settings.
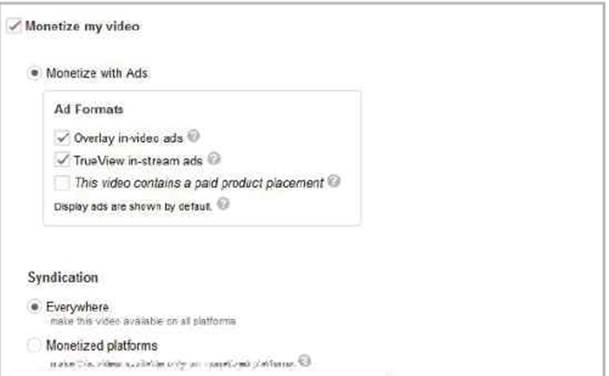
Monetization is where you can opt in for
Google’s AdSense program-me or a branch of it at least. If you think your video
has the potential to attract millions of viewers, then by all means try and
earn a little cash from by clicking on the ‘Monetize my Video’ tick box and
agreeing with the terms and conditions. Then, tick the relevant boxes depending
on the type of video and the content therein.
Advanced Settings allows you to block
comments, which can be a good thing in most cases, as comments aren’t filtered
and there’s always the possibility that some oik can type in something nasty.
You can also make the video 3D or not, add a certification, and even choose
which countries are allowed viewing rights.
Step 6
Once you’ve gone through the Monetize and
the Advanced Settings with a fine toothed comb, and everything is as you would
expect, take a moment to click on the down-pointing arrow next to the ‘Upload’
button at the top of screen and select ‘Video Manager’ from the drop down list.
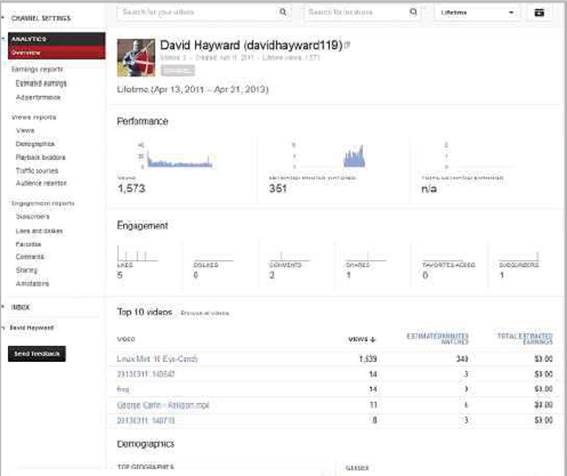
In here you can view and edit all the
video’s you’ve uploaded so far, as well as monetize any you haven’t and enhance
or annotate to your hearts’ content. Plus, on the left-hand side of the screen
you’ll notice a group of links, of which one is Analytics. This is where you
can see who, when and where viewed your video, including the amount of revenue
you’ve earned from the subsequent viewings.
Could
you make money from your video?
Conclusion
That’s all you really need to get a video
onto YouTube and customize it so you can make money, send it to the right
people or just have it viewed solely for its content. Needless to say, there’s
a whole lot more you can do, but half the fun is working that out for yourself.