Now that you have your tiles grouped,
resized and any live feeds turned off, it’s time to label the groups and
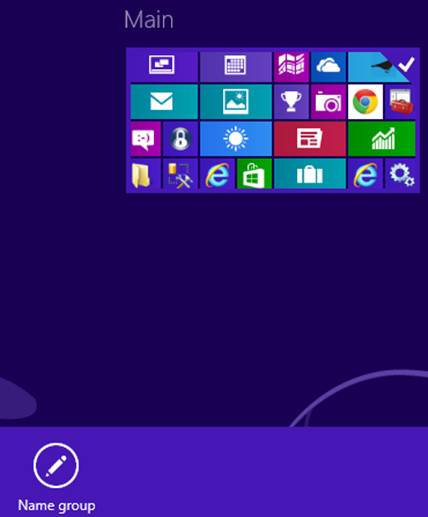
finalize the harmony of the UI You will notice that in the bottom right-hand
corner of the UI there’s a small minus (–) icon. If you left click it, the UI
will be zoomed out significantly and your groups and tiles will be displayed.
If you now right-click one of your created groups, you’ll see the familiar menu
appear along the bottom of the screen, with a ‘Name Group’ icon. Click this,
and enter a name for the group you’ve created (‘Games’, for example), then
either hit Enter or click the ‘Name’ button.
Name
Group’ icon.
Do the same for the remaining groups you’ve
created, then left-click anywhere on the desktop to return to the normal view.
The result is a nicely grouped, labelled and tidier desktop.
Pin URLs
Along with the core web browser
applications, you can also pin your most used and favorite websites to the UI
start screen.
To do this, launch Internet Explorer 10
from the tile on the UI and navigate to the site you wish to pin to the UI.
Wait for the site to finish loading (not always necessary, but there have been
times when a site that’s not loaded correctly hasn’t pinned to the UI), and right-click
anywhere on the screen to open the bottom menu bar. On here you’ll notice a pin
icon. Click it and you’ll open a menu with two options: ‘Pin to Start’ and ‘Add
to Favorites’. Click on the ‘Pin to Start’ option and enter a name, if needed,
for the UI tile, then click on the ‘Pin to Start’ button to add the new tile to
the UI.
Press the Windows key to return to the UI,
and drag the new tile to its correct group.
Pin Folders And Programs To The UI
In addition to the Windows 8 apps you can
install from the Store, and your favorite websites from within Internet
Explorer 10, you can also pin any number of folders, or other programs to the
UI Start screen.
The best way to do this, in terms of
familiarity with previous versions of Windows, is to drop into the Desktop by
clicking on the Desktop tile, opening Windows Explorer from the taskbar (along
the bottom of the screen), locating the folder you wish to have displayed on
the UI, right-clicking it and from the menu selecting ‘Pin to Start’. The
folder will now be pinned to the UI, and you’ll need to return to the UI Start
screen again, to organize them or it into the relevant group.
In
addition to the Windows 8 apps you can install from the Store, and your
favorite websites from within Internet Explorer 10, you can also pin any number
of folders, or other programs to the UI Start screen.
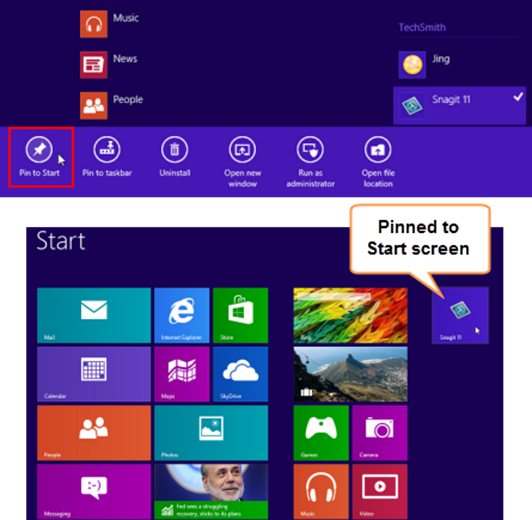
For programs, the same procedure can be
applied. Simply navigate, via Windows Explorer, to the executable of the
program in question, right-click it, and again select ‘Pin to Start’.
If, however, you want to take the more
modern route and fully utilize the new search functions and features within
Windows 8, then from the UI, start typing in the name of the folder or program,
and Windows 8 will switch to the search mode and display a round-up of the
available names associated with whatever you’ve typed so far. For example,
typing in ‘snip’ will display the Windows Snipping Tool. All that’s needed now,
once you have the desired item in the list, is to right-click it, followed by
‘Pin to Start’ as selected from the menu along the bottom of the screen.
Windows 8 Tweaking Tools
To further enhance, improve or destroy the
Windows 8 UI, there are a number of third-party tweaking tools available. While
some of these currently work with the RTM and developer release versions,
there’s no telling whether or not Microsoft will release a sudden update that
will kill off their use, but being enthusiasts of the experimental nature,
we’re sure you’ll find out sooner or later.
Metro Controller: A simple tool to add, or
remove UI elements - goo.gl/0DTyo.
Windows 8 Start Menu Switcher: An app to
enable the classic Windows 7 desktop - goo.gl/pagPA.
Metro UI Colours Changer: Uses to add more
colour choices to the UI - goo.gl/plcqn.
Windows 8 Start Tweaker: More Windows 8 UI
tweaking: goo.gl/gN0mO.
Metro UI Tweaker: Use to enable or disable
the new features in the UI - goo.gl/5BtRq
A Better User Icon
The final touches to making the new UI
appear better looking are again purely personal, but they make for better
viewing, and since you’ve spent this long making the UI look half decent, there
seems little point in scrimping on other elements now.
Change
Account Picture in window 8
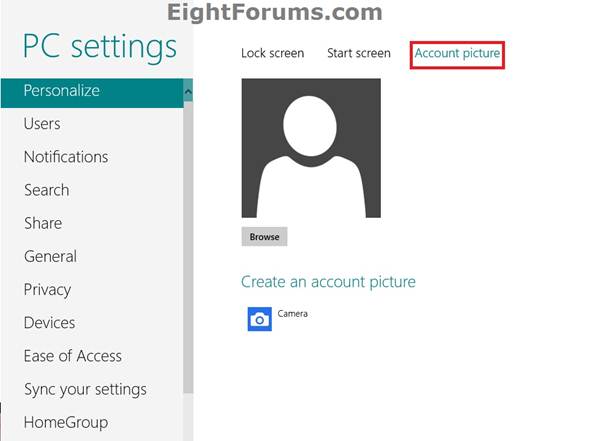
One of the ways of bringing a little more
life to the desktop is to create an account picture, which will sit in the
top-right of the UI, next to your name. Left-click your name, and you’ll be
offered a menu, in which ‘Change Account Picture’ is one option. Click this and
you’ll have the ability to either browse for a suitable downloaded image, or if
you have a webcam installed, you can opt to add a personalized mugshot.
When you’ve selected your chosen image,
left-click in the bottom left of the screen to return to the UI or press the
Windows key on the keyboard. You should now have a tasteful image next to your
name on the UI start screen.
UI Tattoos
Although they’re not officially called UI
tattoos, we’re hoping this phrase will get officially adopted and that we get
some credit from Microsoft in the form of a cheque containing many digits. What
they do is bring some decorative art to the UI background, although when you
look at them, you may simply decide to opt for a black color.
Anyway, you can return to the Settings
screen, where you changed your account picture, by either moving the mouse
pointer to the top left of the screen and clicking on the relevant windowed
preview as it comes in from the left of the screen, or by holding the Windows
key on the keyboard and tapping Tab until the Settings window from earlier
appears.
Once in the Settings screen, click on the
option ‘Personalize’, followed by the middle option (on the right-hand screen)
‘Start screen’. You now have a selection of 20 different styles to choose from
to decorate the UI with. Some are quite artistically pleasing and some are
extremely colorful and very busy looking; the choice, of course, is up to you.
Along with the UI tattoos, you can also alter the desktop UI color from the
choice under the selection of tattoos.
Much Nicer
Given a little time and patience, the new
Windows 8 UI Start screen can be made to not only look pretty snazzy but also
be a benefit and little more productive than the default installed view.
There’s little doubt that the UI will still grate on peoples nerves, no matter
what we do to make it more appealing, but once you get used to it it’s not
really all that bad. It all depends on whether or not you want to get used it
and just how determined you are to make it work.