Recording footage of your onscreen
activity can be a useful troubleshooting aid. Mike Bedford explains how to get
started using free CamStudio
Capturing the contents of a PC’s screen,
using either Windows’ built-in facility or a dedicated utility such as Snaglt,
is a useful technique. Indeed, all the screen grabs you see in were created
this way.
Screen grabs have many uses. If you teach
IT, for example, you’ll find them invaluable in the creation of course notes
and presentations that explain how to use particular applications. Or, if
you’re on the other side of the educational divide, they could come in handy
for illustrating your coursework.
If your friends and family frequently
request your advice on PC troubleshooting, a screen grab could help you answer
their queries.
Conversely, if your latest software
purchase refuses to behave itself, and you’re fed up with explaining to support
staff what’s happened, you can send them visual proof that the software is
faulty.
Sometimes a single still image of the
screen isn’t enough. Rather than send a series of screen grabs, a single video
clip that plays back your onscreen actions can be a better solution.
Screen recordings, also known as
screencasts, can include an audio commentary and captions that help to explain
the behaviour to which you’re hoping to draw attention. The end result can be
sent via email to tech support or a willing tech- savvy friend, or the video
can be hosted on your website.
Screen casting might sound as though it’s a
more complicated and potentially more expensive solution than capturing screen grabs,
but it needn’t be. While many of the more fully functional screen grab
utilities are paid-for products, such as Camtasia Studio, the package we’ve
chosen for recording your onscreen action is free.
We’ll use CamStudio in the following
walkthrough, which you can download from camstudio.org. With our help, you
should find screen casting quickly becomes second nature.
CamStudio will list any video codecs
installed on your PC, but we recommend installing Xvid if you don’t already
have it (xvid.org).
Capture what’s happening onscreen with
CamStudio
Step 1
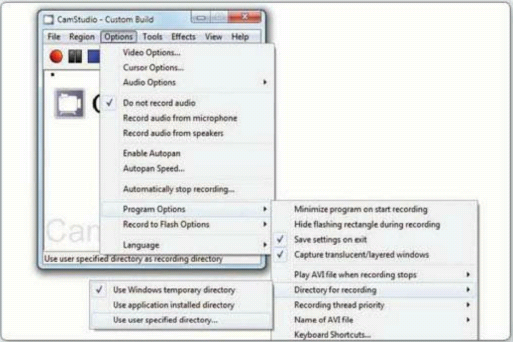
Specify a folder for your recordings in
Options, Program Options, ‘Directory for Recording’. Click the red Record
button, then minimise the app and carry out the task you wish to video. Now
maximise CamStudio and click the blue Stop button.
Step 2

Windows Media Player will immediately play
the recording. You’ll notice that the recording includes the CamStudio window
at the start and end of the recording; since this part of the video isn’t
needed, we’ll deal with how to avoid this in the next step.
Step 3
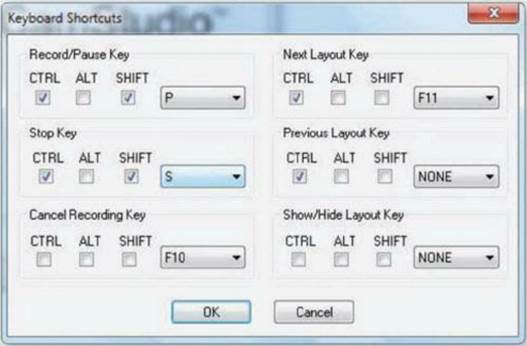
First, select Options, Program Options,
‘Minimize program on start recording’. Next, select Options, Program Options,
Keyboard Shortcuts and define keys for Stop and Record/Pause. You can now end
recording without pressing the Stop button.
Step 4
If you want to record only part of the
screen select Region, Region and start recording. Click and drag to select an
area, then update the numbers to ensure they are even. Green/yellow ‘corners’
reveal which part of the screen is being recorded.
Step 5
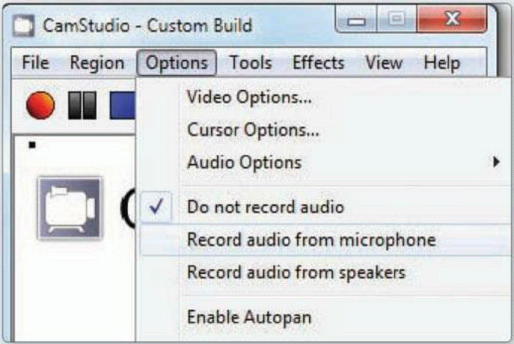
To also record audio select Options,
‘Record audio from I i I speakers’. To add audio after the video
was captured select Options, ‘Record audio from microphone’. If this doesn’t
work, ensure your mic is selected as the Audio Capture Device in Audio Options.
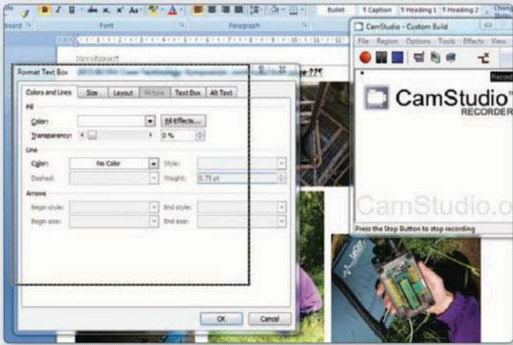
Step 6
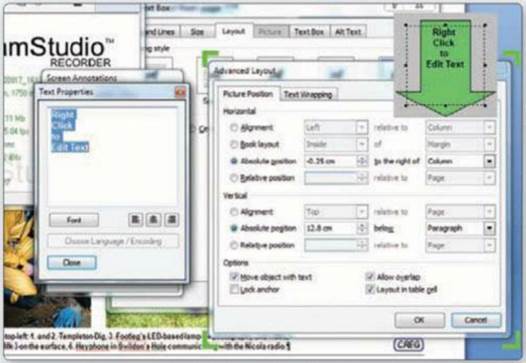
Pause recording to maximise the app and add
a caption. Select Tools, Screen Annotations, then select and drag into position
a shape on the Shapes tab. Right-click the box and select ‘Edit Text’ to enter
a caption, then continue recording.
Using shapes as captions
Captions form an important part of
screencasts, but CamStudio can be rather unhelpful on your first attempt to add
one. Despite it having a built-in library of shapes that you can use as text
boxes, CamStudio doesn’t know where to find it until you tell it where to look.
So, the first time you attempt to add a caption, CamStudio won’t offer you any
shapes.
To tell CamStudio where to find the shapes
library, select Screen Annotations from the Tools menu and open the Shapes tab.
For now, this folder will be empty. Next, select ‘Open Shape Library’ from the
Screen Annotations, Library menu. In the Load Shapes dialog box, browse to the
shapes library and click Open. If you’re using the most recent version of
CamStudio in Windows 7, you’ll find it at C:\Program Files (x86)\CamStudio
2.6b.
Now, when you try to add a shape, as we did
in Step 6 above, you’ll be presented with a list of available shapes. Although
you can’t preview how each looks, the filenames are suitably descriptive, for
example ‘Plain’ and ‘Point Right’. However, if you do end up selecting a shape
for a text box that you don’t like, it’s easy to delete it and select another.
To delete a shape, right-click it and select Close from the drop-down menu that
appears.