Why spend perfectly good money on
boosting your PC when you can do it for free?
It’s always claimed by Microsoft that every
new OS release improves both speed and efficiency. Each new Windows incarnation
can apparently make your PC run faster, smoother and grant you ever more
productivity-enhancing features, and to be fair, aside from a couple of
missteps, this is largely the case. Windows 7 was a huge improvement over the
sluggish Vista, and XP was a mammoth improvement over the incredibly bad
Windows Me. The jury may still be out for many concerning Windows 8's benefits,
but it's still a fast and decent OS, whichever way you look at it.
The problem with PCs, though, is that
regardless of how good or optimized an OS may be, you just can't put a halt on
the inevitable PC slowdown. Partly the fault of software and partly hardware,
after a while all PCs succumb to bloat and slowdown, and even the most powerful
system can lose that all-important speed.
As you use your PC, data builds up,
programs take up space and resources, all sorts of resident applets run in the
background, and features added to the OS (often features you don't even use or
know exist) take their toll. There's simply no avoiding it, and without constant
maintenance, your PC will begin to show signs of tiredness.
Some people remedy this by spending money
on optimization tools, some upgrade their system with more RAM or a better CPU,
and others simply put up with the degradation. This isn't necessary, and not
only should you not have to live with a sluggish PC, in many cases, you
certainly don't have to spend money, and there's plenty you can do in order to
improve your PC's effectiveness and speed.
There are system settings you can change,
built-in tools you can use and free programs available that can fine-tune and
tweak your system to remedy most slowdown issues, and over the next few pages,
we're going to take a look at just some of these methods.
We're going to look at the basic steps
everyone should take to keep their systems in shape, along with some
lesser-known tips and tweaks you can employ to get the most out of your PC.
We'll also have a brief look at some more advanced and specialized techniques
you can try, some of which may be a little risky but have been found by many
users to be beneficial.
The Basics
There are a selection of methods all PC
users can use, regardless of their experience level. These can often be
employed on a regular basis to help keep a PC in shape, and at the very least
can stave off the inevitable slowdown for quite some time. These tips should
become part of your regular PC maintenance.
1.
Uninstall
It's one of the most basic tasks you can do
to fend off slowdown, and is also one of the most overlooked methods people can
use, but simply removing old or unwanted programs can help a great deal.
Always make sure you keep an eye on your
PC's installed applications, and get rid of any you don't need or want.
Programs take up hard disk space, add to fragmentation (more on this later),
and many may have background services and processes that also take up
resources. Simply having more application entries can slow down the Start
menu/screen, and should apps have context menu items, your right-clicking will
be slowed too.

Uninstalling
unwanted programs is an essential task all PC owners should undertake from time
to time
Simply go to the Control Panel and
uninstall anything you don't need. Be sure, however, not to uninstall anything
important. If you're not sure what something is, check it out first, as it may
be an important system tool or security application.
2.
Clean up hard disks
Hard drives are very fast at accessing
data, with solid state being particularly effective, but when there's a massive
amount of data on a volume, any hardware will become a little overworked and
slow down. Imagine if you had to browse through books in an entire library
instead of a small bookshelf at home to find what you want. That's what happens
to hard disks as more and more data is stored on them.
To help it out, it's a good idea to not
only remove programs, as stated above, but also to remove data that's not
needed, along with Windows features you don't want. This can be done via the
simple Windows Disk Cleanup tool.

Use
Windows’ Disk Cleanup tool to remove unwanted files
Right-click the drive requiring a good
clean and click 'Properties'. Now click the 'Disk Cleanup' button and let
Windows scan the volume. After this, a list of items will appear, along with
their total size. Check each item you want to remove and click 'OK' to proceed.
Some entries have special options, such as
viewing offline web pages and files, and you can click the More Options tab to
uninstall programs (as already mentioned) and clear out older, unwanted System
Restore points.
As well as using the built-in tool, also
manually check your drive(s) for data you don't need to keep on the system. You
may have old work, movies, music and other items saved that can be backed up to
disc or other devices. This will keep the drives as clear as possible, leaving
the next tip's tool less to do.
3.
Defrag
To reuse the earlier library analogy,
imagine that your library of books was not only large, but all of the books
were out of place, shuffled around randomly in different sections. It'd be a nightmare
trying to find anything and again this applies to the hard disk.
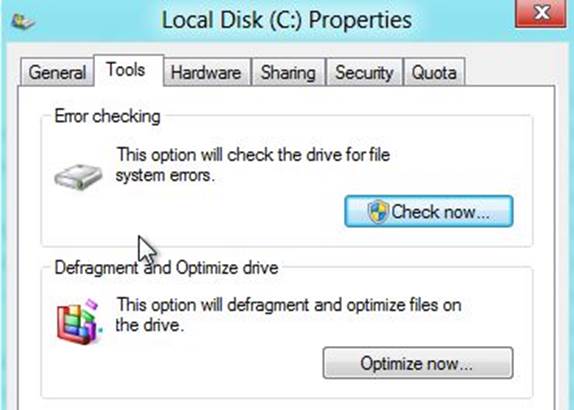
To
use it, right-click a drive in Explorer and select 'Properties'. Here you'll
see the Defrag tool (called Optimize in Windows 8)
As more and more data is saved to the
drive, it gets slotted into free spaces (or sectors). These spaces are
allocated as they're needed, not in sequential order, so as new data is saved,
it's spread out over the volume to any free sector. This causes data
fragmentation, meaning the drive has to search all over its storage for the
required data before it can piece it together and load it up. This obviously
slows down access times and, in turn, your whole PC.
Running Windows' built in defragmentation
tool is an essential way to combat this (although you shouldn't use it on a
solid-state drive), and although it can take a long time, depending on the size
of your hard drives, it will scan and sort out the data on the disk, ordering
it correctly, thereby speeding up data access.
To use it, right-click a drive in Explorer
and select 'Properties'. Here you'll see the Defrag tool (called Optimize in
Windows 8). Click it and then simply select a drive to analyze and, once done,
if required, defrag it. It can take a while, but the results are almost always
worth it. Windows 8 also has the ability to automatically optimize drives on a
daily, weekly or monthly basis, and you can use this option to schedule this
task, which will keep your drive ticking over nicely without input from you.