Create a virtual PC by putting an old
setup into a window on your new computer
Your PC is probably packed with all sorts
of items that you do not want, from aging but useful applications to minor customizations.
If you’re thinking about buying a new computer, one way to retain everything on
the old one is to ‘virtualize’ the existing setup and then install it as a
‘virtual PC’ on the new computer. This is easier than you might think and
effectively puts your old PC into a window on the new one. Here’s what to do.
Step 1
We’re going to use a free tool called
Vcenter Converter to create a virtualized disk image of an existing PC setup.
To begin, launch a web browser, visit www.vmware.com, click the Products tab
and scroll down the page to find the Free Products section – click the Free
Download link to the right of the Vcenter Converter entry. Now click the
‘Create an Account’ tab to the right, type in your name and email address,
leave the ‘Are you a VMware Partner?’ radio button selection set to No, then
click the Continue button.

To
begin, launch a web browser, visit www.vmware.com, click the Products tab and
scroll down the page to find the Free Products section
Step 2
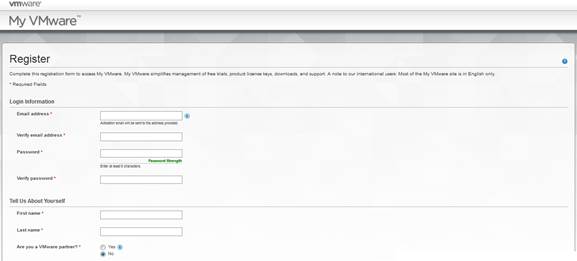
At the registration screen, retype your
email address to confirm it before entering and confirming the password you
would like to use. Now fill in all of the other fields marked with red
asterisks, supplying your personal details when asked for a business address
and phone number. Scroll down the page and tick the boxes to agree to the
various license agreements, omitting the last one (unless you want to receive
promotional emails from developer VMware) and then click the Continue button. A
confirmation email containing a link will be sent to you – click the link to
validate your account, then type in your password when requested.

At
the registration screen, retype your email address to confirm it before
entering and confirming the password you would like to use.
Step 3
You will be redirected to the download page
for Vcenter Converter. To start the download, click the Manually Download link
beneath the blue Start Download Manager button to the right. Opt to save the
installer file to the Desktop or another folder of your choosing and wait while
the download completes – it is 126MBin size, so may take a few minutes to
complete.

Step 4
Double-click the downloaded file to start
the installation, click Run if a Security Warning dialogue box appears, then
click OK. Click Next once the installation files have been extracted and click
Next again. Select the option to agree to the license agreement and click Next
followed by Next. Ensure that the Local installation radio button is selected
and click Next. Click the Install button and wait for a few moments while the
installation is carried out. Click the Finish button to complete the process
and launch the program.

Select
the option to agree to the license agreement and click Next followed by Next.
Ensure that the Local installation radio button is selected and click Next
Step 5
Before continuing, ensure no other programs
are running. If you are using a laptop computer, ensure that it is plugged into
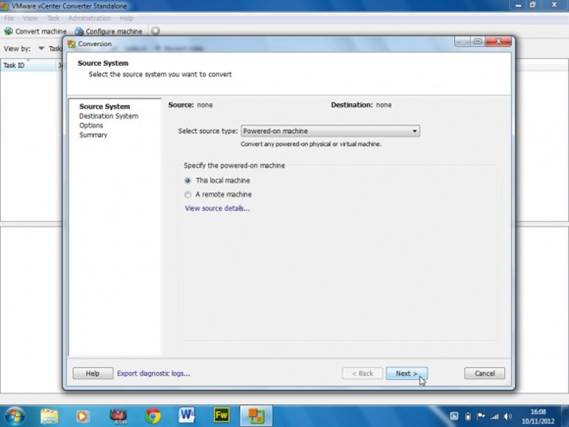
the mains. To get started, click the Convert machine button in the program
toolbar. On the right-hand side of the dialogue box, make sure ‘Powered-on
machine’ is selected from the ‘Select source type’ dropdown menu. Now select
the ‘This local machine’ radio button and click Next.

Now
select the ‘This local machine’ radio button and click Next.