It’s worth taking a little time to consider
what you want to share over your network and how it can be segregated on the
storage your server or PC has. Shares can be nested, so you might password-protect
an entire documents folder, but then guest-share a single folder within that
for public access, for example, to a photographs' folder.
Once in place we think this old school
sharing is more straightforward than the contrived Homegroups with its
unnecessary pins and additional interfaces. Having said that, this does work
best with a central server to which each networked PC does its sharing. In this
case it means just the one server has to be administered, though even this can
be simplified by reusing a single account for access.
PC Format has in the past covered versatile
ways of building your own handy-dandy home server using the great-value HP ProLiant
MicroServer or even making your own from an old laptop - solutions that don't
cost much more than $320 including hard drives. You could, of course, use a NAS
but these don't cost much less than a full server solution, which are never as
flexible.
No matter what your approach, sharing files
over your network will only make your life easier. Not only does it offer an
easy way to share files everyone wants access to, but it opens up easy routes
for backing up, streaming media, providing cloud storage and centralised mass
storage that's machine independent.
We’re the management
1. Advanced settings
Right click the Notification Network icon,
select Open Network and Sharing Center. Click the ‘Change advanced sharing
settings'. The quick list is: discovery on, sharing on, public off, media,
128-bit encryption, passwords off, Use user accounts.

2. The console
We'll use the Computer Management Console a
lot. Right click the Start Menu, Computer entry and select 'Manage'. Open the
Local Users and Groups section and select 'Users'. We'll be taking a look at
Groups, as well as the Shared Folders section too.
3. Adding a user
To create a new User account is
straightforward. Right click a blank area of the Users main display and select
‘New User...' The User name needs to match the account name of the remote PC.
You're able to give it a friendly name and the all-important password.

4. Create a Group
You're able to apply access by the same
groups of users by creating groups and adding the users you want to this.
Select 'Groups' and right-click and select 'New group...’ Choose a name and
click the 'Add...' button to begin adding the users you want to the new group.

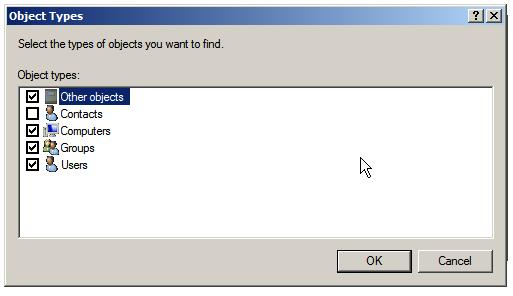
5. Adding Users
We'll see this stupid dialog again. Click
'Advanced' and then 'Find Now'. This actually displays the list of Users you
can add. If you like, select 'Object Types' and deselect 'Built-in security
principles' to simplify the list. Select as many as relevant and click 'OK'.
6. Check your Shares
Finally, take a nose at the Shared Folders
group. It’s worth clicking the 'Shares' entry as this lists all the folders and
drives that are set as being shared on the system. By default, a number exist
already, and these are system shares for the default user only.
To the cloud!
An interesting possibility with shared
folders is to combine them with Dropbox, Box or a similar internet-storage
service. Ideally run with a home server, this provides a universal cloud system
with files available to everyone at home, but also synchronised to any other
devices that are running the storage service. Of course this will be limited by
the capacity of the service. Dropbox offers between 2GB and 18GB for free, Box
offers 5GB and Microsoft SkyDrive give you 7GB. All of these can be expanded if
you pay a monthly fee and it provides an interesting easy and secure way to
keep files available to everyone, everywhere.
Along a similar line is using a shared
folder for back-up and synchronising. We recommend a cool program called
Syncback from 2brightsparks.com. Fully functioning free and paid-for versions
are available and it works in multiple ways. The first is a straight back-up regime
to copy modified files to a remote shared folder. The other is synchronise mode
where it will keep the files on your system and a remote folder in sync.
Enabling you to work locally on documents and have them automatically updated
on a remote folder so others can access them as well.

Cloud
storage services, such as Dropbox offer another folder sharing option for a
home network and across devices
Device sharing
What we're playing with today extends
beyond just your standard Windows systems good news we think to almost all
other devices that can join a network. So if you have an Apple iPhone or iPad,
an Android device and even Mac and Linux desktops you're in luck, as they'll
all play nicely together.
The reason these all work together like it's
some sort of hippy commune goes back to the NetBIOS days, and the need to
connect DOS PCs to other devices over a network. To get everyone holding hands
and singing songs, project Samba was created. If you recognise that name, it's
because Samba exists today, all over the place, as it's an open source system
for networking.
Samba enables you to connect almost any
device to a networked Windows system, using either Guest access or one of your
pre-defined password protected User accounts. Unfortunately, the Samba part of
apps and the like can be implemented in many different ways. By that we mean in
terrible ways. Usually the easiest way to connect is by using the Windows IP
address of the PC.
If you have a server you might want to set
it to a permanent IP address via your router’s DCHP settings.
Well-designed apps will provide the NetBIOS
name for the PC in a handy list of networked systems, but not always. This is
also worth mentioning as many NAS devices also run an implementation of Samba -
via their BSD-based OS to enable them to connect over the Windows network too.
Hence they're also able to provide similar User/Group structures and access
restrictions.