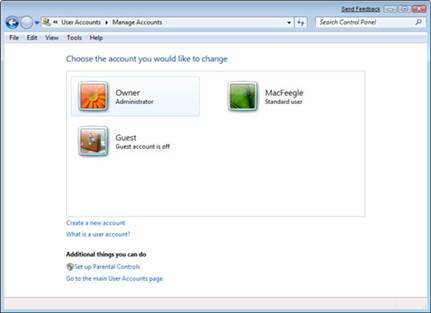
1. Guest account
First make sure your shared system has a
Guest account create and active. Select 'Control Panel' > ‘User accounts'
> 'Add or remove user accounts’. The Guest account is shown here and it'll
be active or off. You'll need to activate this before going any further.
2. Guest access
Right-click the 'Notification Network' icon
to check the basic sharing settings, select 'Open Network and Sharing Center'.
Click the 'Change advanced sharing' settings. Public sharing can be left off
but make sure 'Turn off password protected sharing' is selected.

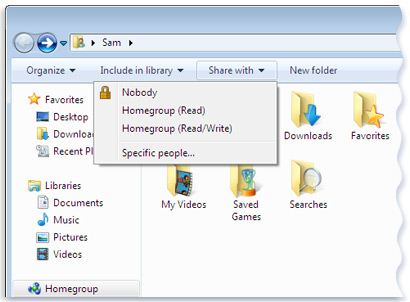
3. Add guests
Let's guest share a folder. Create, for
example, a Public folder, right-click this and select 'Share' > 'Specific people...'This
is the Homegroup extended interface so you can choose 'Everyone' and click
'Add'. The Guest option would work just as well too.
4. Adjust read/write
When a user is added this way you're able
to adjust the level of access via the Permission Level column. Click the arrow
next to the 'Read' option and select 'Read/Write' to enable Guest users to copy
files into and out of the public folder.

5. And share
With the Read-only or Read/write setting
done, click ‘Share' and the folder is made available to everyone on the local
network. The final window displays the Network path to the folder and offers a
couple of basic ways to send this to other people.
6. Limited options
Using the built-in Homegroup controls does
make sharing easier but the flip side is that it offers less control over how
the shared folder is created. So if the folder already resides inside a share,
it's not possible to create a separate listed shared folder this way.

Advanced sharing
1. Check your user
Before we create a user account, we need to
check the remote user account name so they match. The easiest way is on that
system open the Start Menu and see the name in the top right of the menu, or
check the User list in the Management Console.
2. User access
Armed with the correct User name, open the
Computer Management Console, go to 'Users^ right-click a blank area and select
'New User...’ Add this name to the User name and choose a password. Click
'Create' to add this new user to the system.

3. Complex sharing
Create a folder on your drive. Right-click
this, select 'Properties' > 'Sharing tab' > 'Advanced Sharing..' and
click the 'Share this folder' box. You're able to give this the name that
appears within the Network folder and limit the maximum connected users.

4. Users and Groups
Click 'Permission' and remove 'Everyone',
as we don't want that. The next bit is stupid: click 'Add' > 'Object Types..
’ Deselect 'Built in security principles' and click 'OK'. Go to’ Advanced' >
'Find Now'. A list of all the available Users and Groups will appear.
5. Adjust Permissions
Select as many users or groups as you want
to have access to this share and click 'OK' > 'OK'. You can now adjust the
read/write/ delete permissions for the folder per user.
We never quite understood why Deny exists,
but perhaps it's to torment people?

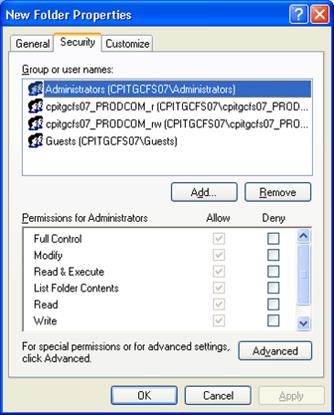
6. Security issues
Click 'OK' followed by 'OK' and the folder
is now shared with the displayed path within the Network folder. The last thing
to note here is the Security tab. This can seem confusing as it appears to
duplicate permissions. It does, however, deal with local access rather than
network shares.
7. Computer Management
Right-click 'Computer' in the Start Menu
and select 'Manage! Browse to 'Shared Folders' > 'Shares' and double-click
the share you created and click the 'Share Permissions' tab. This will list the
Groups and Users you added previously.
8. Closing sessions
Select the Sessions' and 'Open Files'
sections and you'll see lists of the currently connected and active registered
users or guests. Right-click a session and you can choose to close it down.
Under Open Files, 'spools' are printer jobs queued for printing.
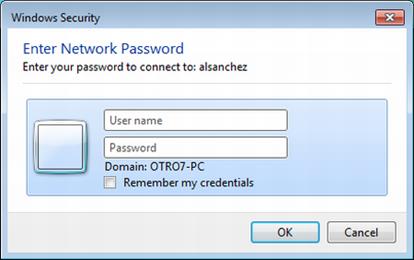
9. Remote connecting
All that's left to do is remotely log in
from your newly registered system. You may need to log them off and back on
again if you've changed password or other details but otherwise it's a case of
entering the user name and password you selected.
Remote desktop
If you've gone to the trouble of setting up
remote User accounts then it's not much more of a step to enable people with
remote-control of a PC via the Windows Remote Desktop RDP system. As it turns
out under Groups is a Remote Desktop Users entry. By default the main User
account will have this access already, but you can add any other users to this
group to provide them Remote Desktop access. To do this via the Computer
Management Console select 'Add >'Advanced'>'Find' and select the User.
You'll also need to enable Remote Desktop
access to the system. The easiest way to do this is right-click the 'Computer 'shortcut,
select 'Properties,' click 'Advanced system settings' > 'Remote' tab and
make sure 'Allow connections' is on. If you're connecting from Windows XP or
non-Windows devices you'll need to select the middle 'any version' option.
Trouble shooting? I'm the fire stopper
Networking and problems seem to go hand in
hand. If it's not an old router that needs resetting then it's some crazy
setting you've failed to tick that's blocking a port. A major issue with
Windows file sharing is that so many of the options are spread over so many
different dialog boxes and different areas of Windows. If you find you're
having issues connecting to a remote PC or getting access to a share then let's
go through the areas that can cause an issue.
It's always worth checking the physical
aspects. During writing this we couldn't access the server, because it had
powered down. Similarly check routers, connections and, if you can, connect to
the internet for general network function. Usually the PC's name should show up
in the Network folder almost instantly.
If the physical side is good but the PC's
name isn't showing up in the Network folder you'll find that a fairly basic
issue is the problem. Check the 'Advanced sharing' settings within Network and
Sharing Center, and network discovery and file sharing are both on. If they are
you may also want to check that File and Print Sharing are enabled in your
firewall. The Windows Firewall can seem crazily complex, but check the Private
profile and (SMB-ln/ Out) is enabled.
If you're sure everything is connected,
functioning correctly, basic settings are set and Firewalls have the right
ports open, let's delve into the common issues for refusing a share. The most
common annoyance is Windows firing up a dialog stating access cannot be
established, with an option to diagnose the problem. This can happen in a
number of circumstances and the usual issue depends on how you're accessing the
remote share.
The first scenario is someone just trying
to connect to a PC as a guest. The big two reasons for this are that either the
Guest User account hasn't been created or is disabled. The other is that'Turn
on password protected sharing' is selected, so only registered users can
connect. Alongside these, if you're using Public folders check this option and
make sure Homegroup connections is correctly selected.
The second is if a registered user cannot
access a system this will likely be the account names not matching correctly or
the account being disabled on the remote system. Similarly, if a registered
user can't access a share but can get on the system then it's most likely their
account has been added to the permission list.