Esata, being intended for storage devices,
doesn’t provide power over the bus, but a powered variant – known as eSATA or
eSATA/USB – is offered a hybrid USB 2 port with 5V power, and one or two optional
12V lines, but isn’t a general standard and is likely to be eclipsed by USB 3.
Thunderbolt carries power down the present copper versions of its cable and can
supply up to 10w of power.
Peripheral buses also differ in their
topology, the manner by which y connect multiple devices to them. USB has
generally used a star payout, in which Macs have multiple USB port to which you
can connect external hubs that can in turn accept further connections. However,
peripherals such as displays and keyboards may be designed to act as hubs
themselves, allowing you to connect additional USB devices to them.

Catch
the bus - If you have problems with peripherals, once you’ve checked the
connection, cables and the like, inspect that bus using System Information
Prior to USB 3, sporadic issues have been
produced or resolved by connecting devices directly to your Mac or to a USB
hub, which may work best with external power supplied or without that. Early
experience with USB 3 is that. Early experience with USB 3 is that you can
encounter similar issues, although it’s unclear whether they result from
inadequate power provision or engineering shortcomings. The most common USB 3
issue is that of backward compatibility – for example, there are several
reports that M=Audio USB 2 devices can play up when connected directly to a
Mac’s USB 3 port. These can resolve if you connect the USB 2 device to certain
USB 2 or 3 hubs, but selecting the right one is currently little more than
guesswork.
Thunderbolt users a daisy chain layout, so
that you connect your Mac to your Thunderbolt display and then connect that to
an external RAID system, for instance. When buying Thunderbolt peripherals,
check that they have two ports to permit this. There is something of a black
art developing over the exact order in which you should connect connecting its
Thunderbolt display directly to your Mac’s Thunderbolt port and adding further
displays then storage systems beyond, in that order.

Reality
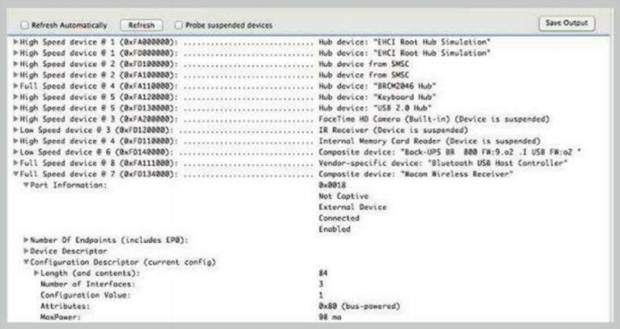
check - Older utilities, such as USP Prober, which used to ship as part of
Xcode, can check inside a bus more thoroughly
However, if you connect a Mini DisplayPort
display on the far side of an Apple Thunderbolt display, the former won’t work.
It may work if you interpose a non-display peripheral such as a RAID system
between the two displays, though. Apple’s full documentation on how to get the
best from Thunderbolt is at support.apple.com/kb/HT5219, but no doubt the
precise rules will become clearer with further experience. Currently,
Thunderbolt supports a maximum of six devices on each daisychain.
eSATA works point-to-point, so you can
connect just one eSATA device to each e SATA port. If you need more ports, you
can install a port multiplier, but those are unusual.
Better buses should mean faster performance,
less fuss and no trouble. There’s abundant evidence as to the improvements in
performance delivered by USB 3 and Thunderbolt, but we’ll keep you updated in
these pages as to whether they really do prove to be easier to use.
Connectors
Finding the right electric string to
connect peripherals can be fraught. Even simpler buses such as FireWire and
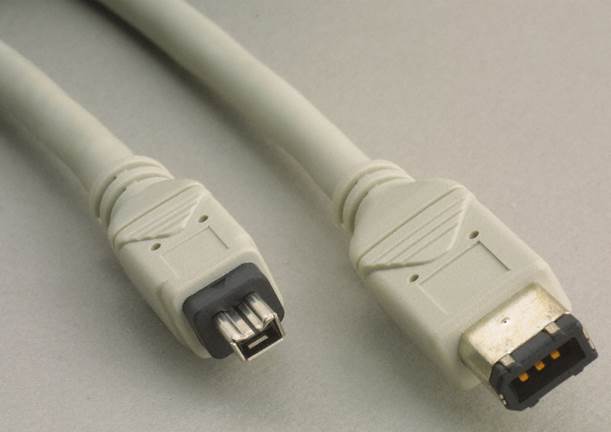
thunderbolt have become quite messy. FireWire connectors come in three main
flavors: miniature and full-side 400 and the rectangular nine-pi form for 800;
adaptors are available, as are long cables up to the 4.5 metre maximum length.
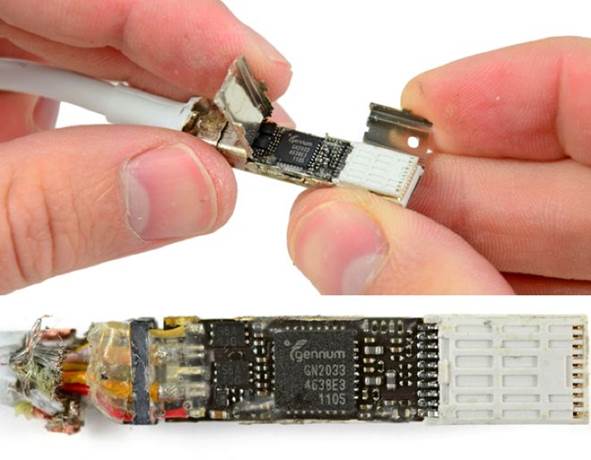
Thunderbolt cables use the same plugs and sockets as Mini DisplayPort, but with
quite different cables, and you can’t use an ordinary display cable in a
Thunderbolt daisychain. All Thunderbolt cables are made of copper wire, so are
limited to a maximum of three metres in length, but fibre-optic versions may
extend that in future. eSATA is even more limited, to a maximum of two metres,
but more uniform unless it carries power.

FireWire
USB connectors and cables cause greatest
confusion, and the advent of USB 3 can only worsen this. Full-sized USB 2
connectors are either slim rectangular ‘type A’ or squarer ‘type B’ often found
on printers and scanners, but there are four different varieties of smaller
connectors, resulting in most users having a drawer full of different cables
for cameras, GPS and so on. To maintain high-speed transfer over the cable, USB
2 cables can be no longer than five metres, although longer cables still work at
lower speeds. USB 3 ports and plugs should have distinctive blue plastic
internals to distinguish them, although there are many exceptions. Because you
should be able to interchange all full-side USB 2 and 3 plugs and ports, this
may be the only way of telling them apart unless you can see that USB 3 has an
extra five pins. As with Thunderbolt, copper cables are limited to no more than
three metres, but optical versions might go further.
Diagnostics
So you’ve hooked up your external hard
disk, graphics tablet or other peripheral only to find that it doesn’t work at
all or plays up. Aside from the logical steps of checking that the cables are
connected properly, changing the port and cable, and performing a USB hub
shuffle, what can you do to diagnose the problem?
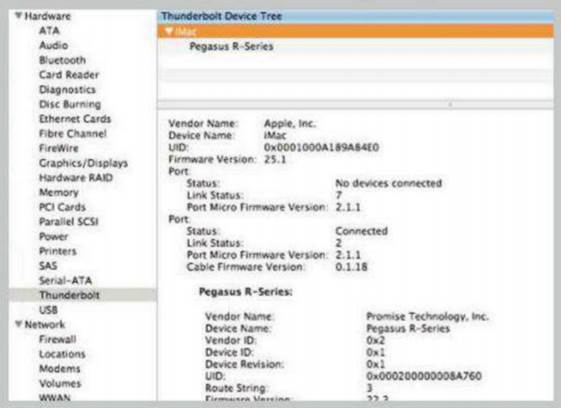
The first point of reference is to open
System Information, the bundled utility you can access through the About This
Mac dialog or directly from the Utilities folder. Each internal and external
bus is listed under Hardware, enabling you inspect what OS X believes to be
present. Select Thunderbolt and you can see the firmware version of your
Thunderbolt cable (it will be interesting to see how long it will be before
that causes issues), what’s connected to each port on your Mac and any
peripherals fed from a thunderbolt port, and their full details.

Thunderbolt
cable
USB diagnostics have improved considerably
– for instance, showing the current a available and required at each
connection. The latter enable you to check that no device is trying to draw
more than can be delivered by the port to which it’s connected. Software
drivers and other components can be inspected by selecting the Extensions and
Frameworks items, and preference Panes where relevant, listed under Software.
However, system Information can’t run bus diagnostics disc, it can run through
checking the function of its ports, as can tools such as TechTool Pro. Here are
also more specialist utilities that enable you to go deeper into some types of
expansion bus and the devices connected to them: USB Prober, formerly part of
the suite of tools supporting Apple’s Xcode SDK, is one of the few that still
works, although it may lack support for USB 3.