The dangers of D.I.Y
If you run into a software problem on your
Mac while running a homemade Fusion Drive, support might be refused at a Genius
Bar or a service provider until your Mac is restored to a regular
configuration.
Use Time Machine for protection. With your
backup drive attached start your Mac in the Recovery System by holding Command
+ R at the startup chime. In the option that restores from Time Machine, verify
the most recent backup is listed. Backing up OS X this way gives a
straightforward recovery if needed.
A Boot Camp partition can be preserved
during the process, but back it up for safety. Windows Vista and later OSes
have a backup feature, but require an external drive formatted for Windows.
Alternatively, WinClone ($20, www.twocanoes.com)
backs up Boot Camp from within OS X.

WinClone
It’s possible to remove the Recovery System
when setting up Fusion Drive, but that can be avoided by specifically targeting
a partition. When creating a Mountain Lion install disk, take a USB flash drive
you don’t need to reuse, so the OS X installer, Terminal, and Disk Utility are
always to hand. Installing Mountain Lion to a drive from scratch will recreate
a Recovery System on it.
Removing a Fusion Drive configuration
requires starting from an install disk, opening Terminal. Use the command
diskutil cs list and copy the code listed next to Logical Volume Group to the
Clipboard. Type diskutil cs delete tap space, then paste the code and press
Return. The internal hard drive is then independent of the SSD.
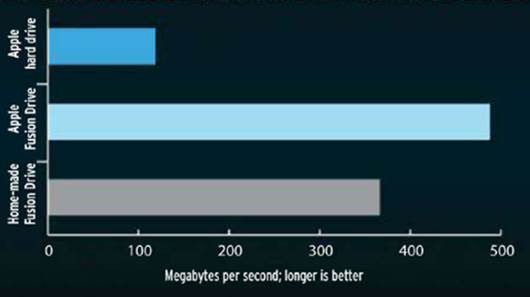
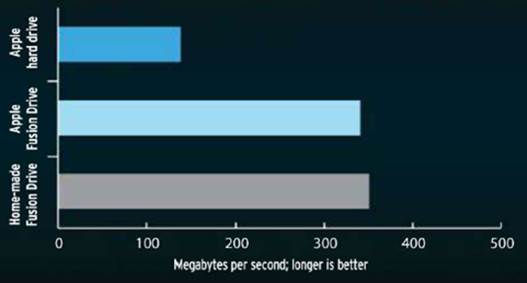
Fusion Drive Benchmarks
We measured these peak speeds from three
storage options. Sequential data transfer is the best-case scenario. Random
transfers involve accessing locations speed around a drive. Hard drives suffer
most because of their moving parts.
Sequential
read
Sequential
write

Radom
read

Radom
write
6 steps to your own Fusion Drive
If you’re up for a bit of a challenge,
here’s what to do…
1. Back up your Mac
Open the Mac App Store. You’ll need to
purchase and install Mountain Lion if you don’t already have it. Otherwise,
click Purchases at the top of the window, locate Mountain Lion in the list and
click its Download button. Once complete, the Applications folder will contain
a file named “Install OS X Mountain Lion”.
Install
OS X Mountain Lion
If you already use Time Machine, open its
System Preferences pane, click the Options button and check that you haven’t
excluded system files, your user account, or any other folders from the top
level of the hard drive from its backups. If you don’t already use Time
Machine, connect a Mac-formatted drive, flick the switch in Time Machine’s
preferences to On, and choose the drive.
Click the Time Machine icon in the menu
bar, choose Back Up Now and wait until the backup is complete.
2. Prepare a USB Flash Drive
You’ll need a USB flash drive with a
capacity of at least 8GB, the contents of which can be erased. Connect it and
open Disk Utility. Select the drive in the left pane – that’s the row that
shows its capacity and model, not a partition already on eth drive then click
the Partition tab.
Set the Partition Layout item to “1
Partition”. If the drive is bigger than 8GB, you can create more to use for
other purposes, but there needs to be a partition that’s at lease 5GB on which
to create an install disk. It doesn’t matter what you call this partition.
Click the Options button below the
partition layout. From the three options presented, choose “GUID Partition
Table”, and then click OK. Click the Apply button toward the bottom-right of
the window and wait for the drive to be repartitioned and mounted.
3. Create a mountain Lion install disk
Browse to the Applications folder and
Control-click the Mountain Lion installer. Choose Show Package Contents, and
then browse to Contents/ Shared Support and double-click InstallESD.dmg. Wait
for the integrity of the disk image to be verified.
In Disk Utility, click the Restore tab.
Drag “Mac OS X Install ESD” from the left pane into the Source box, and the
partition on the USB flash drive into the Destination box.
Click the Restore button. You might be
asked for your account credentials to proceed. It takes a while for the OS X
installer to be copied to the flash drive.
In System Preferences, click Startup Disk
at the far right of the row labeled System. Among the available startup disks
you should see “Mac OS X Install ESD” with “OS X, 10.8.3” below it. Click it,
and then click the Restart button.
4. Look up essential details
When your Mac restarts, choose Disk Utility
from the options. Eject then disconnect everything except the internal hard
drive, the SSD, and the USB flash drive. Quit Disk Utility. Choose Utilities
> Terminal. Type diskutil list and hit enter. Partitions are grouped by the
disk to which they belong under rows starting /dev/ diskX (where X is a
number). Two rows below those use the Size column to work out which is the SSD.
To avoid wiping Boot Camp and the Recovery System, look for the partition with
the name of your OS X volume on the hard drive. Note its identifier, such as
diskXsY.
5. Create a logical volume group
Type dikutil cs create Fusion then a space,
then the identifier of your SSD, another space, then the identifier of your OS
X volume. Press Return to create a logical volume group that identifies the
storage that will be used by the Fusion Drive. Type diskutil cs list and press
Return for a summary of what was created. In the row starting “+-- Logical
Volume Group”, drag the pointer through the long alphanumeric code to select
it. Press Command + C to copy it to the Clipboard. Make a note of the free
space listed four lines below the code.
6. Create a Fusion Drive volume
Type diskutil coreStorage create Volume
then a space. Press Command + V paste the code. Type another space, then jhfs+
“Macintosh HD” and another space. Type the capacity noted previously. If it’s in
gigabytes, use the form XXX.Xg, or X.Xt for terabytes. Press Return to create
the volume. When done, look for a line that says “Finished Core Storage
operation”. Quit Terminal, then open Disk Utility to see a device named Fusion
and the volume just made on it. You can install a fresh copy of OS X or restore
form Time Machine. The former is the best starting point. Migration Assistant
can later transfer users, apps, and files from your Time Machine backup.