These tiny devices can project presentations,
slideshows, and video to admiring audiences.
LIGHTWEIGHT, handheld Pico projectors can display a
bright image on a screen or wall in an average-size room, even in moderate
light.
We looked at four models weighing between 6 and 15 ounces,
priced at $230 to $450, and with resolutions of up to 1024 by 600 pixels.
Pico projectors are great for business travelers who make
presentations to small groups.
Aaxa P4-X
The $291 Aaxa P4-X comes with an HDMI input, so you can use
it with Blu-ray players and other high-def video sources. Though it offers no
on-board storage, it sports a MicroSD card slot and a short cable (Mini-USB to
USB) that you can use to connect a USB flash or hard drive. But the P4-X
doesn’t run Windows CE or provide viewers for Microsoft Office docs; instead,
it has two media players and viewers that support popular image, music, and
video file formats. Its only document support is for TXT files.

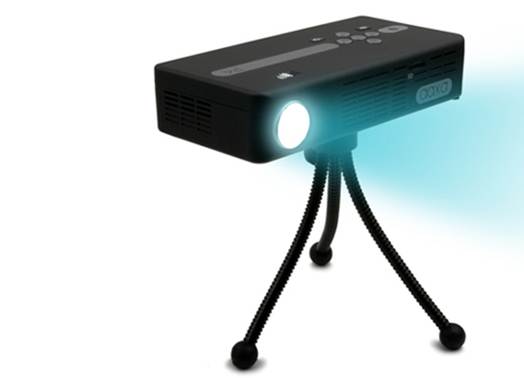
Aaxa P4-X
projector comes bundled with a remote and a tripod
As a result, businesspeople who want to project a
Power-Point presentation or a Word document will likely be tethered to a laptop
that can run Office applications, using one of the P4-X’s supported video
outputs: VGA, composite video, or HDMI. Aaxa provides adapter cables for all of
the video sources it supports.
In fact, Aaxa is very good about including accessories in
general. The P4-X comes with a small infrared remote control (an infrared
sensor sits on the rear of the projector) and a sturdy tripod.
The P4-X weighs 12.8 ounces, which is a bit heavy for a Pico
projector; its dimensions (5.6 inches wide by 2.7 inches deep by 1.2 inches
high) are about average for this category. Its LED-backlit DLP engine projects
images rated at 80 lumens when connected to the AC adapter, and 60 lumens when
running on its lithium-ion battery. The battery is rated to last for 75 minutes
between charges. The P4-X’s native resolution is 854 by 480 pixels, and it can
accept input resolutions of up to 1280 by 768 – fairly standard capabilities
today.
Atop the machine are a return button and a directional
keypad (four arrow buttons surrounding an OK/select button). When you fire up
the projector, the first screen you see shows icons for video sources and
settings. In selecting a video source, you also choose a media player/viewer
that will display the available appropriate files.
Controls for playing a video include fast forward/rewind,
next/previous, repeat, and mute. I preferred the remote’s button-based options.
The P4-X can decode AVI, MP4, and SMV video; MP3, OGG, WAV,
and WMA audio; BMP, GIF, and JPG still images; and TXT files. It can throw a
50-inch image at a distance of 8 feet, though in my tests slightly smaller
images looked far crisper. Overall, the projector’s images looked bright and
colorful (you can make minor adjustments to color quality in the settings).
Audio from the 1-watt speaker was predictably lack-luster in
my hands-on testing; however, you can easily beef up the sound by connecting
external speakers to the projector’s headphone jack.
Acer C120
The Acer C120 is small, bright, and attractively priced ($230),
but it’s not very versatile: It projects only the screen of a USB-connected
Windows PC, and it doesn’t support Macs.
The C120 is bare-bones in other ways, too: It lacks speakers
and a power on/off button, and the lamp lights up whenever you plug the projector
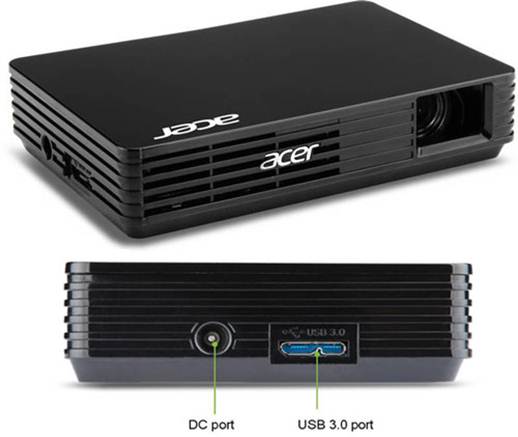
into a power source. The USB cable (a Y cable with two jacks to support either
USB 2.1 or USB 3.0), an AC adapter, and a rather flimsy fabric case are the
only accessories included. Apart from a temperamental focus wheel, the
projector has no hard-ware controls. Those design decisions may have helped
Acer keep the C120’s weight down to a minuscule 6.3 ounces and its dimensions
to 4.7 by 3.2 by 1.0 inches, but I’m not convinced that the trade-offs were
worth it.
You must use your computer to control the projector’s
display resolution and power consumption (standard or eco). The applets for
these controls should install automatically on your PC when you connect the
two. In my tests, however, I had to repeat the procedure multiple times
(including a couple of reboots) before it worked. Until the computer recognizes
the C120, the unit will project only the Acer logo.

The Acer C120 is
extremely light but not very versatile
Once the installation succeeded, the projector’s DLP engine
immediately threw a large, bright image of my Windows 7 ThinkPad’s screen on
the wall from a good 10 feet away. Initially it also fiddled with the laptop’s
display resolution, but switching that back wasn’t difficult. The C120 natively
displays a resolution of 854 by 480 pixels, and it supports inputs of up to
1280 by 800 – typical for a recent Pico Projector.
Image brightness varies according to how you’ve set up the
C120: Acer rates the projector at 100 lumens when it’s running on AC power, but
you have several ways to connect the USB cable. The company recommends using
USB 3.0 for best performance (which makes sense, given that standard’s superior
bandwidth).
When you plug in the second USB cable, the projector will
take advantage of the additional power to produce a slightly brighter image.
Acer rates the C120’s brightness with a USB-only connection at 75 lumens –
plenty for a small, well-lit room.