Get the new Windows 8 cloud service working
with your Android device

SkyDrive
The SkyDrive icon hides a menu that
connects to three different options: SkyDrive, Recent documents and Shared with
me. Selecting SkyDrive takes the user to their SkyDrive account, Recent
documents will list any recent documents, while Shared with me shows any files
that have been shared from a user
Folders
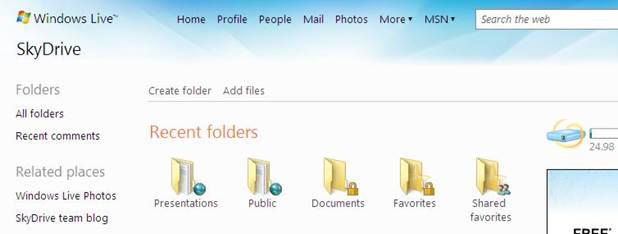
By default SkyDrive comes with three
different folders: Documents, Pictures and Public. The default option is to
display the folders using a grid view. There is the option to switch to a list
view by tapping the icon in the bottom-left corner. This option allows users to
select a folder to share or delete
By
default SkyDrive comes with three different folders: Documents, Pictures and
Public
Add
files and folders
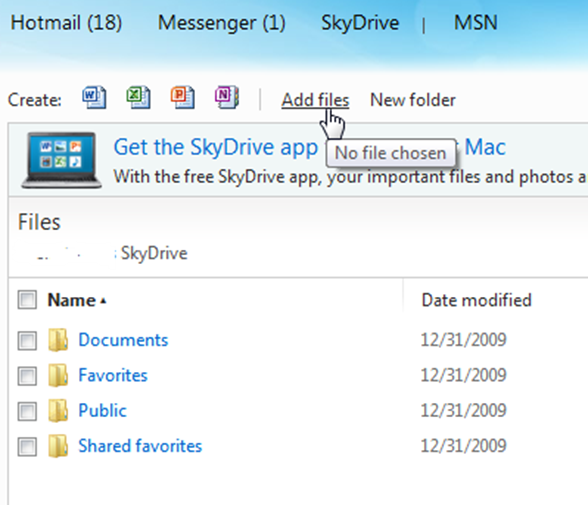
The Upload icon (second from the left) lets
users upload content from their current device. Tapping the icon will reveal a
set of locations (will vary dependent on folder) to upload from eg the camera.
Tap to open, tap to select a file and tap Upload to start the process
Settings
The bottom-right icon gives access to the
Settings menu. Hit this and tap Settings to open. This offers a General
overview of the current account, eg account name, your storage (a visual
indicator of storage used) and the option to sign out
SkyDrive is Microsoft's cloud solution that
offers users 7GB of free storage and the opportunity to sync and share via
desktop and device. To use the service effectively users will need a Microsoft
Live account and the appropriate version of SkyDrive. Mac and PC users can
download a version for the desktop where a SkyDrive folder is automatically
created. SkyDrive creates three default folders within the SkyDrive folder.
Opening the folder reveals a standard window which allows users to drag and
drop and populate with content.
The desktop solution can sync and share
with any smartphone or tablet running the SkyDrive app. Android users will need
to download the free app from the Play store and sign in to start sharing.
The default setup uses three folders, but
the option to add additional folders is an easy task via the app or the
desktop.
Two views, grid and list, are easily
interchangeable, and selecting a file, or folder, activates a host of options.
Share a link to allow others to view or view and edit via email,
Bluetooth or other installed cloud storage
services such as Google Drive. Alternatively, a complete file can be exported
via email or again via an installed service.
1.
SkyDrive account
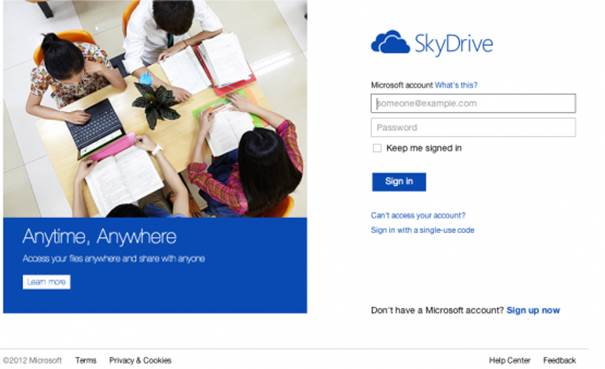
To use the SkyDrive service, a SkyDrive
account is needed. This can be set up via https:// signup.live.com.
Alternatively, to use SkyDrive effectively the appropriate software needs to be
installed on a computer. When Installing the software there is the option to
set up an account.
2.
Add files
After installing SkyDrive, users can add
files via the desktop. A SkyDrive icon will appear in the notification
bar/dock; from here, open the SkyDrive folder. This will contain three default
folders: Documents, Pictures and Public. Drag files and folders into the chosen
folder.
3.
Log in

Head to the Google Play store and search
for the SkyDrive application. Install the app and open it on your device. Now
locate the app then tap to activate SkyDrive. Before the app can be used, users
will need to sign in. After logging in you are presented with the default
folders.
4.
View and delete
To view the contents, simply tap the
folder. To change from the grid view to the list view, hit the list icon
(bottom-left). Next to each folder is a checkbox. Tap to select a folder and
activate the delete and share buttons. Tap the trash icon and confirm to delete
a folder.
5.
Share folder

To start, select the desired folder. Note,
only one folder can be selected at a time. Next, tap the share icon. By
default, the View only option is selected. To allow for editing, select View
and edit and tap OK. Now choose the option to share the link to, for example,
Gmail.
6.
Share file
To share a file, open a folder such as
Documents and switch to the list view. Next to each file in the list is a
checkbox. Now select a file (only one can be selected at a time) and tap the
share icon. Choose an option and select a service eg Google Drive. Name the
file and select a folder.
7.
New folder
To add a new folder alongside the default
folders, tap the folder icon. Name the new folder and press the OK option that
is visible. To add a folder within a folder, simply repeat the process. Note,
users cannot directly move a file from one folder to another.
8.
Download
To download a file from SkyDrive to the
device, first select the desired file by tapping the associated checkbox. Now
tap the Download icon and the selected file will be downloaded to the device.
This will typically be to an SD card and opened ready to view or edit.
9.
Export
SkyDrive files can be exported to another
location using the Export option. Again, select the desired file by tapping the
checkbox. Now tap the Export icon; the file will be downloaded before a list of
options appear. Select one. Tap the Use by default button to always use the
selected option.
Create and manage playlists

Get instant access to your favourite set of
songs with the assistance of playlists on your Music app
Storing music on a smartphone can mean
hundreds or even thousands of songs to choose from. This offers plenty of
choice, but also means more searching.
Everyone has their own favourite set of
songs, and even sets of songs for different occasions and moods. This is where
playlists make the grade. They allow users to choose a selection of songs and
place them in an appropriately named playlist. So, if it's time to chill out
and relax, users simply pick a playlist to suit.
The beauty of a playlist is that users can
easily edit to suit changing moods and taste. It's a straightforward process
and one we've delved deeper into with our annotated image and quick
step-by-step below.
Add
tracks
To create a new custom playlist, first
select your preferred viewing option: Artists, Albums or Songs. To add a
complete album, select Artist or Album, tap the button to the right and select
Add to playlist. First-time creation will need users to add a name and tap Save
Save
playlist
Selecting Playlists will display all the
current playlists. To add a new playlist tap Menu>Add a playlist, name the
new playlist and tap Save. This method produces an empty playlist. The new
folder will have a default icon rather than album art
Artists
The Artists option will display an artist’s
moniker with all related albums and songs stored within the folder. Tap a
folder to view albums, and hit an album to view the songs on the album.
Alternatively, tap All songs to view all the selected songs from that artist
Add
individual songs
To add individual tracks to a playlist,
individual songs need to be displayed. This can be done via Artists, Albums, or
Songs. Selecting Songs will display all available songs in alphabetical order.
To choose a song, tap the button to the right and select Add to playlist.
Choose a playlist and the song is added
More
playlists
One option for adding additional playlists
is to choose a song, tap the button to the right and select Add to playlist.
This will display the currently available playlists and an Add button. Tap Add,
name the new playlist and tap Save to complete