Don’t be beaten by challenging lighting
conditions, simply combine your images for a HDR result
·
Ratings: 4/10
·
Price: Free (Pro version $10.5)
·
Web: www.ohanaware.com

HDR
Artist gives you the easiest and fastest way to create the best HDR effect
photos from just a single image
In the early days of digital imaging it was
something of a triumph to be able to declare to film-loving friends that you
could make one exposure for the landscape and another for the sky, then combine
them into one. That rather fell by the wayside with the onslaught of the HDR
craze which, at the extreme end, became less about creating a great exposure in
difficult or impossible lighting conditions and more about producing absurd
colors and contrast. HDR Artist is an app that aims to cater for both ends of
this spectrum, with a free version that is simplicity itself and a paid-for Pro
version that apps tone-mapping control. The free version then requires one or
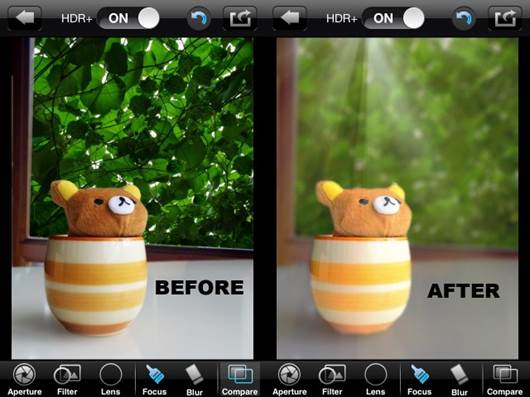
more images to be drag and dropped onto the interface. With just one image it
performs the process of brightening the shadows, darkening the mid-tones and
lightening the highlights. Hey presto, pseudo-HDR.
For a more compelling alternative, drop a
number of shots with different exposures onto the app. There’s an automatic
alignment function, which takes its time but can cleverly line up shots that
are slightly off. At the bottom of the screen is the HDR effect slider. Just
drag it to the right to see the process start to work. Using multiple images
means that they all get complied into an average that really doesn’t suit grey,
cloudy skies. Some HDR apps and plug-ins will maximize cloud contrast, but this
doesn’t work that well here it has to be said. As the slider moves along you
get results that any photo editor produces – it’s only towards the maximum end
that a more HDR-like result is generated. You can stop there with a reasonable
result or press on for a more cartoon-like look and feel depending on your
sense of taste.
System requirements: Mac with Intel CPU, OS X 10.6.6 or later. This is a 6.3MB download.
Verdict:
This isn’t really that impressive. The single image treatment has been done
better elsewhere and pushing the effect to the maximum creates lots of halo
effects, especially in the clouds. The multiple image approach isn’t that much
better, making little difference to the clouds and producing results that could
be created in any photo editor using Curves. The Pro version does add more control
over how the tone-mapping works, so it might be worth having a look at the free
version first to see if it delivers the kin of results you want.
Big Lens
Too much depth-of-field in your photos?
Get that background out of focus and add some creative filter effects along the
way too
·
Ratings: 7/10
·
Price: $1
·
Web: www.facebook.com/ReallusionApps?ref=ts
Big
Lens also offers some filters and lens flare effects
One of the main disadvantages of the iPhone
and compact cameras is that there is always too much depth-of-field in portrait
shots. This universal app aims to fix that, though as masking on a phone-size
screen is pretty difficult, we’re looking at this on the iPad. There’re two
modes of operation – Basic, which uses simple shaped to draw masks and
Advanced, where you can draw around the subject. The Basic mode uses either a
circle or a parallel strip for masking. The latter can be used for miniature
camera style effects, the former is pretty much useless.
On to Advanced then, and either use Lasso
or Brush mode to paint the mask. Unfortunately, the lasso mode is fairly stupid
and often fills the wrong area if painting step by step. You really do need to
zoom in and then use two fingers to move the screen around. Mistakes can be
erased, but it really isn’t easy or accurate to draw masks with your finger.
On to the next part of the app and the
background is then blurred according to which aperture setting is used. There
are also filters to add for creative touches, lens shapes for a Bokeh effect, a
pseudo-HDR function and the chance to touch up the mask. That’s fine, except
the blurring is a bog-standard blur, which leaves artefacts on the edge between
it and the sharp area. There’s no blending and the mask selection isn’t
intelligent so it doesn’t pick up edges. The blurred effect doesn’t look
convincing at the wider aperture settings. Fortunately, the Bokeh effects work
very well and to save the entire process there’s a slider that moves between
macro and non-macro. Well, whatever it’s supposed to represent, this actually
reduces the opacity of the blur, so you can blend it in better while keeping
the effects. On top of this, the selection of filter effects is actually quite
good so from the jaws of defeat, some useful effects are just about possible.
System requirements: Compatible with iPhone 3GS+, iPod touch 3+ and iPad 1+ running iOS
4.0 or later. The iPhone 4/4S and iPad 2 support 8-megapixel images, the rest only
3-megapixels. This is 28.1MB download.
Verdict:
Painting a mask with your finger is hardly very accurate and the app doesn’t
help at all with no sophisticated edge detection. The blurred effect isn’t
convincing at maximum strength and there are artefacts clearly visible until
you blend the effect in with an opacity slider. The Bokeh effects and filters
are an added bonus. Decent enough, but you wouldn’t want to do this with your
prized DSLR photos.
Classic TOY
Grab a handful of lenses and a bagful of
films with his neat take on the classic plastic camera craze
·
Ratings: 8/10
·
Price: Free (Premium Pack $2)
·
Web: http://misskiwi.com/classic

The
Classic Toy app offers unique films and lenses such as a basic single-focus
lens, a multi-shot lens that can take various photos consecutively, a fisheye
lens, and others
Well we’ve seen plenty of this type of app
already, but Classic TOY scores from the start by being free. There’s an in-app
purchase of $2 to add more films and lenses, which is fair enough because there
plenty built-in to start with. There are 4 lenses and 17 film stocks to try
out, from vintage to vivid, mono to 70’s styles. What further expands the range
is the fact that each film stock has an original and a remake version and that
there are also normal, supertoy and grunge versions of each one as well.
The camera lenses offer a lot of variety
too, from a standard lens to multi-shot, fish-eye and split-lens that takes two
shots. On this latter one you can also control the timing for when the second
shot occurs. The camera interface is fairly barren, rather than using the Retro
Camera route of filling the entire screen. At least it means you can see what
you’re doing. The app supports both front and back cameras for the iPhone and
iPad. It’s in the settings that the graphical finery comes out, with a camera
back that slides open to let you rotate through the film stocks, or slide a new
lens in place on the front.
The results appear hanging by a peg in a
virtual darkroom and offer all kinds of overexposed and distorted effects.
Really, you’re not going to get much idea from the names of the stocks until
you try them out, especially with the variations involved. Fortunately, because
the app is free, you can do just that. Finished films are developed
high-resolution to the Camera roll and they can be sent via email or Twitter
or, alternatively, opened in other apps.
System requirements: Compatible with iPhone 3GS+, iPod touch 4th gen, iPad 2
and requires iOS 5.0 or later. This is a 23MB download.
Verdict: As
most of the film stocks don’t use recognizable names, it’s largely guesswork
seeing what effect they have. The fact that there are so many variations on
each one means you’ll spend plenty of time just trying them out. The graphic
interface is slick and fun to use while the results are ideal for those who
love grungy, overexposed and messed-up colors. Overall, this is very decent
little package.