Launchy is free software which was initially designed as a
start menu alternative. Launchy allows opening of files and folders quickly
with just a few keystrokes. It can be easily downloaded via the internet.
Personalized shortcut
Launchy will run in the back ground and can be brought up at
any time using the alt + space keys which are the default keys for this action.
When the Launchy inter face appears, simply type in the name
of the software or folder and Launchy should automatically find and start that
software up or open that folder for you. Just a few letters of the applications
name should be enough and the applications icon should immediately appear on
Launchy’s interface. Launchy also memorizes its searches and shows you the most
used application on future use. For example, if you happen to have Two Software
which starts with the letter p, i.e., paint and PowerPoint, you may need to
input, “pa” for paint and “po” for PowerPoint. But if you happen to use PowerPoint
more often, Launchy automatically shows you PowerPoint the moment you input the
letter “p” followed by other relevant suggestions.
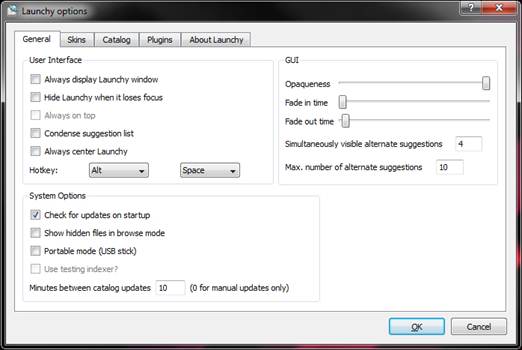
The default keys to invoke Launchy can be changed by going
to the Options. The Options can be accessed by either right clicking Launchy’s
interface or simply right clicking the Launchy icon in the system tray at the
bottom right.
Configure Launchy
The General tab has options relating to the User Interface,
the Visual Effects, System Options and how you want suggestions to be seen,
i.e., the number of suggestions displayed and whether you wish for the file
path to be displayed as well or not etc.
The User Interface focuses on how and where Launchy appears.
We suggest not having the first option “Always display Lanchy Window” ticked as
always having the Launchy window visible can get in the way of your other
actions.

The portable mode
is the last option in System Options
Try different looks
The Skins tab lets you change Launchy’s look and there are a
number of options to choose from. Skins are constantly being created by users
and submitted on various online forums and sites from where they can be
downloaded.
Expand your Index
Launchy works by indexing your programs and files. Programs
can then be launched by inputting a few keystrokes and show up on a menu
according to relevance. Launchy indexes your start menu by default, since
everything you install will most likely show up there. But for cases which
don’t, you can point Launchy to their location. This can be done by once again
accessing the Options and going to the Catalog tab. The Catalog tab contains
the directories that Launchy uses to launch its applications. By clicking on
the + button, you can add your commonly accessed directories. This applies to
any kind of file, i.e., music files, image files etc. You can also choose which
kind of files you want indexed and which kind you don’t want showing. Once
you’re done adding directories, you can check the Include Executable option, to
include .exe files as well. Once you’re done adding directories simply click on
the Rescan Catalog option and Launchy should now also include the directories
you’ve input as well.
Perform Math Calculations
Launchy is also capable of performing simple mathematical
calculations. Simply input the numbers where you would normally type in the
application name. The operations are limited to addition (+), subtraction (-),
division (/) and multiplication (*).
Use Launchy in portable form
Launchy has a feature which lets you run it from a portable
device instead of directly from the computer. This can be anything, like a USB
thumb drive or portable hard drive. Simply activate Portable Mode from the
System Options in the General tab and move Launchy from its installed location
onto the portable device. Launchy then runs directly from the device and future
configurations are stored in the device instead.
Desktop customIzatIon
You can’t teach an old dog new trick but you can at least
give it a new collar. Here are a collection of tools and utilities that you can
use to the breath some new life into your aging system, by giving it the make-over
it deserves.
Transform Windows
Download the Windows 8 transformation pack from
http://dgit.in/UfrPBS. If you’re clamoring for the Windows 8 design, sans the
Metro (yes, it’s been renamed, but we don’t care) madness, this is the pack for
you. It is a very basic pack that adds Windows 8’s sharp edged windows, but
keeps the Metro Start screen at bay. You do have the option of installing the
charms bar but we would advise against it as it doesn’t really seem to be
serving any purpose. This transformation pack works on every version of Windows
from XP onwards.
For a more complete Windows 8 experience, add on some themes
and widgets from Rainmeter and Windows Blinds (available at http://dgit.in/WxOf0T for Rainmeter and
http://dgit.in/URpKdzfor Windows Blinds)
Rainmeter has some very nifty widgets that do a far better
job of providing a metro experience than even Windows 8 can. The weather and
clock widgets are of particular note and can transform your boring Windows
desktop to an oversize live tile.

Transform Windows
Xp to Windows
Transform Ubuntu
Maybe you’re a big fan of Apple’s Mac OS and just don’t want
to spend on one of their devices. The solution couldn’t be simpler. Just open a
terminal in Ubuntu and type wget
https://downloads.sourceforge.net/project/macbuntu/macbuntu-10.04/v2.0/Macbuntu-10.04.tar.gz
-O /tmp/Macbuntu-10.04.tar.gztar xzvf /tmp/Macbuntu-10.04.tar.gz -C /tmpcd
/tmp/Macbuntu-10.04/ $ ./install.sh
Follow the instructions to download and install.