What better way to put together your
own custom set of tracking-building blocks than to analyze and learn from
what’s worked in the past? Here we deconstruct five classic bass music tunes
and discover some key ideas we can borrow
Flux Pavilion - Bass Cannon
While the likes of Skrillex were just
starting to gain worldwide attention with a much edgier sound, the brostep subgenre
was already leading the way here in the UK. Indeed, it was indicative of just
how far bass music and come when Flux Pavilion’s Bass Cannon made it
onto Radio 1’s playlists.
A musician with an eclectic background,
Flux Pavilion is known for bringing a fresh perspective to his tracks, and this
is particularly evident here. While the tempo (140bpm) and structure are pretty
much typical of any dubstep track, it’s the sound selection that takes Bass
Cannon to a different place.

Structurally,
Bass Cannon is relatively simple. The main dubstep sections are both 64 bars
long, arranged in four 16-bar sections
This is most obvious in the main intro
section. It starts on a Latin tip with a marimba loop, and the theme is
followed when a cowbell and piano come in, with a crowd noise adding to the
vibe. Of course, the warped “bass cannon” vocal then appears, and the whole
track gives way to the full-on dubstep sections, shifting things in a much
harder direction. Then the Latin section returns for the middle drop and at the
end, making it integral to the track and setting it apart from the crowd.
Structurally, Bass Cannon is
relatively simple. The main dubstep sections are both 64 bars long, arranged in
four 16-bar sections. Sections 3 and 4 essentially repeat sections 1 and 2,
although section 4 doesn’t include a lead sound. The whole 64-bar section is
repeated after the main drop, although there are a few subtle differences this
time around.
Sonically, the track includes a typical
brostep mid-range lead line, and this dominates sections 1 and 3. Section 2 has
a less dominant lead sound which is musically up a third from the bass, and
section 4 has no main lead sound. All the dubstep sections include solid
sub-bass, doubling up the lead either in unison or offset (as mentioned) for
section 2.
In our step-by-step tutorial over the next
couple of pages, we’re going to focus on the high-pitched ‘bubble’ sound that’s
used to retain high-frequency content in some sections of the track and to
create transition effects. Let’s get started…
High-frequency interest
Bass Cannon makes use of a number of
non-pitched effects and transition sounds – including sweeps, bends and more –
to add a variety of different frequencies to the mix. There are a couple of
really clever sounds in particular that keep the high-frequency interest going
(though with a twist, as we’ll see).
High frequency content can be created
from all sorts of sources, including noise generators
The first example of these comes in section
2, when the main lead synth drops out and a new lead line with much less
high-frequency content comes in. To keep the high-frequency interest in the
track, a very high-pitched ‘bubble’ sound enters the mix. This has two
interesting characteristics. Firstly, it’s modulated rhythmically in sync with
the track, with a triplet feel; you can hear the sound also being replayed like
a synth part to keep the rhythmic content in sync with the track.
Secondly, if you listen closely, you’ll
hear the sound itself is being modulated very quickly, to create a really harsh
but strangely analogue sound. As mentioned, this sound is non-pitched, so here
we’ll set about creating something similar using a noise generator. For
modulation we’ll need two source modulators: one for the super-fast filter modulation
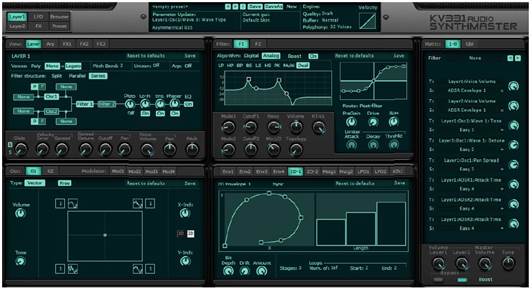
and one for the synced modulation. Although most synths can handle this, our
weapon of choice is SynthMaster 2.5. This offers a simple matrix for
modulation, various LFO choices including the option to sync one LFO and run
another in free time, and also the option to modulate the tone of the noise
generator.
In our second walkthrough we’ll look at
ways of modifying this sound to create some further effects, first by tweaking
the super-fast LFO, then by adding a second low-pass filter in series. Then we
simply throw in a bit of automation for some great non-pitched effects!
If
you listen closely, you’ll hear the sound itself is being modulated very
quickly, to create a really harsh but strangely analogue sound
Step by step: Generating high-frequency
noise
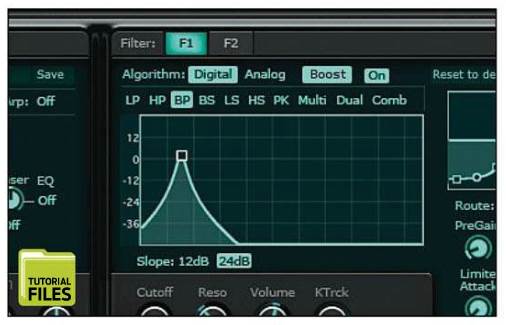
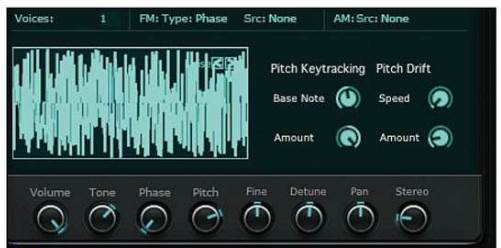
- Start with a new patch and head to the
Oscillator section to choose the noise waveform for Oscillator 1. The
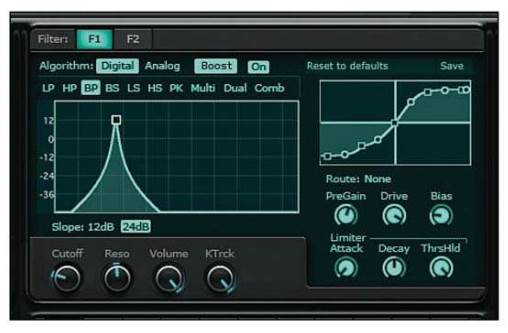
default sound already includes an ADSR, so the next step is to load up a
band-pass filter. Here we’re using the ‘digital’ option as it’s quite
sharp and tight. (HFN1.mp3)
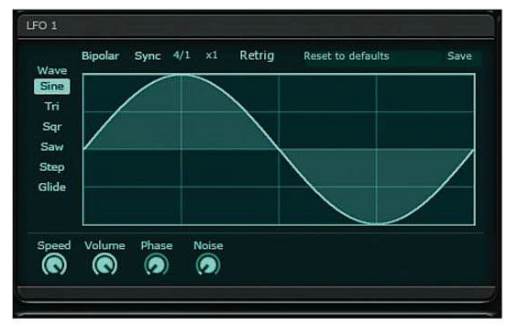
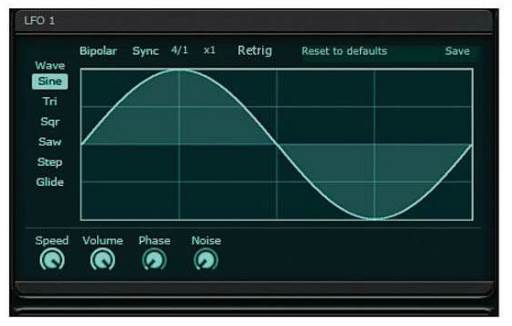
- Now let’s add a modulation to the filter
cutoff. Load up a sine wave LFO and connect it using the modulation
matrix. We want the LFO to run really fast and not sync to tempo. We set
it to almost its maximum speed – around 80Hz – to create a fast,
modulated noise. (HFN2.mp3)
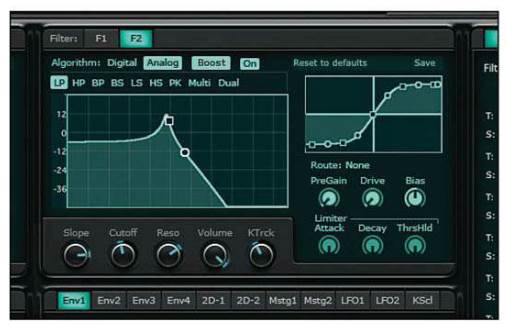
- Next we need to fine-tune the filter
settings. This will be a process of trial and error, as all filters sound
slightly different. We’ve gone for 24dB/octave, ramped up the Resonance,
added some Drive and tweaked the Cutoff. The result is thin,
bright and nasty, but also slightly analogue-sounding. (HFN3.mp3)
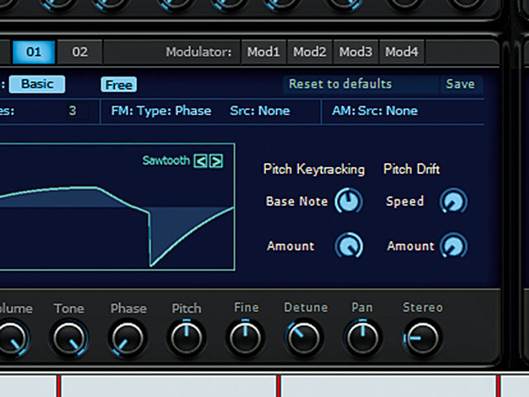
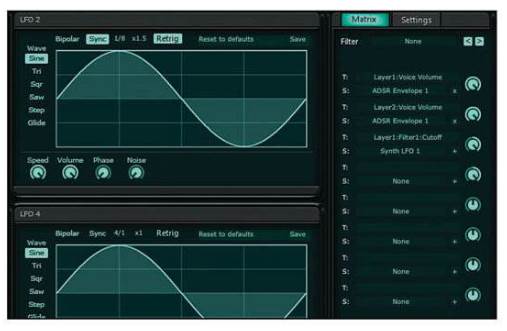
- Our final step is to add a tempo-related
modulation, this time to an oscillator parameter – this will enable us to
modulate the Tone. Via the matrix, set up LFO 2 modulate the Tone,
using a synced setting, and offset the Tone so it changes as
required – we’re using swung eighths. Finally, readjust the filter and
play a note to taste. (HFN4.mp3)
Step by step: High-frequency sweeps
- Working with our basis sound, we can
create loads of other effects. Let’s start with the slowing-down bubble.
We want to begin with our settings as they were in Step 2 of the previous
tutorial, so reduce the second LFO modulation to zero and readjust the oscillator
Tone setting (don’t forget to offset it!). (HFS1.mp3)
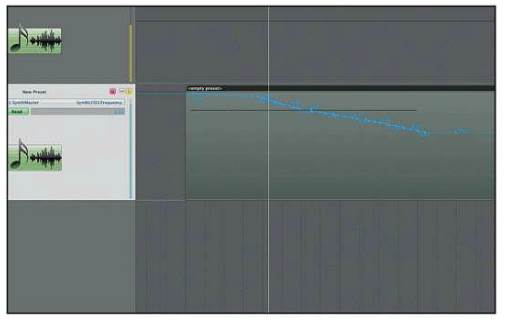
- Now turn your attention to LFO 1. This is
still running in free time, so we can adjust its speed smoothly to create
a very cool transition effect. Try doing this in real time and recording the
move as automation in your DAW. (HFS2.mp3)
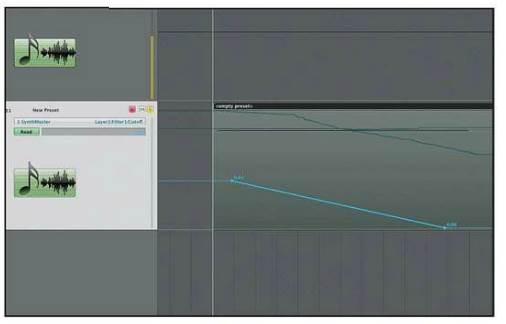
- As a further twist, take the main filter
cutoff and move that manually as well (HFS 3a.mp3). This works
great as a cutoff down-sweep in tandem with the slowing-down LFO, but it
can also be effective when sweeping up, or up and down. You can tailor a
wide range of effects using these parameters. (HFS 3b.mp3)
- Now let’s add a second filter into the
equation, and reintroduce the synced second LFO. At the moment our
starting sound is roughly as it was in Step 4 of the previous walkthrough.
Set up a second filter in series and set it to low-pass.
- Try sweeping this up across one bar –
once again, the easiest route is to program in some automation (HFS
5a.mp3). Things are getting pretty harsh-sounding, so be careful with
the Resonance settings. Also, try shifting the synced LFO to
something faster – we’ve gone for 32nds. (HFS 5b.mp3)

- Finally let’s go back to the idea we
introduced in Step 3, which is to modify the LFO speed of LFO 1. This adds
some further interest to the sound – again, programming in some automation
is a good plan. (HFS 6.mp3)