DJ Fresh - Gold Dust
By far the most commercial track of our
featured five, Gold Dust started out in 2008 as an instrumental 12-inch,
then spawned a vocal mix featuring Ce’Cile, which appeared on the 2010 album Kryptonite.
The track had a further lease of life with new vocals from Miss Dynamite, this
version appearing on Fresh’s 2012 album Nextlevelism.

Understandably,
the single versions focus on the main hook and vocals
The key theme throughout is the pulsing
bassline/lead line combo that takes its inspiration from classics such as
Moguai’s U Know Y. however, at 177bpm and in a full-on DnB style, this
is a far more energetic workout than the breaks classic.
Understandably, the single versions focus
on the main hook and vocals. If you can track down the original instrumental
version, you’ll discover a more complex structure with more interesting
sections that shift away from that main lead/bassline and into beat-driven breaks.
As is the case with a lot of DnB tracks, the programming can be very complex,
and a lot of these subtleties are lost in the shorter edit versions or simply
masked by the vocals. In the version we’ll be looking at here, there are a lot
of great vocal snatches peppered throughout, along with additional synth stabs
and effects to complement the main rhythmic square-wave bleep that sits right
up front.
The main bass/lead riff sound is a staple
of club tracks (Mason’s Exceeder is a good example) and features a
four-semitone offset in the higher oscillator on top of an octave or two-octave
interval below. As it’s such a critical aspect of the track, we’re going to
focus solely on it in our walkthroughs. We’ll show you how to create that sort
of sound in the first place, then look at ways to manipulate it, and hopefully
you’ll learn that even if you think you’ve created a killer riff and sound,
there’s always more you can do to make it better.
Although you could build this part using
separate MIDI notes, if you’re sticking with fixed-note intervals, as this part
does, it makes more sense to create it all within one patch. The upside of this
is that you can then manipulate the whole part more simply via the synth
itself.
Step by step: Bass/lead sound
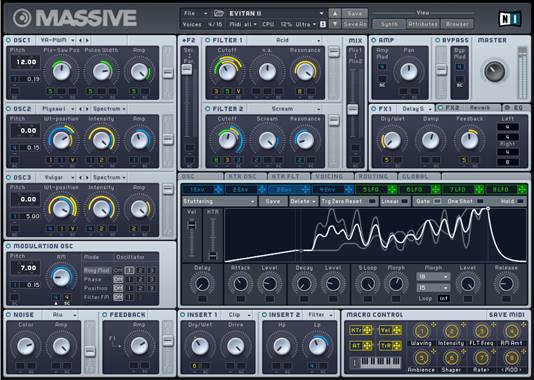
- The main bass/lead sound is quite easy to construct using
offset oscillators and some additional effects. Here we’re using NI
Massive in an attempt to get as close as possible to the original vibe,
although any multi-oscillator synth can build similar sorts of sounds. The
starting point is to get the synth to monophonic.

- The first oscillator needs to be set to
the basic square/saw setting at -12 semitones. Here we’ve also set
it to Bend -/+ mode to give it a bit more attack. This is the bass
end of the sound, and tweaking the wavetable position (Wt-position)
will influence the bass content as well, so experiment to get a good,
solid bass end. (BL 2.mp3)

- For the next two oscillators, set the basic wave settings the
same but set one to +16 semitones and one to 0 semitones
offset. Again, tweak the wavetable positions and intensity to taste. Make
sure all three oscillators are routed through one filter, and set the
glide Time to taste (though it should be pretty quick). (BL
3.mp3)
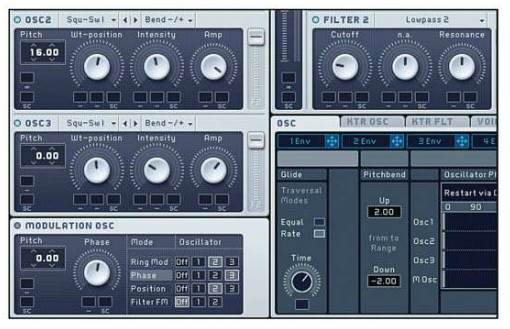
- For added edge, we can phase modulate one or more of the
oscillators, and we’re going to do this to Oscillator 3, which is the one
with the zero Pitch offset. Again this is a matter of taste, but
we’re pushing it roughly halfway, which will add a bit of grit to the
sound. (BL 4.mp3)

- Now to add a filter. Select a Lowpass
type with low to minimum Resonance. We want to modulate the filter
to open on the note attack. There are various ways in which we can do
this, but we opt to use a special LFO shape called Fall 1 and route
it to the Cutoff. This LFO can be synced, so we can also set it to
work in time with the track. (BL 5.mp3)

- There are a few extra things we can do
for the sake of finesse. First up, add in some noise; we’re using the Tape
setting. Next, use a distortion insert such as the Sine Shaper
option that we’ve chosen here. And finally, a bit of EQ – we’ve just edged
out some of the low end and removed some top. (BL 6.mp3)

Twists and turns
Zone in on the main bass/lead sound and
you’ll hear how it morphs and shifts throughout the track, with various changes
to the envelope and note decays. This make the sound feel much more organic and
breaks up the repetitiveness. There are various ways you can go about effecting
these sorts of changes, and with the main pattern programmed up, it’s easy to
just cycle sections, playing with synth parameters to see what works best.
We’re aiming for two particular effects.
First, we want the note lengths to gradually increase towards legato, so that
the notes start to smear together. Second, we want to change our filter attack,
which is currently fast with a sharp decay, to a slow attack, so that the sound
swells in. To stretch out notes you can sometimes simply extend the note
lengths, but in this case that doesn’t really achieve the sort of extreme
effect we’re after - we’re much better off leaving our MIDI programming as it
is and actually automating parameters within our synth sound.
Zone
in on the main bass/lead sound and you’ll hear how it morphs and shifts
throughout the track, with various changes to the envelope and note decays
We will need to make a couple of tweaks to
our existing synth sound to achieve this. The main LFO is already modulating
the filter cutoff, but we can also route the amplitude envelope to it. By doing
this we can lengthen out the envelope release, influencing both the cutoff and
the note length at the same time, and this will go some way to setting up a
more extreme effect.
Next, we need to work out a way of
switching the attack on our filter. Massive offers us a rather neat solution
here, as it can crossfade from one LFO to another. So, by setting up a second,
differently set LFO and switching mid-track, we can automate the envelope
change quickly and simply. Read on to see exactly how it’s done, step by step.
Step by step: Modulating the lead
- First extend the release stage of the amplitude envelope, using
automatic to increase it gradually. This begins to create the effects
we’re after but it’s not quite there, so we also assign the amplitude
envelope to the filter cutoff. (Mod lead 1.mp3)

- With this done we can now automat the filter cutoff. If we do
this to match the increasing amplitude release, we get that note-extending
effect with lots of top end, so it all sounds a little bit out of control.
We can then automate both of them back down for the next section. (Mod
lead 2.mp3)

- To influence the attack stage of the
sound, we could modify the amplitude envelope. We really want to influence
the attack stage of the filter too, however, and although our amplitude
envelope is routed to the filter, the effect isn’t strong enough. A much
neater option is to use a second LFO and switch using the LFO blend
control. Se, set the second LFO to ramp up.
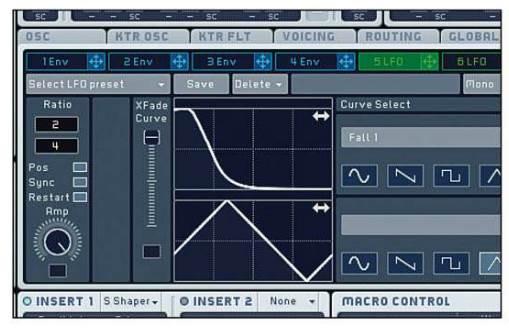
- Now both attack styles are influence by
an LFO, so to make the switch between one style of attack and the other,
we simply use the LFO cross fader. This is easy to play on the fly or
automate, and we can also blend between the two for further sounds. (Mod
lead 4.mp3)
