Follow along step-by-step as we put
some of our favorite synths for bass music through their sound design paces
Sound design with Massive
When Massive launched in late 2006, it blew
its contemporaries out of the water: here was a soft synth capable of not just
rivaling top-of-the-line virtual analogue hardware such as the legendary Access
Virus, but in some areas superseding it. Massive quickly became a staple of all
kinds of electronic music producers, but it would be bass music where the
instrument would have the most impact.
Soon sounds created with Massive could be
heard all over electro and drum ‘n’ bass productions, and the synth would play
a huge role in the evolution of the tear-out dubstep sound. As dub step’s
basslines moved into the midrange, it was Massive that provided the
harmonically rich wobbles, vocal bass sounds and screeches that would come to
define the brostep take on the sound.

Sounds
created with Massive could be heard all over electro and drum ‘n’ bass
productions
Now, almost seven years later, Massive is
still the most popular soft synth around. So what is it that gives the
instrument its perennial appeal? Part of it must surely be that while Massive
is a hugely powerful synth, its interface remains relatively straightforward
and unintimidating. Modulation routing can be assigned with ease, and the
clever visual representation means you can always keep track of what’s going
on.
More importantly though, Massive’s
oscillators are sophisticated yet straightforward sound generation tools. Each
oscillator only has three knobs, a pitch control and two menus, but they’re
capable of conjuring up an incredible array of timbers. This is thanks to the
huge number of available wavetable oscillator shapes, and the five different
oscillator modes, which provide even more flexibility. By modulating the
wavetable position and oscillator mode’s intensity control it’s a cinch to come
up with complicated, rich tones, even before the feature-packed filters, effects
and unison controls are brought into the equation.
Step by step: Massive bass
- Start by loading Massive up in your DAW.
First we want to ensure that the envelope controlling the amplitude level
is set to sustain at maximum volume. Click the 4 Env button and
turn the Decay Level knob up all the way. Now when you play a note
it’ll have a consistent volume for as long as the note is held.

- The majority of Massive’s sound creation potential lies in its
oscillators, which can be used to create interesting tones without having
to activate the synth’s filters or FX. If you sweep the Wt-position
knob in the Osc 1 panel you’ll hear the synth output morph between a
square and a saw tooth shape.

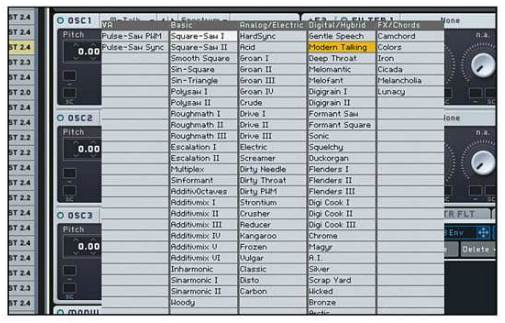
- Click on Squ-Sw I and you’ll see a huge list of
available oscillator wavetables. Select Modern Talking in the Digital/Hybrid
section. Now try sweeping the Wt-position knob. Clearly, by
modulating this parameter we can easily make some complex-sounding
patches. Just using this knob is a waste of Massive’s potential, though.
Set the oscillator wavetable back to Square-Saw I.
- Let’s take a look at the oscillator mode,
which is set to Spectrum by default. In this mode the middle knob
controls Intensity – turn it down and the waveform is filtered down
to its fundamental frequencies. This can be handy sometimes, but we can do
much more interesting things with the other oscillator modes.

- Click Spectrum and a menu showing the five available
oscillator modes will appear. These include Spectrum, which we’ve
already seen, as well as Format and three different Bend
modes. Select Format mode, then turn the Wt-position knob
all the way down and try sweeping the Intensity knob.

- This ear-piercing noise is clearly the basis for many brostep
sounds. Let’s modulate the Intensity knob to quickly make one. Set
it to 12 o’clock, then drag the modulation handle from 5 LFO and
into the first slot under the Intensity knob.

- To set a modulation amount, drag down where is now reads 5
under the Intensity knob until the modulation amount indicator goes
all way around the knob as shown. This gives us the correct modulation
range, but now we need to get the shape of the LFO right.

- Click the 5 LFO button and click the sawtooth shape in
the top Curve Select panel. Click the Sync button to sync
the LFO’s rate to the host DAW’s tempo, and set the tempo resolution to 1/8,
as shown. Check out Formant Laser.mp3 to hear how this sounds.

- Click Formant and this time Select Bend -/+.
As you can hear from Bend Bass.mp3, this totally changes the feel
of the sound. The Bend+ and Bend- modes offer further
variations – we won’t go into how these different modes work right now,
but if you’re interested you can read more about them in Massive’s manual.

- If you sweep the Wt-position knob, you’ll hear that the
sound changes subtly. We can get a much more dramatic change if we use a
different wavetable oscillator. Open up the wavetable oscillator menu
again, and this time select Strontium from the Analogue/Electronic
menu.

- Now if you sweep the Wt-position knob you’ll be able to
create an intriguing array of timbres. Set the Wt-position knob to
11o’clock, drag over the modulation handle from 5 LFO, and set up the
modulation amount as shown. This gives the sound even more character and
movement. (Wt-position Mod.mp3).

- Now let’s take a look at what we can do
with the modulation oscillator. The matrix on the right-hand side of the
Mod Osc panel shows which oscillators it’s set to modulate. Activate Oscillator
1 in the Phase row. This essentially gives us a frequency
modulation effect – turn up the Phase knob to hear how it affects
the sound.

- Set the Phase knob to 9 o’clock to get a rough sound
that’s suitable for filtering (Phase Mod.mp3). Finally, let’s bring
in the filter and use a modulated filter cutoff to get a dirty bass sound.
In the filter 1 panel, click the filter type box that currently reads None
and select Lowpass2.

- Turn the Mix fader to the right all the way up so we’re
just hearing the output of Filter 1, then drag the modulation handle from 5
LFO to the first slot under the cutoff. Set the Cutoff and modulation
as we have above, and turn the Resonance up to just before 9
o’clock. This gives us our final sound, Filter Mod.mp3.
