Using GIMP, we’ll show you how to wield this
nifty for easy image improvements
What you’ll need…
·
Editing software
·
Dull image
We used…
·
GIMP
You could try…
·
Serif Photoplus X5
·
Photoshop CS5
What you’ll learn…
How to use the Curves tool to add contrast
to a flat, boring image

After
a quick curves adjustment, the contrast has been increased and the reds in the
shot have been made more stricking
With modern digital cameras it seems harder
than ever to take a bad shot. There are countless modes that make it easy to
have the perfect settings for any situation. However, most images can usually
benefit from a few small modifications.
The Curves tool can be used to tweak the
tones of the image, correct the exposure and enhance the colours. Curves are
easy to learn about and can be used for a number of simple improvements.
Upon opening the Curves tool with any
image, you are given a range of options, all centred round a histogram behind
the adjustment curves. From here you can rescue the darker areas of a shot,
brighten up different tones and even fine-tune the various colour channels
individually.
The left (bottom) of the line refers to the
shadows, the right (top) is the highlights, and the middle represents the
midtones. Manipulating the different parts of the lone will affect that
corresponding tonal area.
There is no set way to use the Curves tool,
as individual images will be affected differently with each adjustment. Follow
along with these easy steps to see how using the Curves tool can rescue an
image.
“Curves are easy to learn about and can be
used for a number of simple improvements”
Adjusting the curve
Add contrast to your shot
1.
Duplicate the layer
Duplicating the original photo allows you
to make nondestructive edits. You can therefore return to the original image
later on, or adjust the effect of the edits further down the line. To duplicate
the layer, simply go to Layer>Duplicate Layer.

Duplicate
the layer
2.
Open Curves
Using Curves tool gives us the simplest and
most effective way of transforming the photograph into a more appealing shot.
The tool can be found in the Colors menu, which will open a separate window
where the tweaks can be made.

Open
Curves
3.
Histogram adjustments
Much like using the Levels tool, you can
use the Curves tool to bring in the tonal range of the image. Each end of the
line on the graph should be positioned at the edges of the histogram. Simply
drag and drop the edges to align with the graph behind.

Histogram
adjustments
4.
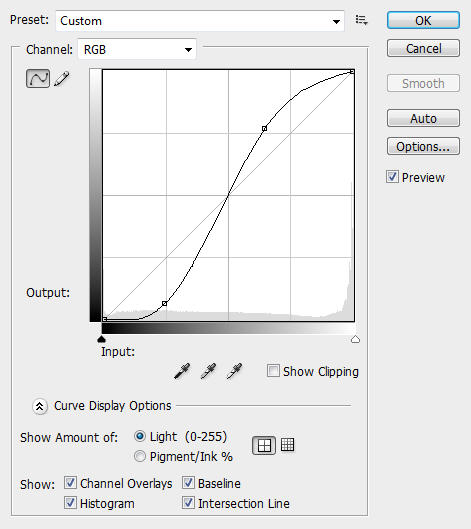
The simple S curve
By clicking on the line you can adjust its
position. The most common type of curve modification is a simple ‘S’ shape.
This isn’t ideal for all photographs, but it darkens the shadows and brightens
the highlights to give the image more contrast and punch.
The
simple S curve
5.
Fine-tune colours
If you want to make more precise edits, you
can select one of three colour ranges from the drop-down menu. Choosing the
red, for example, allows you brighten or darken the reds in the image, so you
can easily enhance a prominent colour.

Fine-tune
colours
3 of the best…
iPad apps that allow curves adjustments
Photoshop
Touch
$9.99
This app has a huge range of editing
options for touch devices, including an easy Curves tool.

Photoshop
Touch
PhotoForge
2
$2.99
Adjust the main curve graph as well as the
three colour tones with this simple editing app.

PhotoForge
2
Photogene
$2.99
An overlaid curves graph allows you to
carry out easy photo adjustments and see the effect immediately on your image.

Photogene