Someone’s been watching a little too much
Honey, I Shrunk the Kids. But in the case of NZXT's Phantom 630... er... case,
that's a good thing. And when you really look at the tale of the tape, this
case isn’t all that much smaller than NZXT’s Phantom 820 - its bigger, louder
cousin that comes with a few more eccentricities than the 630, but, to be
honest, a few more headaches, as well.
NZXT’s really tightened the hatches to
deliver a compelling experience with its "ultra-tower” chassis - we’ll
forgive the silly description there. Though it’s a wee bit pricey, this case
definitely summons up a “wow” factor with its sleek, easily accessible design
and captivating fan-control system. In fact, we don’t really have any outright
complaints with this chassis; suggestions and dreams, perhaps, but nothing
about this case stands out in a negative light.
NZXT
PHANTOM 630
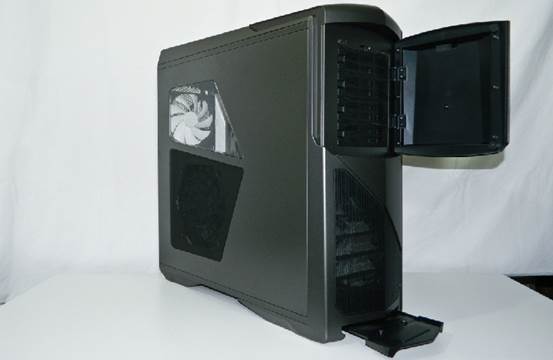
Where to begin? The case’s four 5.25-inch
drive bays are completely screw less and don’t require you to painstakingly pop
off a front panel on the chassis in order to gain access. Just open up the
case’s magnetically attached front-panel cover, pop off one of the bay covers,
and you’re good to go assuming you’ve already unscrewed and removed the 630’s
elegant-slash-lovely left side panel, of course. A note on that: We love the
subtle, grilled treatment that NZXT gives to the side panel’s attached 20cm
fan, hiding it just enough that it’s not a monster eyesore below the panel’s
smaller window.
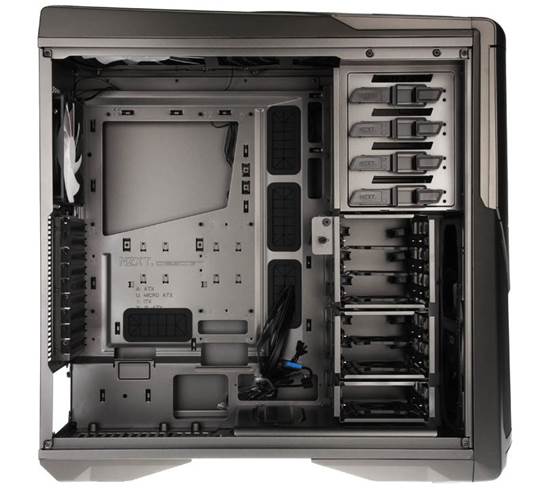
Slapping up to six hard drives in the
case’s available bays is a bit mix-and-match, but that’s a good thing. The
drives themselves use easily configurable trays that slide right into the three
separate drive bay compartments, which are themselves removable and
interchangeable depending on your preferences and need to accommodate longer
video cards. You can even mount a 12cm fan directly on the side of one of the
bays and pivot it to blast air across any part of your setup that needs it.
NZXT
PHANTOM 630 - Inside
The case comes with a considerable amount
of cooling preinstalled. In addition to the aforementioned side-panel fan, you
get one 20cm fan in the front (your mechanical hard drives will love you), one
20cm fan up top, and a single 14cm exhaust fan on the case’s rear. They’re all
wired up to the 630’s best feature a built-in fan controller that you can
operate from a switch and button setup directly on the front-top of the
chassis. Pick from a low, medium, or high speed, and flick the case's included
white lighting on and off at the press of a button - it’s as easy as powering
up your system.
While it is a mild letdown that the 630
doesn’t give you a switch for changing the internal lighting to any color you
want, we love how the system's entire fan setup is powered by a single Molex
connector. We had a bit of trouble getting the fan controller to work in the
Phantom 820, so it’s a joy and a relief to see a much easier setup in its
“lesser" iteration.
We’re appreciative of the case’s six major
routing holes for cables, in addition to a large, cutout area on the
motherboard tray for simplified aftermarket CPU cooler installation. There’s
plenty of room between the tray and the right side panel for your cables even
two 2.5-inch drives, if you’re ambitious and the tray itself comes with the
motherboard standoffs preinstalled for your convenience.
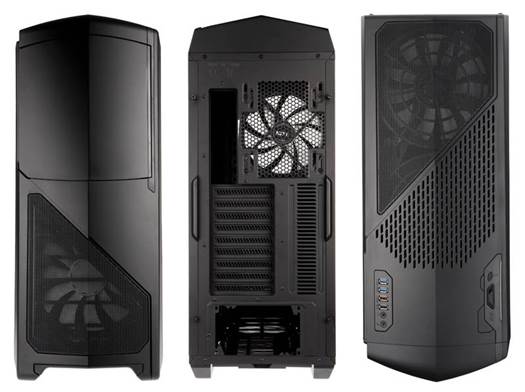
With
the unmistakable appearance, the NZXT 630 High Performance Modular Full Tower
Chassis keeps the timeless, striking visuals as previous series of the case
with a next generation design.
In other words, what’s not to like about
the NZXT Phantom 630? Spoiler: Nothing. We’re always fans of more pizzazz but,
as constructed, there’s really nothing to dislike about this one.
|
Specifications
§ Motherboard
Form Factor: Mini-ITX, Micro ATX, ATX, XL-ATX
§ Drive
Bays: External: 4x 5.25”; Internal: 6x 2.5"/3.5", 2x 2.5"
§ Cooling:
Front: 1x 200mm intake fan (supports 2x 140mm or 2x 120mm); Rear: 1x140mm
exhaust fan (supports 1x120mm); Top: 1x200mm exhaust fan (supports 2x200mm or
2x140mm or 3x120mm); Side: 1x200mm intake fan; Bottom: 2x 120mm/140mm fan
mounts
§ Expansion
Slots: 9
§ I/O
Port: 2x USB 3.0, 2x USB 2.0, 1xHeadphone, 1x Mic
§ Power
Supply Size: Standard ATX
§ Clearances:
HSF: 170mm / 200mm without side intake; PSU: 220mm; GPU: 325mm / 507mm
without HDD cage
§ Dimensions:
9.65" x 24.69" x 23.62" ; 245mm x 627mm x 600mm
§ Weight:
27.12 lbs. / 12.3 kg
§ Special
Features: USB 3.0 connectivity via internal headers, Toolless 5.25"
drive bays and 3.5" drive sleds, Support for 360mm/280mm radiator in top
of enclosure, 240mm/280mm in bottom of enclosure, thickness up to 60mm,
Integrated three-speed, 30W fan controller (supports up to 10 3-pin fans),
Toggleable rear I/O and expansion LED illumination, Integrated SD card
reader, Three removable drive cages (3-drive, 2-drive, and 1-drive)
§ Price:
$179
|