We’ve written thousands of words about Windows
8, starting with the first hands-on in September of 2011, followed by deep
dives on the Developer Preview, Consumer Preview, Release Preview and RTM
build. Even our readers have had ample time to get acquainted with the OS –
it’s been available as a public download since February. We’ve never checked
the final version of the software running on the new hardware built for Windows
8. With the OS is now on sale (alongside dozens of new PCs), it’s finally time
for us to double back and revisit everything we’ve previously written in the
form of a final, comprehensive review.

Windows
8’s display
And this is a challenging task: it’s hard
to give an OS the full review treatment without burying the reader in minute
details. It’s even more difficult when the software is designed for so many
kinds of hardware. Combining a traditional desktop with Windows Phone-inspired
Live Tiles, Windows 8 was designed to be equally at home on traditional PCs and
more finger-friendly devices, like tablet and hybrids. In addition to leading
you through the operating system’s various gestures and built-in apps, then,
we’ll spend more time talking about which form factors are best suited to this
redesigned version of Windows. Read on to see what we found.
Getting started
It’s
all about the cloud

Windows
8 cloud integration
We still remember when we first started
using Windows 7; the start-up sequence wasn’t that different from Vista, which
in turn wasn’t unlike versions of Windows that came before that. The chain of
start-up screens could be long, sometimes taking more than one minute to
complete. Depending on how slow the system was, it could have taken longer for
the desktop to fully load. Here, booting Windows feels like starting on An
Android tablet, or other mobile device. The entire process takes not 1 minute,
but only 20 seconds in some cases – a short sequence marked by a brief splash
screen and redesigned Windows logo. If this is the first time you start a
Windows 8 machine, you’ll see a 30-second video tutorial explaining some of the
controls that otherwise might not be so obvious – for example, what called
Charms Bar which you pull out from the right side of the screen. (We’ll circle
back and explain all those new user interface elements in just a moment.)
Since then, setting up is a quick and
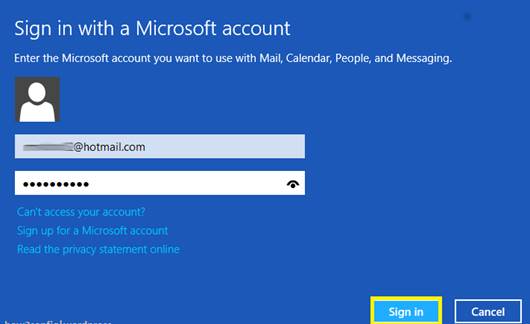
painless affair. When you first start up Windows 8, you’ll be prompted to log
in to your Microsoft account. Yep, the same one you might already be using for
Hotmail, SkyDrive and Xbox Live. This means that every time you log in to a
Windows 8 PC, settings and customizations will follow you to your new device.
Besides, as the Microsoft account is linked to your SkyDrive storage, you’ll be
logged into SkyDrive on any Windows 8 device where you’ve logged in using your
Microsoft ID. So, because Office 2013 backs up to SkyDrive by default, it means
any document you edit on your Windows 8 device will upload to the cloud
automatically.

Logging
in Microsoft account
If you didn’t have a Microsoft account, you
can create one while you’re setting up your PC. You can link your account at
any time, and you can also have the option of disconnecting it (in Microsoft’s
words, “switching to a local account”). Naturally, you can add multiple user
accounts, as you could on previous versions of Windows.
If you like, you can also choose which
settings do and do not get synced
across your various Windows 8 devices. For example, go into the settings menu,
you can use on-off switches to sync your settings for desktop personalization,
accessibility, language, app and browser settings. You also have the option of
syncing your lock screen, account picture and other Windows settings, like
those relating to File Explorer or the mouse. Note: to have your passwords
follow you from PC to PC, you’ll need to “trust” the computer through an online
verification process.
Security
options
Obviously, if you log into Windows 8 for
the first time by using your existing Microsoft account, you’ve already got a built-in
password for your PC. But beside the standard password, you can use a
four-digit numerical pin to unlock the device. Moreover, with Windows 8, Microsoft
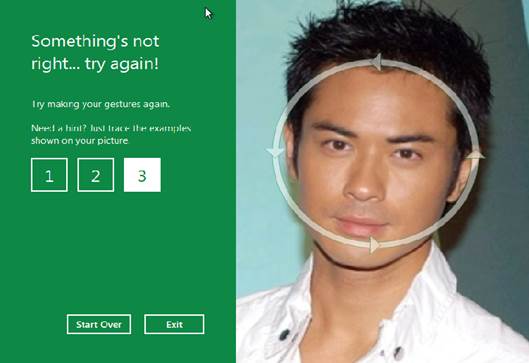
is also providing a new “Picture Password” option allows you to select any
photo and make a series of gestures on it. You can make as many gestures as you
want, but they do have to be taps, circles or swipes. However, apart from the
order, you’ll have to remember where on the picture you’re supposed to make
each gesture.

Windows
8 Picture Password
We had mixed success here. On the one hand,
when we set our password to be one tap in each corner of the picture, we were
able to replicate this pattern, even if we didn’t hit the exact same pixels
each time. However, when our password was a diagonal slash across each corner,
we struck out trying to draw the lines in the same spot we did initially.
Fortunately, as you’re configuring your picture password, you’ll be asked to
repeat the pattern, so if you can’t do it then, it might be a sign that you
need to come up with something else.