In addition of using the rescue disk, remove
hard drive and plug it into an active computer, users can use the Windows
installation disk to copy data when the computer cannot boot.
The scope of this article refers only to
guide user to copy data on computers running Windows 7 or Windows 8
installation CD with the respective OS version.
Basically, this method will use the command
line interface window (Command Prompt) to activate the Notepad text editor and
copy data within the simple text editor interface. Note that you can use the
Windows 8 installation disk to boot and copy data on computers running Windows
7 and vice versa.
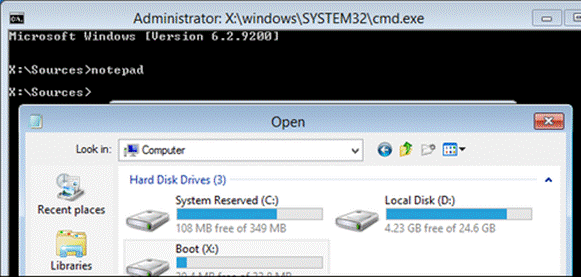
Users
can use the Windows installation disk to copy data when the computer cannot
boot into the operating system.
Here is the specific step-by-step guide:
Step 1
Firstly, you need to prepare a Windows 7/8
installation disk or USB Boot which contain the installer of one of the two
above OS. If the computer cannot boot from USB or CD, you would have to
configure the system's BIOS. If a Boot Menu is available during the Booting
process, select Boot from a proper device. Once you have selected proper boot
device, pay attention to the screen until you see a sentence appear, as shown
below, then you press any key to continue.
Step 2
Now, if you use Windows 8 installation
disc, click on the "Repair Your Computer" first instead of the
Install Now button. At the interface screen that appears, select
Troubleshoot> Advanced Options and then select Command Prompt as shown
below.
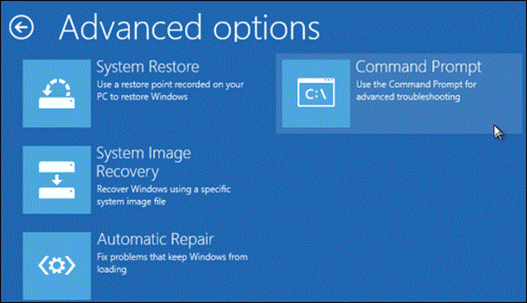
Windows
8 installation interface
If you use Windows 7 installation disk, you
must select the "Repair Your Computer" first, then select
"Restore Your Computer using a system image you created earlier" in
the dialog box that appears. Next, press the Next button and then select Cancel
two times and select Command Prompt as shown below.
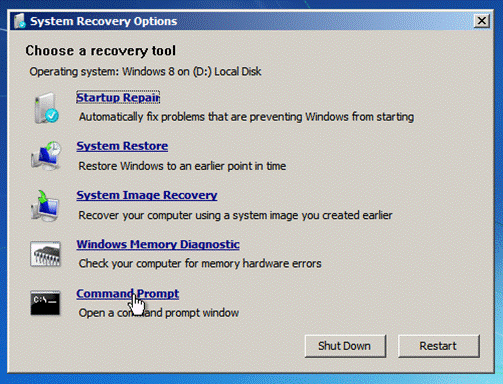
Windows
7 installation interface
Step 3
As mentioned earlier, it doesn't matter
that you use Windows installation disc version 7 or 8, the ultimate goal is to
access the command line interface Command Prompt. Once the Command Prompt
window appears, the next thing you need to do is type in the command prompt
"notepad" and press Enter to activate the Notepad program interface.
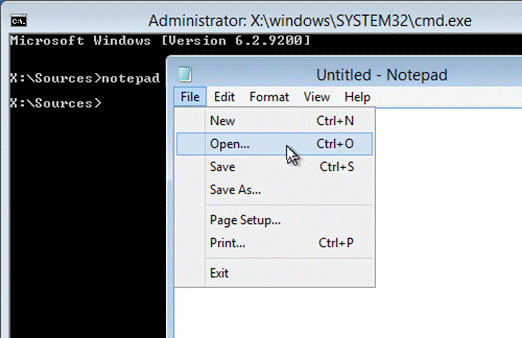
Step
3
Now, at the Notepad interface, you press
"Ctrl + O" to open the Open dialog box. Just be sure to select
"All Files" in the "Files of type" to be able to display
all the contents that Notepad cannot open.

Select
"All Files" in the "Files of type"
At this point, you almost have a simple
Windows Explorer interface. The next thing that you need to do is to find the
files that you need to copy on the partition of the OS, press right-click to
select "Copy" and "Paste" them to other partition.
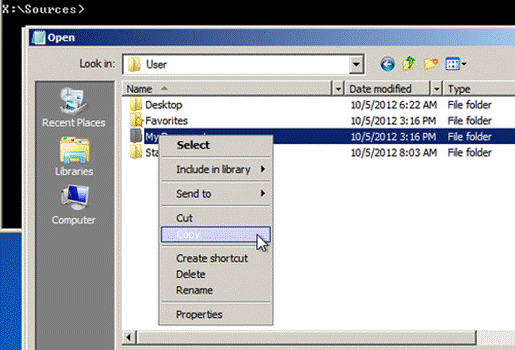
A
simple Windows Explorer interface
Note that you shouldn't double-click
(double click) on any file because Notepad will try to display its content and
your time will be wasted. If you got in this case, let's go back to the command
line interface, type in the phrase "taskmgr" and press Enter to
activate the interface management tasks Windows Task Manager. In this
interface, select Untitled - Notepad and then click the End Task button below
to close the Notepad window. Then, go back to step 3 to continue the copying
data process.
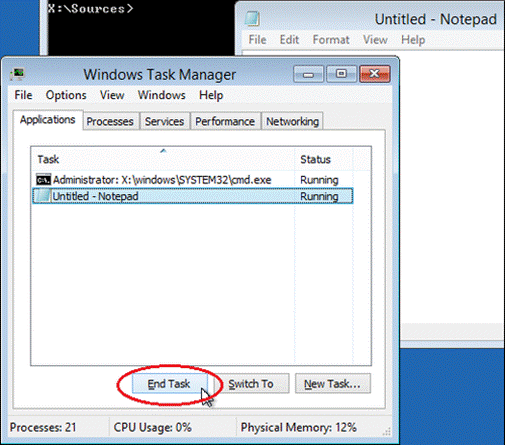
Windows
Task Manager
Once the copying data process is complete,
you can close all open windows, restart the computer and can safely reinstall
the whole system. Hopefully with a few basic steps in this guide, you can save
a little time and simplify the process of "saving data" when the
Windows computer does not work.