Keynote’s Outline view dispenses with
frippery for tighter presentations
Whatever the merits of Microsoft’s
PowerPoint, there’s little argument that iWork’s Keynote is capable of
producing more visually arresting presentations. Keytone has, after all,
superior typography, support for alpha transparency and a fair richer array of
stunning transition effects.
However, the incidental, if predictable,
drawback to having such comparative power at your disposal is that it’s too
easy to go nuts with it. Every time I give a corporate presentation to people
more used to watching the relative drabness of PowerPoint presentations, I
battle – occasionally successfully – against the temptation to add a Sparkle or
Flash bulb effect to every bullet point or a Magic Move transition between each
slide. I think my natural tendency to favor style over function is exacerbated
by the way I’ve been creating presentations. Using Keynote’s default standard
navigation view encouraged me to create presentations linearly, making it too
easy to abandon structure and add another slide or fancy transition if I
thought it looked good.
So I’ve been experimenting with Keynote’s
Outline view (View > Outline) instead, and found it a great way to add
structure and tighten up a presentation. In this view, the slide thumbnails in
Keynote’s Slide Navigator are replaced by a text outline of your slide’s
content, including its title and bullet points. This has two immediate
advantages. By showing text rather than images in the Navigator, it encourages
you to concentrate on the content of the presentation rather than its
appearance, which is no bad thing when your presentation is at the planning
stage. Its second advantage is even more useful: because you can edit files in
the Slide Navigator, it’s a lightning-fast way to create a presentation.
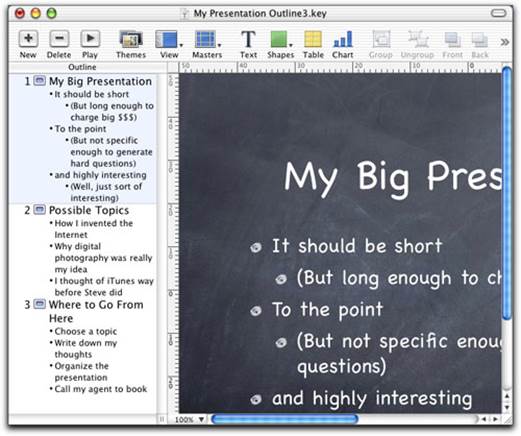
Let
things slide: Creating slides in Outline view and edit text from Slide Navigator
If you’ve used outlining tools such as
OmniOutliner (ominigroup.com), you’ll be familiar with the keyboard shortcuts
that the Outline view uses to manipulate text. To create a new slide, you click
inside the Slide Navigator and press the Return key, then start typing to add
the title of the slide directly in the Slide according to the keynote you’ve
chosen. You can add bullet points underneath the title by pressing the Tab key
and then entering the text.
Once you’re used to working in Outline
view, you can see its advantages in testing out ideas or organizing your
thoughts. It’s flexible: you can promote sub-topics by pressing Shift-Tab, or
rearrange items in the Slide Navigator just by dragging them.
Moreover, if the text begins to look a bit
cluttered, you can get an overview of your presentation by simply selecting all
the slides in the Slide Navigator, right-clicking and choosing Collapse from
the drop-down menu. This hides all of the sub-topics underneath each slide
title. (You can also collapse individual slides just by double-clicking the
slide’s icon in the Slide Navigator).
When you’ve organized your presentation in
Outline view you can just switch the view back to the standard Navigator or
Slide Only views to add some visual polish.
So far, so functional. But once I was
firmly ensconced in the outlining method of creating slides, I realized that I
was no longer restricted to Keynote as a presentation authoring environment.
Thanks to Outline view, you can use a word processor to create an outline and
export it into Keynote. Using a word processor to build a presentation sounds a
bit daft, but I find a lot of the time that I’m building a presentation from a
short list of ideas I might have jotted down in Pages, or want to turn
material, such as word-processed report, into a Keynote presentation, without
typing in the main points in again.
You can create a Keynote-compatible outline
in Pages quickly using an Outline template in the Template Chooser. Only two
Outline templates – Harvard and Research are strictly compatible with Keynote.
This is because both of these templates use list styles to organize the text,
and Keynote’s outline view converts those list styles neatly into titles and
bullets. The other Pages templates won’t convert properly without some
adjustment.
Even so, it isn’t a big job to convert any
existing styled document, even a fairly lengthy one, into an outline suitable
for use in Keynote. The secret is to apply list styles to the document.
Say, for example, that you want all the
headings in a document to appear on separate Keynote slides, with the body text
below each heading appearing as bullet points on each slide.
First off, prepare the Pages document by
selecting all the heading; you can do this by opening the Styles drawer and
clicking the arrow next to the paragraph style that has been applied to all
headings. When you select the ‘all uses’ of that style option from the
drop-down menu, all of the headings will be highlighted.
The next step is to select one of the List
Styles below the paragraph styles – it doesn’t matter which one – to turn those
headings into a list. Repeat the process to select all the body text in the
document. Select the same list style in the List Styles area. When all the body
text has been selected, press the Tab key. This will indent the body text from
the heading. Now your whole document is an outline, and you can adjust
indentation levels by selecting the relevant text style and pressing the Tab
key to increase the level of indentation, or Shift-Tab to reduce it.
When you’re happy with your outline, select
it all and open Keynote. There, create a new document and select Outline view
(View > Outline). Click on the first slide in the Slide Navigator making
sure it’s highlighted and choose Edit > Paste and Match Style. By choosing
this option, the imported text will match any styles used in the current
Keynote theme rather than the list styles you’ve applied in Pages. Each top
level element in the list – your headings will appear as a slide, and the body
text will appear as bullets each heading.
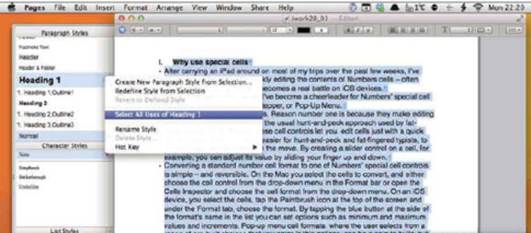
Heading
home: Converting any text document to a Keynote-compatible file is easy as long
as the text is styled
You don’t need to create the outline in
Pages on the Mac, either. A basic word processor, such as TextEdit, will do the
same outlining job. In TextEdit, just make sure you’re working in rich text
view (Format > Make Rich Text). Create a list of headings and text, and then
format it as a list by choosing a bullet or number style from the List pop-up
menu on the toolbar. You can then indent items in the list by putting the
cursor before them or pressing the Tab key. Copy and paste into Keynote’s
Outline view.
Bullet
proof: You can create outline in many word processors, such as here in
TextEdit. Completed outlines can be pasted into Keynote
Even better, you can create a presentation
outline on an iOS device. This is doubly handy; as Keynote for iOS lacks an
outline mode and I always find it relatively awkward to create a presentation
in standard mode on its small screen. To create an outline in Pages for iOS,
select the list of items you want to convert. Next, click the Paintbrush icon
and choose one of the list options under the List tab. To indent text, select
it, and then tap one of the Indent Text buttons on the ruler bar at the top of
the page or under the List tab.
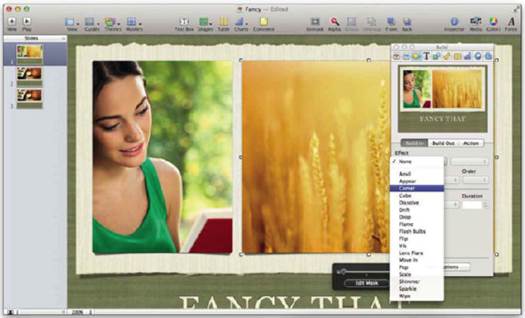
Eye
candy: Working in Outline view doesn’t mean you sacrifice flair. Just switch
back to Keynote’s default view to add any visual touches
While you can’t open such as outline in
Keynote for iOS, if you’re syncing your Pages documents, you can open it in
Pages on the Mac and then export it to Keynote in the usual way.

In
the frame: The list tools in Pages for iOS allow you create the framework of a
presentation – useful because Keynote for iOS lacks an outlining tool