Remember thin client computing? Well, it’s
back again, and it’s faster and cheaper than ever
If you don’t remember the last time thin
client made the news, then here’s a brief intro. Back in the days when
computers were big and expensive, each one had several terminals attached to it
so lots of people could use one computer at the same time. PCs (personal
computers) put a stop to that in many situations because they became so cheap
you could put a computer on a desk for the price of a terminal. Then we got
networked PCs running software held on a server and suddenly the distinction
wasn’t so clear any more.
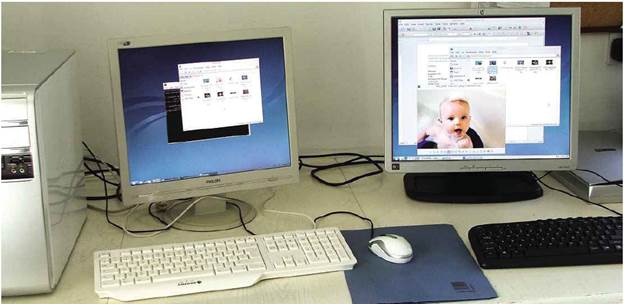
Server
on the right, terminal on the left
‘Thin client’ became the preferred term for
terminals that had very little processing power of their own and no locally
installed applications. They did little more than display images created on the
server. ‘Fat client’ referred to PCs that could run their own software, but
often ran networked stuff in a business setting. For example, you might run an
office suite and a browser on your PC but log into Sage or some other
enterprise management package running on the company server.
Thin client computing has never totally
gone away, though. They may be pretty rare in offices these days, but thin
clients live on as PoS (point of sale) terminals in shops, and as control
consoles in industrial processes. And they are sometimes used in education,
libraries, computer kiosks and other situations where people want simple,
cheap, secure access to basic computing. In my case, I’m experimenting with a
system that will eventually go into a social enterprise hub in Llangollen.

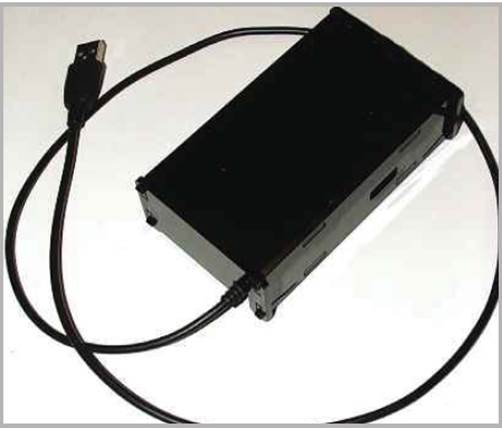
The
extended case keeps the SD card secure
LTSP (The Linux Terminal Server Project
- www.ltsp.org) exists to meet that
need. LTSP servers are usually just desktop PCs with a lot of memory and plenty
of hard disk space. Until recently, LTSP terminals were usually either old
terminals from commercial mainframe computers or just old PCs given a new lease
of life as thin clients. But now we have the Raspberry Pi to play with.
BerryTerminal
BerryTerminal (berryterminal.com) is a minimal Linux
distribution designed to turn a Raspberry Pi into a low-cost thin client, which
will connect to any Linux distro running LSTP. Like all Pi projects, it’s come
a long way in a short time, and there are almost daily updates.
Raspberry
Pi safely boxed
We’ll look at the server setup first,
though, because then you can use that to create the BerryTerminal SD card.
LTSP Server Hardware
There’s loads of information about LTSP on
the LTSP website at wiki.ltsp.org. Specifying a server is not straightforward;
it very much depends on what your users will be doing, and how many of them you
have. The wiki pages suggest that if you have a few people playing simple
games, a few browsing and a few using Libre Office, a single 2GHz processor
should handle 20 users. I’m pretty skeptical about that, and given that you can
get a less than state-of-the-art dual- or even quad-core device pretty cheap
these days, I’d aim a bit higher.
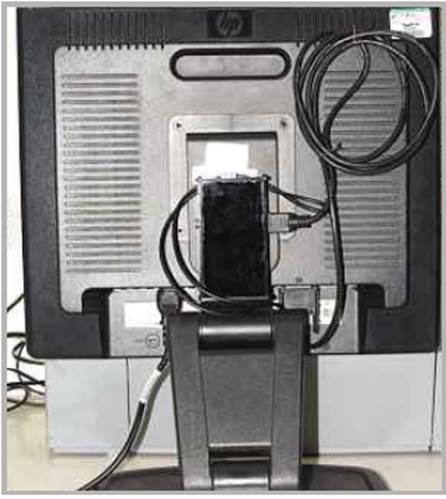
Raspberry
Pi mounted on the rear of the monitor and cables coiled up neatly
The LTSP wiki gives a formula for
calculating how much RAM you need and comes up with 4GB for 20 users.
Elsewhere, though, I’ve read users suggesting 1GB for the server itself plus
500MB for each user if you are using a graphical desktop, watching video and
visiting Flash encumbered websites.
Each user will get their own ‘Home’
directory on the server, so plenty of disk space is essential, and if you want
to avoid being lynched by disgruntled users, make sure you have a RAID 1 system
in case a disk fails!
For 20 or more users, you really need a
gigabit network interface from server to network switch, though 100Mb is okay
for each terminal. Most of the documentation assumes you have a server with two
network interfaces: one to link the server to the internet, the other to handle
the clients. In a home or small office you can use a single NIC or on-board
Ethernet and a domestic router. As we’ll see later, a separate network switch
is a big help rather than relying on Ethernet ports in the router itself. For really
big networks, multiple server setups can be used to share the load.
My tested machine currently is a
three-year-old, dual-core Dell Inspiron with 2GB of RAM, but I’m only running
one client so far. With LTSP used in quite a few schools, a lot of references
are to Edubuntu, but I did a fresh install of Lubuntu, which has the LXDE
desktop as standard. The Raspberry Pi client won’t handle Ubuntu’s default
Unity desktop, and I’m not keen on the fallback Gnome. LXDE is light and fast.
There are a couple network things to deal
with before we get into LTSP itself.
DHCP
Dynamic Host Control Protocol (DHCP) is the
system used to hand out IP addresses on a network automatically. In a simple
home system, the router functions as a DHCP server and you don’t have to think
about it, but it’s an issue with LTSP. The LTSP server gives IP addresses to
each of the clients so they can communicate, but if it tries to give out an
address already used by your router you have a problem.
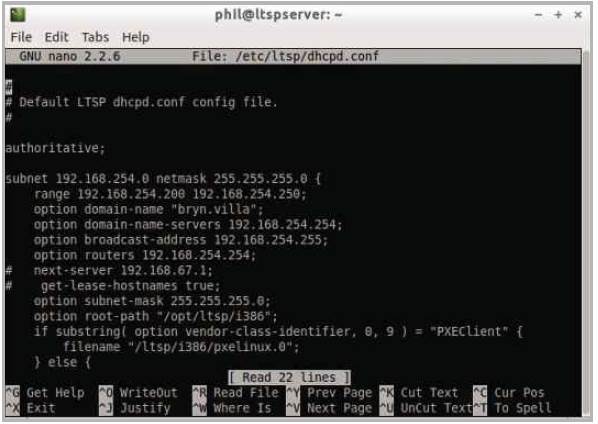
Configuring
DHCP in Nano
The first step is to find those old login
details you got when the router was new and log into it. Somewhere in the menu
system you’ll find details of its DHCP server settings. IP addresses on home
networks are generally 192.168.xxx.yyy, where xxx and yyy can be any number
from 0 to 254. You will probably find that the router uses a limited range of
numbers in the last group for DHCP. On mine it’s 0-199. 254 is the router’s own
address and three others are reserved. 200-250 are available for LTSP to use.
Make a note of your router’s settings. You may well find the range is
adjustable, in which case adjusts it as you wish.

Configuring
DHCP in Leafpad
Next go to your server’s network settings
and set a fixed IP address. This usually means unticking DHCP. Chose a number
outside the range used by DHCP on the router (in my case, I use 200).
LTSP Server Setup
You can add LTSP to any distro using the
normal package managers or one of the newer application installers. The snag is
if you enter ‘LTSP’ in the search you’ll get a huge list of applications and
libraries and not much indication of what’s really needed to get started. There
is an easier way, but it involves a bit of typing. Open a terminal and enter:
sudo apt-get install ltsp-server-standalone
(Or if your distro allows it, login as root
and dispense with ‘sudo’.)
This will drag in a whole load of related
applications and libraries, saving you the bother. Now we have to configure
LTSP server, and that means editing a config file by hand. You need to run any
text editor with root privileges, my preferred method is to open a terminal and
run ‘sudo nano’ followed by path and file name.
Nano is a basic text editor that runs in a
terminal session. If you’re using LXDE, then ‘sudo leafpad’ opens a more modern
editor. In this case the file that needs attention is dhcpd.conf so the command
is:
sudo nano /etc/ltsp/dhcpd.conf
Before you start messing, back up this
file. I usually just add .old to the file name so if I screw up I can find it,
delete the .old and have the default file back.
As you might guess from the name and path,
this file controls how LTSP uses DHCP. Referring to the sample file here, you
need to change the first three sets of numbers of the subnet to match your IP
address and set the last to 0.
Set range outside the DHCP range dished out
by your router. Domain name is optional. Leave it on default if you want. Domain-name-servers
have to be the same as the IP address of your router.
Set option broadcast-address so the first
three sets of numbers are the same as the subnet setting and end with 255.
Option routers should be the same as the
option domain-name-servers. All other settings can remain the same. Save the
file with its original filename. Restart the DHCP server with:
sudo service isc-dhcp-server restart