Snag 1, And A Cure
Once you’ve set all this, it would be
reasonable to assume that the DHCP server would start when the server was
booted. It’s supposed to, but on my system it didn’t. Starting manually is fine
for me, but I want a system I can install and forget. Eventually, I installed
WebMin (www.webmin.com). This is probably
the best ever Linux setup tool that works on any distro, beating the distro’s
own tools. Once it’s installed, open any web browser and enter:
localhost:10000
Going to System > Boot up and Shutdown,
I discovered that although both the standard DHCP and IPv6 DHCP servers were
set to run on boot, neither was actually running. Attempting to start DHCP6
manually from WebMin failed, so I removed the ‘start at boot’ option from it.
Now the standard (IPv4) server runs as it should. If your network supports
IPv6, this issue may not arise, but webmin is useful anyway for other admin
duties, especially as the LXDE tools are pretty limited.
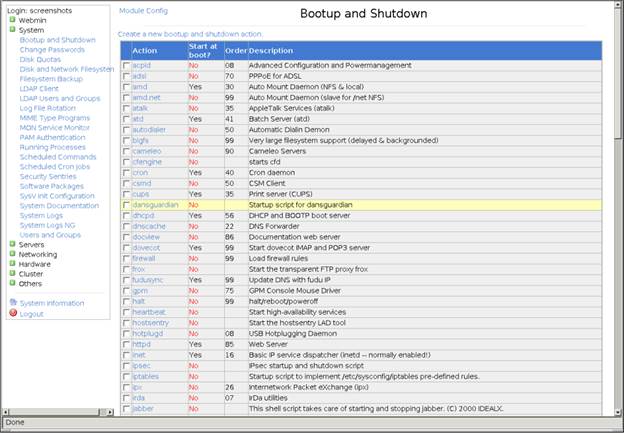
Using
Webmin to select services to run at boot time
Build A Client
Build in this case refers to creating a
place on the server into which clients will be welcomed. We’ll get to building
client hardware soon.
Once again, the command line seems the
easiest way to do this. The following command starts the process:
sudo ltsp-build-client --arch i386
It can take a long time, as LTSP needs to
download and install some extra utilities and libraries. Now you can build the
client hardware.
Client Hardware
A Raspberry Pi model B with Ethernet
connection, case to put it in, a monitor, power supply, keyboard, mouse, video
cable and SD card. Pis are currently $49.42 from Farnell, including P&P and
VAT.
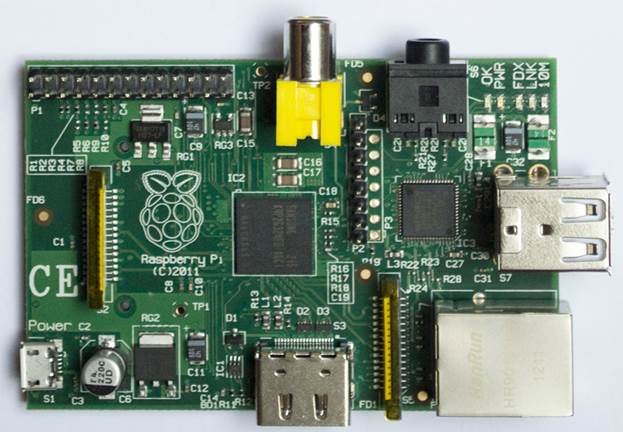
A
Raspberry Pi model B
The case came from eBay. There are several
people offering laser cut Perspex cases, but one, ‘groovybananas’, offers
customised versions. For $10.79, it made me one a bit longer than normal so the
SD card fits inside the case and users can’t mess with it.
I found some 19” LCD monitors on eBay for
$52.85. They’re not widescreen, but they are 1280x1024 and they have a built-in
USB hub that just needs a short USB to micro-USB cable to power the Pi. You
need a monitor with a digital connection. It doesn’t have to be HDMI, though;
an HDMI - DVI cable (from guess where) costs about $2.26.
I found a USB keyboard and mouse set at the
same place for $11.32, which are remarkably usable, and an SD card under a
fiver. Total cost, about $135.9, not counting the sticky pads I used to fix the
case to the back of the monitor. You can get Pi cases with Vesa fixing holes,
but this monitor uses the Vesa mounts to attach the stand, so that wouldn’t be
convenient.
Client Software
Download the latest BerryTerminal. It
arrives as a .zip file. Stick the SD card in your PC (any OS will do) and
format the card with FAT32 file system. Unzip the download and transfer to the
card. (On most Linux desktops right-click the file and ‘extract to’ then pick
the card.) Insert the card in the Pi. Done.
Snag 2, And A Cure
It’s DHCP again. Boot the server, log in
and create another user. Boot the Pi. With luck, it will find the server and
display a login screen. Mine didn’t; it found the DHCP server on my router and
displayed a basic BerryTerminal login. According to the BerryTerminal site, you
can set a server address manually by opening cmdline.txt on the SD card and
appending “server= [your server’s IP]” and saving the file. It didn’t work for
me; DHCP overrules it.
What did work was switching off the router,
or disconnecting it from the switch. With only one DHCP server online, the
BerryTerminal finds it and displays an LTSP login. Log in with the second
username and password. Reconnect the router. Once you’ve logged in, the
terminal remembers the server location, so next time you switch on the
terminal, it will connect automatically. Now you see why I recommend a separate
router and switch? If you don’t have a separate switch, investigate your
router’s settings. You can probably switch off DHCP temporarily while the
terminal discovers the server.
Using BerryTerminal
Switch on the server. On my modest
hardware, it boots to a login screen in under 20 seconds. Switch on the
terminal - that’s even faster. With only one terminal, I can’t honestly say how
the system will behave under load, but using the terminal is exactly like sitting
at the server. Flash websites work okay and sound works via the Pi’s headphone
socket.
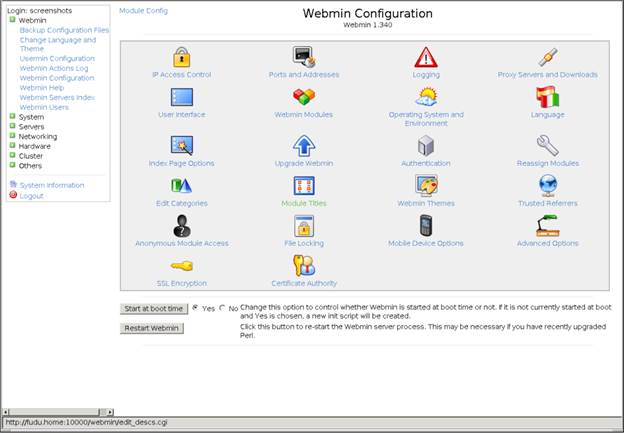
Webmin’s
configuration page
The only problem I foresee in a public
setting is that the terminal cannot read USB local storage. People who arrive
wanting to view photos off a camera or files off a memory stick will be
disappointed. In the longer term, BerryTerminal may well release a version that
can do this - LTSP clients on other hardware already can. In the short term,
there is a workaround of sorts.
Insert a USB stick or camera/phone
connector into a port on the server. When the pop-up appears, opt to view the
device in a file manager; this will mount the file system. On the server, run
WebMin. Go to System > Disk and Network Filesystems. The USB gadget should
be at the end of the list. Click the blue (link) text description on the left.
Midway down the page, find the option ‘Allow users to mount this filesystem’.
Click the ‘yes’ option then ‘Save’.
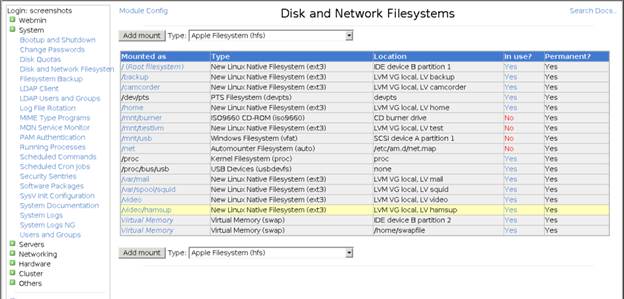
Using
Webmin to enable users to access USD devices
Exit Webmin. ‘Safely remove’ the USB
gadget. Now, with the terminal, running inserts any USB gadget into the server
and in a second or so a dialogue box will open on the terminal asking for
authentication. At this point, you need to give the server’s admin password, so
in a public setup this isn’t ideal. If you (the admin) go to the terminal and
enter it yourself and don’t just hand out the password to all and sundry, it
will probably be okay. It’s a good idea to change the admin password regularly,
though.