Remove malware from your computer
The simplest way to remove malware is to
let a security program detect it and then remove it automatically. Once
complete, restart the computer and perform a full scan again to verify the
threat has been removed.
Sometimes you may have to scan and remove threats
a number of times before they are all finally defeated. Other times the threat
stubbornly remains. If that is the case, or your security tools refuse to run
properly (or at all) because they are being blocked by malware, the next step
is to try to restart Windows in Safe Mode. Safe Mode is a cut down version of
Windows for troubleshooting purposes. In this environment many, but not all,
malware infections are crippled, making them easier to detect and remove.

System
explorer lets you manually check for suspicious-looking programs and processes
taking place on your computer
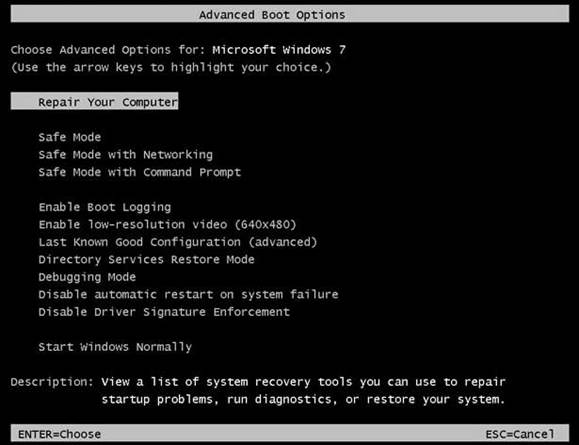
To access Safe Mode, restart the PC and tap
the F8 key to summon the Advanced Boot Menu. Choose ‘Safe Mode with networking’
to enable internet access so security tools can update (XP users must be
connected to the internet via an Ethernet cable for this to work).
When Safe Mode opens, click Yes (if
prompted) to avoid opening System Restore; it is little use for removing
malware infections. Safe Mode is set to run at a low resolution, so security
tools may be awkward to use. To change this, right-click the Desktop and choose
Screen Resolution (select Properties then the Settings tab in Windows XP).
Click Advanced, choose the Adapter tab and click List All Modes to pick a
higher resolution from the list – 1,024x768 pixels is a comfortable size.

You
may need to resize the screen in Safe Mode to use your security software
Now launch your usual security tool from
the Start menu. Many security tools will work in Safe Mode, but not all do,
while others may still be crippled as a result of the malware infection. If
yours does launch, update it and perform a full scan, letting it remove any
infections it finds.
Whether or not this approach works, run
scans with both Malwarebytes Anti-Malware and Norton Power Eraser. If prompted
to reboot, do so, but return to Safe Mode by tapping F8. Once all three tools
have done their work, restart your PC, which should automatically launch
Windows in normal mode. Perform full scans with all three tools again to verify
no traces of malware remain.
Remove stubborn threats
Sadly not all malware is crippled by Safe
Mode, while other infections actually block access to Safe Mode. If your PC
restarts or displays a blue ‘STOP’ error when attempting to access Safe Mode,
then a malware infection is likely.
If this is the case, or you are unable to
remove infections even in Safe Mode, you will need access to a second, clean
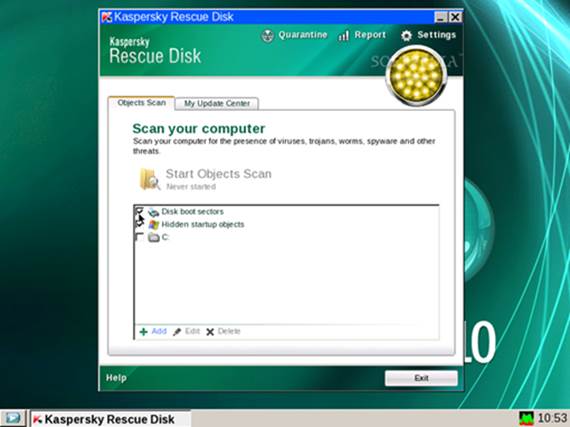
PC. From here, create a rescue CD or DVD to scan your computer without
launching Windows. Most security companies provide rescue discs, but you can
also download free tools from the likes of Kaspersky and AVG.
The downloaded file will be a very large
file with an .iso extension – this is a disc image that can be used to create a
CD or DVD. If you don’t have disc-burning software, then download and install
the free ISO Recorder tool from www.alexfeinman.com.
Then double-click the ISO file and follow the wizard to create the rescue disc.
Once created, insert the disc into the PC’s drive and restart. If the computer
is not set to boot automatically from CD or DVD, find an option to choose the
boot device in the Bios look for a prompt to press F2 or Delete (Del) or
similar soon after switching on the PC.
The security tool should launch from the
disc. Follow the prompts to let it download the latest updates from the
internet and scan. Should an infection be found, let the rescue disc deal with
it, and then run another scan to verify that it has been removed. Remove the
disc, restart the computer and perform final scans.
Repair any damage a virus has done
With luck, your PC will be returned to good
working order. However, it may still be affected by some of the damage caused
by the infection – not being able to access Safe Mode, for example, or being
locked out of key tools such as Windows Update and Registry Editor.
There are free tools designed to repair
such havoc. Visit www.snipca.com and download the portable edition of Windows
Repair. Save the Zip file, right-click it and choose Extract All, then Finish.
Open the ‘Tweaking.com Windows Repair’ folder and double-click the
‘Repair_Windows.exe’ program to start. Click Next twice to skip the section
about cleaning your computer – you have already done this – then click the Do
It button. Let Windows restart for a disk check.

Rescue
CDs can help repair even those computers that are badly affected
Once the disk check completes, launch
Windows Repair again, this time switching to the ‘Step 3 (Optional)’ tab. Click
Do It again to allow Windows to perform a check for damaged and missing files.
You may be prompted for your Windows CD to repair files. Once complete, click
Next followed by Create to create a Restore Point, then Backup to back up the
Registry.
You are now ready to apply repairs. Click
Next followed by Start to open a new window with a list of available fixes.
Start by clicking the Unselect All button, then click on an item to read more
about it in the right-hand pane. If the symptoms described match problems on
your PC, tick the box. When you have gone through the list, click Start and
fixes should be applied. If a security warning box appears, verify that the
publisher is Microsoft Corporation before you click Run.
Once the repair jobs have finished, you
will probably be prompted to restart your computer. When Windows has reloaded,
you should find it works correctly.
Keep it clean
Prevention is always better and easier than
cure, so take these quick steps to ensure your PC stays infection-free.
First, run regular scans with both
Malwarebytes Anti-Malware and Norton Power Eraser, in addition to your main
security software. Second, take steps to minimize your exposure to malware.
Most malware comes through the internet, so that means improving the security
of your web browser and email.
Make sure you are running the latest
version of Internet Explorer, Chrome or Firefox. These include antimalware
tools that screen websites and download for known risks. Supplement this
protection by installing a site filtering plug-in such as MyWOT (www.mywot.com) or Norton Identity Safe (http://identitysafe.norton.com), both
of which provide safety ratings for websites and search engine results, helping
to steer you away from unsafe sites.
Finally, consider installing a free tool
called POP Peeper (poppeeper.com), which allows you to screen email before
downloading it to your computer, giving you extra protection against fake
emails.
Tablet and smartphone security
These days many people own Smartphone and
tablets, and these may become vulnerable to malware infections in the
not-to-distant future.
Owners of iPhones and iPads can feel a
little smug, because Apple’s tight control over apps and its mobile operating
system, iOS, means that there are far fewer opportunities for malware authors
to sneak their wares onto Apple devices. Apps also run within an electronic
ring fence known as a ‘sandbox’, from which the app cannot escape.
Android tablet and Smartphone owners, on
the other hand, should protect themselves. While you can pay for anti-malware
software, you will find free tools are adequate. Avast Mobile Security protects
against malware, dodgy websites and even theft
Should i pay for antivirus software?
There is no real need to pay for antivirus
software. The likes of AVG Antivirus Free and Avast Free Antivirus provide
perfectly adequate protection. More comprehensive suites, such as Kaspersky
Internet Security 2013, offer a combined firewall and antivirus suite, plus
other goodies such as a sandbox, a tool that runs unknown programs in isolation
from the rest of your computer to help prevent infection. There are, however,
some advantages to buying paid-for security packages. Suites such as Norton
Internet Security 2013 have features including File Insight, where all
downloaded files are screened for safety and reliability against a large
community-driven database of known files, as well as tools that further protect
Facebook users. It is worth looking for three-user versions, which allow you to
protect an entire household’s computer collection with a single purchase.