
The
first step is to insert all the resistors that lay flat on the board.
The first step is to insert all the
resistors that lay flat on the board. There are other resistors to fit, but
we'll add these later, as they need to stand upright. Each resistor location on
the board requires a specific value, which you read from the resistor by
decoding the colour stripes on its body. The wrong resistor in the wrong place
means a dead ZX81. Just to make matters even more complicated, some positions
on the board are left empty. There are no handy PCI slots or ZIF sockets for
these components, either; once inserted, you need to flip over the board and
solder each resistor into place - a total of 26 solder joints are needed to
complete this first step.
Step 2
Next,
we need to solder the diodes to the keyboard port.
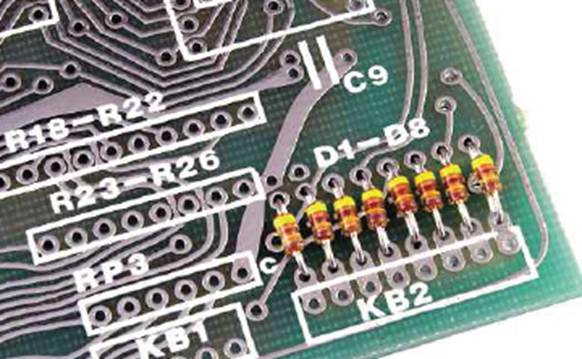
Next, we need to solder the diodes to the
keyboard port. Diodes act as electronic gates, so that electricity can flow in
one direction but not the other. In some ways, the diodes are easy to fit; unlike
the resistors, they all have the same value and only fit in one location.
However, the diodes are polarised, meaning that they need to be fitted with the
thick band pointing upwards, or the keyboard won't work. Another 16 solder
points in this step brings us to 42 so far - the sweat is starting to build and
the fumes are getting troublesome.
Step 3

More
resistors! To save board space - and therefore money - Sinclair's engineers
opted to fit some resistors standing upright.
More resistors! To save board space - and
therefore money - Sinclair's engineers opted to fit some resistors standing
upright. This means that each of these resistors needs to be carefully bent
into shape, inserted into the holes and then held in place while the board is
flipped. After soldering - another 24 joints for a running total of 66 - each
resistor is inspected to make sure that it isn't touching any of its neighbours
and causing a short circuit.
Step 4

Just
when we thought we'd seen the last resistor, Sinclair throws in a curveball: a
set of resistor packs.
Just when we thought we'd seen the last
resistor, Sinclair throws in a curveball: a set of resistor packs. These
contain several resistors in a single long package with a common pin at the
end, saving even more space. While these have their values printed on the side
- meaning that we don't have to squint at coloured bands - they need to be
soldered to the board with the common pin pointing towards the 'C' marking on
the PCB. Another 15 solder points for these brings us to 81 in total. The iron
is starting to feel remarkably heavy now.
Step 5

Finally,
we're able to have a little break from resistors, as it's now time to solder
the capacitors to the board.
Finally, we're able to have a little break
from resistors, as it's now time to solder the capacitors to the board. These
store small amounts of electricity - like a very small battery - and provide
smoothing for various important signals. Some are ceramic discs, which are no
more difficult to fit than resistors. However, the blue drum-shaped
electrolytic capacitors have a specific polarity, like diodes, which means that
you have to carefully investigate the markings on the PCB. Another 24 more
solder points and we've broken the century at 105 in total - and we're barely
halfway through the build process.
Step 6

Next
comes a trio of miscellaneous components: three-legged transistors, which are
significantly smaller than the tip of your finger, and a ceramic filter
Next comes a trio of miscellaneous
components: three-legged transistors, which are significantly smaller than the
tip of your finger, and a ceramic filter. The filter can go on the board anyway
around, but the transistors need to be aligned with the out line on the PCB.
This is a short step, and adds nine solder points to the total, bringing us to
a sweat-inducing sum of 114..
Step 7

Sockets
and slots make matters a lot easier when you're building a modern-day PC
system, but not when you have to solder them on yourself.
Sockets and slots make matters a lot easier
when you're building a modern-day PC system, but not when you have to solder
them on yourself. The IC sockets protect the chips from the heat of soldering.
We'll add the sockets now, then put the chips in them towards the end of the
build. This part is seriously time-consuming; the ULA (uncommitted logic array)
and CPU sockets both have 40 pins, while the ROM has 24 and the RAM has 18,
plus a further 17 for the two keyboard connectors - that's a whopping 139
solder joints, more than doubling our total at 253. At this point, we had to
open a window for some fresh air.