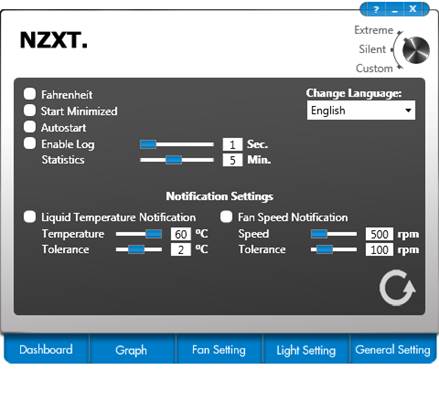
Software
One of the main features of the NZXT is
supporting the ability to regulate and monitor via software. It comes with the
Kraken Control V1.1.0, which has a screen to show the coolant and each CPU
core’s temperature and the rotation speed of the fan and pump.
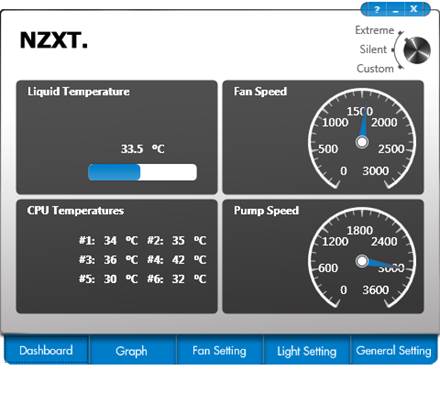
The
Kraken Control v.1.1.0
Besides, there is an operation mode switch
that enables you to control the speed of the fan(s) on the right corner of the
window. However, the speed of the pump’s motor cannot be regulated.
The second tab of the utility is for
monitoring the fan speed and CPU temperature data via a graph.
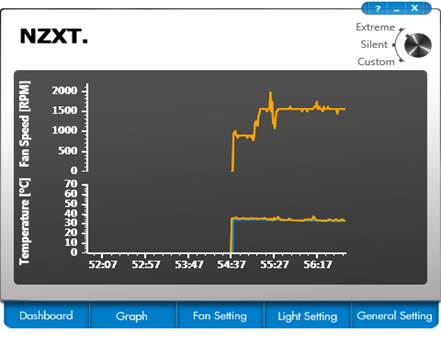
The
utility’s second tab
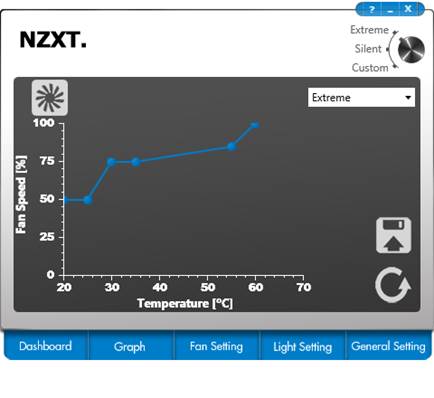
The third tab is called Fan Setting and
allows to manually specify how the fan must change its speed depending on CPU
temperature. This setting can be saved into a profile:
The third tab is named Fan Setting. It
allows manually specifying how the fan’s speed must change to be corresponded
to the CPU’s temperature. This setting can be saved into a profile
The
Kraken Control V1.1.0
It seems to be the most valuable among the
utility’s features.
Besides, you can deactivate, activate or
choose a color to highlight the pump and make the color change depending on the
temperature of the CPU.
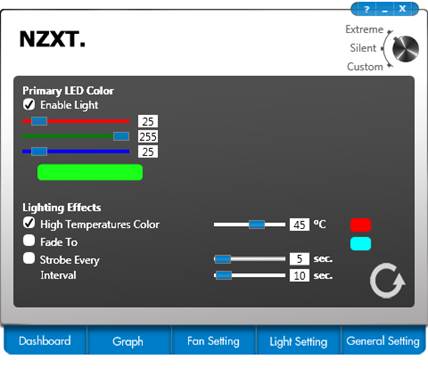
The
Primary LED color
In the general setting, there are different
interface languages, measurement units for you to choose. It is also possible
to set the utility to start up automatically, turn on logging and specify
temperature and fan speed thresholds for notifications.
Choosing
the interface language
Even Davy Jones himself does not have such
power like his sea monster as what NZXT’s Kraken can do.
Testing and methodology
The testing process was carried out inside
a system case whose one side was removed. The configuration of the test is as
follow
·
Mainboard: Intel Siler DX79SI (Intel X79
Express, LGA 2011, BIOS 0537 from 07/23/2012)
·
CPU: Intel Core i7-3960X Extreme Edition, 3.3
GHz, 1.2 V, 6 x 256 KB L2, 15 MB L3 (Sandy Bridge-E, C1, 32 nm)
·
Thermal interface: ARCTIC MX-4
·
Graphics card: AMD Radeon HD 7770 1 GB GDDR5 128
bit, 1000/4500 MHz
·
System memory: DDR3 4 x 4GB Mushkin Redline
(Spec: 2133 MHz / 9-11-10-28 / 1.65 V)
·
System drive: Crucial m4 256 GB SSD
·
Drive for programs and games: Western Digital
VelociRaptor (300GB, SATA-II, 10,000 RPM, 16MB cache, NCQ) inside Scythe Quiet
Drive 3.5” HDD silencer and cooler
·
Backup drive: Samsung Ecogreen F4 HD204UI (SATA-II,
2 TB, 5400 RPM, 32 MB, NCQ)
·
System case: Antec Twelve Hundred (front panel:
three Noiseblocker NB-Multi-frame S-Series MF12-S2 fans at 1020 RPM; back
panel: two Noiseblocker NB-BlackSilent PRO PL-1 fans at 1020 RPM; top panel:
standard 200 mm fan at 400 RPM);
·
Control and monitoring panel: Zalman ZM-MFC3
·
Power supply: Seasonic SS-1000XP Active PFC F3 1,000
W (with a default 120 mm fan)
To prepare for
the test and summary diagrams, we overclocked the six-core processor with the
pre-set fan speed of 125 MHz, the multiplier at 34x and “Load-Line Calibration”
enabled to 4.375 GHz. The nominal Vcore of the processor is increased to 1.385V
in the BIOS of the mainboard. During the testing process, the “Turbo Boost”
technology is deactivated, but the Hyper Threading technology is activated to
increase the heat-spreading process. The memory voltage is set at 1.65Vand its
frequency is 2,000 MHz with 9-11-10-28 timings. Other parameter which is
available in the mainboard’ BIOS and related to the overclocking process of the
CPU or the memory are kept unchanged.
All tests are carried out under the Windows
7 Ultimate x64 SP1 operating system. We use the following software
Linx AVX Edition version 0.6.4 – to load
the processor (memory -4500MB, problem size -24234, 2 11-minute cycle
Real Temp GT version 3.70 – to control the
temperature of the processor’s core
Intel Extreme Tuning utility version
3.1.201.5 – control and observe the system’s parameter during the overclocking
process.
Therefore, the screenshot of the finished
testing process has the following look:

Screenshot
of the finished testing process
The CPU is loaded by the LinX AVX two
consecutive times with the pre-set parameter mentioned above. It takes about 8
to 10 minutes to stabilize the CPU’s temperature between these two testing
times. We take the highest temperature of the CPU’s core to graph the diagram.
Moreover, we also provide a table which includes all recorded temperature for
each core as well as their average. The ambient temperature is checked through
the system case by an electronic thermometer with the increments of 0.1°C which
allows us to monitor the hourly monitoring of the temperature changes during 6
hours of testing. The room temperature in during our test takes the values from
23 to 23.5°C.
The noise level of the cooler are measured
from 1:00 to 3:00 M in a 20 m2 closed room by using the CENTER-321
electronic noise level. The noise level of each cooling device is tested
outside the system case while the main noise maker in the lab is the cooler and
its fans. The noise meter is installed into a tripod and is 150 mm far from the
fans’ motor. Laid at the edge of the table, the tested cooler is placed on a
piece of polyurethane foam. The lowest noise level that the meter records
is29.8 dBA and subjectively, the comfortable noise level in this testing is about
36 dBA (do not mistake it with the low noise level). We keep the rotation speed
in the entire regulated range using our in-house controller by changing the
voltage with 0.5 V increment.
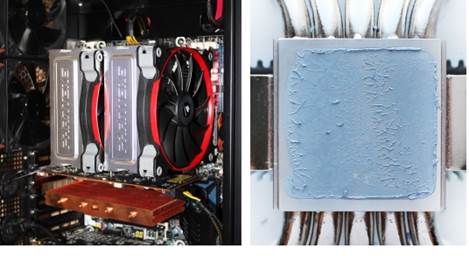
Just like all of the cooling system that
have been tested before, the NZXT Kraken X40 will fight against the best air
cooler on the market – Phanteks PH-TC14PE. However, we replace the Phanteks
heatsink by two Corsair AF140 fans instead of two default fans which are not
particularly quiet.
Phanteks
PH-TC14PE
According to our preliminary test, the
performance of this cooler is not affected by these changes, but its acoustic
performance, on the contrary, is improved considerably. However, the following
noise level diagram also contains curve for the Phanteks PH-TC14PE with its
defaults for your reference.
Besides the super-cooling system, NZXT
Kraken X40 also fight the battle with the best closed-loop liquid cooler that
we have ever tested up to now – Corsair H100i Extreme Performance
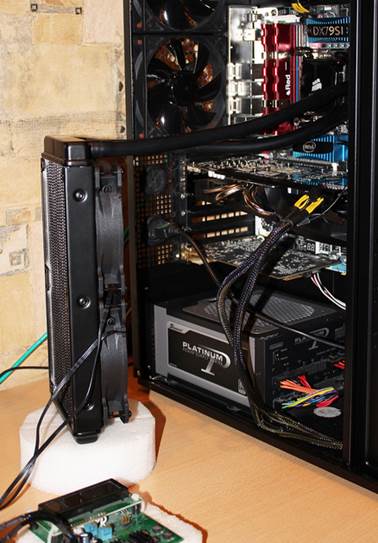
The
product after installed into the system case
As you can see, this system has been tested
in the environment which is consistent to that of the NZXT Kraken X40 and is
not placed in the system case either. We also wish to add that all fans are
controlled by our special in-house controller whose precision is ±10RPM.