BIOS function
In our previous MSI motherboard review, we have discussed MSI Click BIOS II, representing the quite successful apply of UEFI (Unified Extensible Firmware Interface)
standard. The uppermost of the
screen shows not only info function but also allows choosing interface
language, change the startup device order by dragging and dropping them simply
with a mouse pointer. Running devices will be marked.

BIOS
startup screen
The center of the screen is apportioned for
displaying the BIOS settings, with the selecting icons right on the right
and left sides. Let’s take a look at the first item called “settings", this item also contain some sub-items.

System
Information
The "system status" sub-item is, in fact, the same startup screen, which we see when we
enter the regular traditional BIOS.
It reports important system info.
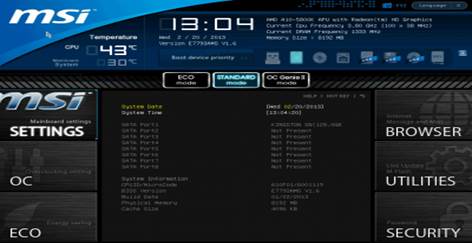
The
system readings
The variety of the settings in “advanced”
is nothing surprise to us, as they
moved from regular BIOS which almost
have no change. There’s a sub-item called “Windows 8 configuration", where
you can activate the specific boosting feature of the system at this OS in
particular and speed up overall startup time.

Standard
mode
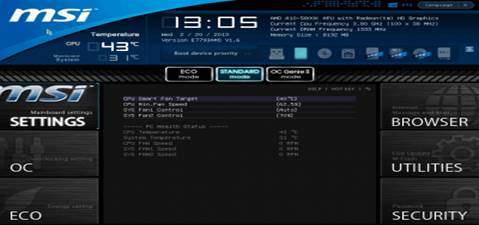
Now let’s check the "screen hardware"
where you can auto activate the
process of adjusting CPU fans
speed depending on the current processor temperature. Adjusting only works for
the 4-pin fans, which is the same
on most of the motherboard of the other manufacturers. All the 3-pin fans will
rotate at their full speed. However, if you connect 3-pin fans with 2 4-pin
system-fan ports, their rotation speed will be lowered when needed. Adjusting
the rotation speed for the fan connectors is set at auto or a specific level. 2
remaining 3-pin connectors
don’t allow adjusting the rotation speed or controlling process.
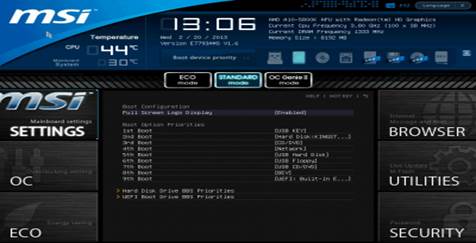
"startup"
sub-item
"Startup”
sub-item will allow you to set the order of the boosting devices and some other
stuff used during the boosting process of the system.
"Save
& Exit" sub-item
The function of the "Save
& Exit" sub-item is clear and doesn’t need any
explanation.

Installing
section in BIOS
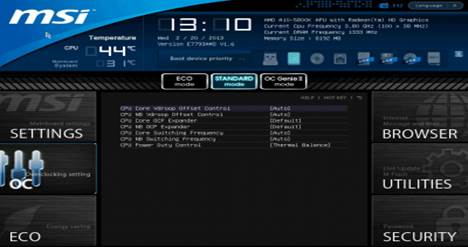
"OC" section
is the largest part considering the available settings. It includes most of the
necessary options for the suitable configuration and overclocking process. It
also has some readings that report the current state of the system. However,
you can only set the current voltage at specific value, not adjust them by
using the "Offset"
approaching method, when you just simply need to add the desired values for the
nominal setting. This makes the motherboard disable all the power-saving techs
in the overclocking process as well as in the process of lowering the processor
frequency along with the process of reducing voltage at the same time.
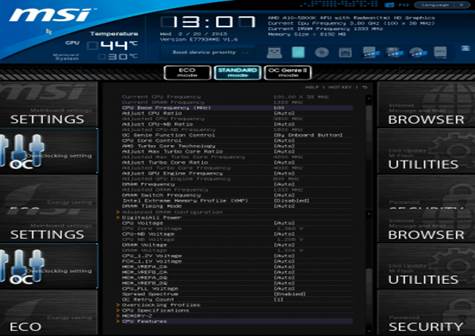
OC
section in BIOS
To be easier while working in this section
which is plentiful in feature, a few readings has been moved to personal page.
Specifically, all the memory timing readings are segregated in a separate
sub-item. They can be identical for all of the memory channels, or set
individually for each of them.

OC
section in BIOS
All the readings related to the DigitALL
Power voltage regulating configuration hve been moved to a separate page with
the name of “DigitALL Power”.
OC
section in BIOS
The motherboard can save 6 full BIOS setting configuration
in the “Overclocking Profiles” sub-item. It allows saving and loading the
installing configurations from the external source. A small inconvenience is
that you can’t know that the configuration has been used by looking at the list.

OC
section in BIOS
However, real-time operations with the
configurations are a completely free problem. The date and time of the
configuration-creating process as well as the BIOS versions it belongs is auto-saved for each configuration. You can
set each configuration with a memorable description or erase a configuration
from the memory when needed.

"Memory-Z” sub-item
"Memory-Z" sub-item
is also organized in the same way. The first thing you see is the info recorded
in the SPD memory modules. The motherboard will use specific settings by
default.

OC
section in BIOS
However, the true potential of the memory
modules can only be found in AMD Memory Profile (AMP) or Extreme Memory Profile (XMP), where you can access through here.

OC
section in BIOS
Unlike the motherboard for the Intel processors, "CPU feature" sub-item
of MSI FM2-A85XA-G65 doesn’t
contain any CPU basic info. All we can do here is to configure some techs of
the processor. This is a very important sub-item for the reason of being the
last item in the list, but it’s still accessible, because all the readings in
the "OC" section have
been tightened. You don’t need to keep pressing “down” for countless times to
have the sub-item to have the sub-item or the final installation. You just need
to press “up” 1 time only and you will get that instantly.

OC
section in BIOS
"ECO" are what used to belong to "Green
Power" before. Here we can work with some of the
power-saving readings, control the most important voltages in the system at
present time.

ECO
section in BIOS
The “browser” icon on the top right will
allow you to browse the Internet, check
your e-mail, use some office apps
or the texting apps, but only when you’ve already installed the OS based on the
Winki 3 Linux platform from the
bundled DVD disk.

“Browser”
icon
This is also right for the backup hard
drive and the Live Update utility, which is hidden behind the “Utilities” icon.

Live
Update utility
In the "M-Flash" sub-item, we can try and startup by a BIOS images on a flash
drive, can be able to sane the current BIOS version or update it. It’s quite inconvenient when the images are
not only saved in the root folder of the drive, they also need to have a
successful update. Without the file manager, unsupported NTFS
file system, and the flash must have FAT or FAT32 format.
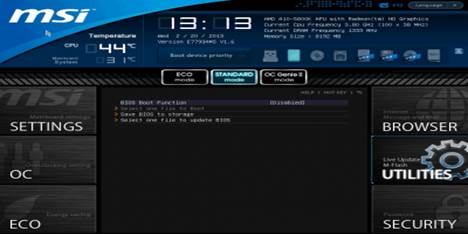
"M-Flash" sub-item
In the “security” section, you can set the
password for accessing the system, that’s the feature other boards allow.
However, there’s also an interesting and exclusive point of MSI which is U-Key feature which will allow you to turn a regular
USB drive into an access key.
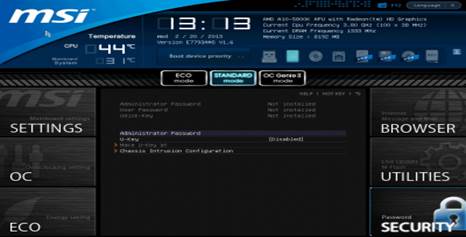
“Security”
folder
You can press the F1 key anytime and while in any section of BIOS to display the help item. They also introduce new hot keys: - F8 and F9, allowing you to load the installing configuration into the external
storage and download the configurations from them. I expect that they’vedone
the same hot key for you to erase all the changes and return to the previous
settings jist with an important key.
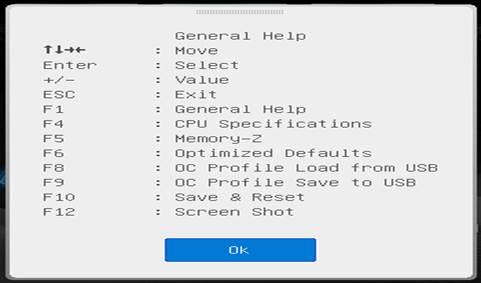
Hot
keys
There’s a “language” button on the top
right corner of the BIOS screen,
normally allowing choosing interface language from a long list consisting of
supported languages. However, it becomes useless in this case, because there’s
nothing to choose.

Choosing
language
In general, MSI Click BIOS II looks easy to
work with and has illustration, and the company has improved it
uninterruptedly. They introduce
new readings to enrich the features of the board and make the working process
with it become even easier than before. However, they haven’t broken out of the
typical shortcomings that all MSI motherboards
have: MSI motherboard is still
unable to increase processing core voltage at “Offset” mode by simply adding
necessary values to the nominal mode. Moreover, most of the difficulties users
can have with the Micro-Star
motherboards, normally begin from
the problems of BIOS, the problem
we will discuss later in this review.