Panning and EQ are usually handled
separately, but combine them within one plugin and you end up with something
like this.
DDMF impressed us with their very accurate
Neve Portico-inspired 6144 EQ, but their other releases (including two
excellent graph-based EQs) indicate a leaning towards more cutting-edge
development. Their latest plugin, DirectionalEQ (VST/AU/RTAS), is a perfect
example of this.
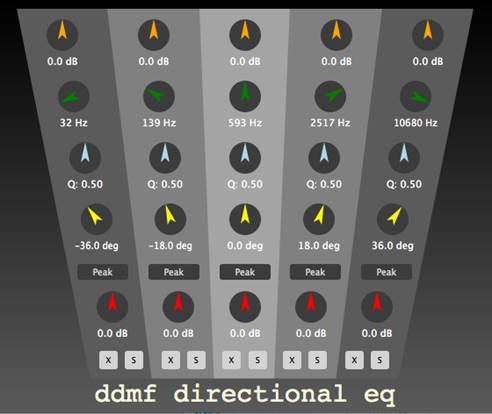
As the name implies, DirectionalEQ combines
EQ and panning, the aim being to modify the frequencies of specific parts of
the stereo image. It has five parametric bands, each with the same set of
controls. From the top down: EQ Gain, Frequency, Filter Q, Degree, Filter Type
and Directional Gain, plus Mute and Solo.
The filter types on offer comprise
band-pass (two types), notch, low-/high-pass, low-shelf, high-shelf and peak.
EQ Gain (+/-20dB) and Q apply to the shelf and peak types, and all bands’
frequencies are fully sweep-able from 16Hz to 22kHz. Directional settings are
made using the Degree control (-45 to +45 degrees). In addition to the
traditional EQ Gain knob, there's also a Directional Gain knob that controls
overall gain in the direction set by the Degree control, and once again it
gives up to +/-20dB of boost/attenuation.

DDMF’s
directional equalizer for accurate stereo image manipulation purposes.
A game of two halves
The first thing to get to grips with when
using DirectionalEQ is the red Directional Gain knob. Even with your EQ
settings flat, this can have quite a dramatic effect on the stereo balance,
combining with the Degree setting to form a very flexible pan control.
Obviously, with five bands in play, it’s important to keep a clear head. Next
up, the filter shapes influence how you work. With all options available across
all bands and frustratingly, no graphical feedback - it’s imperative that you
really think about what you’re doing. Not surprisingly, we found ourselves
calling on the individual band mutes and solos a lot.
We started by testing DirectionalEQ on a
range of stereo sources such as sampled strings - using the regular filters to
boost and cut specific frequencies at specific points in the stereo image. The
results were very impressive - we could boost the brightness quite heavily
where we wanted to without affecting everything else, and a knock-on benefit is
that the overall result doesn’t sound over-EQ’ed.
Staying with stereo material, we moved on
to some sub-mixes and full mixes. With multichannel material like this, there
are various clever things you can do with DirectionalEQ, such as adjusting the
overall width of the image by altering the central level, or shifting the image
by using Degree offset gains. Also, by EQing a centrally panned band (effectively
a mono signal) you can boost or cut vocals and other ‘centered’ material.
Finally, we had a go at enhancing mono
signals. Working on an acoustic guitar part, we were able to enhance different
parts of the stereo image pretty accurately, creating artificial width by
spreading low frequencies towards one side and higher ones towards the other.
Directional EQ wears its two hats
-correctional and creative - well, and although the graphics are rather
uninspired, it’s certainly easy to understand and use. Sure, there are other
ways to do the things it does, but not in such a simple or affordable package.
The creative angle
The first thing you’ll probably do when you
get your hands on DirectionalEQ is sweep the panning controls to get a good
idea of what it sounds like in general. Indeed, when using the regular EQ
shapes, this can be a good way of fine-tuning the effect, finding the sweet
spot in the stereo field.

The
first thing you’ll probably do when you get your hands on DirectionalEQ is
sweep the panning controls to get a good idea of what it sounds like in
general.
However, switch over to the high-, low-and
band-pass filters, and this process takes on a whole new dimension. Coming at
it from a deliberately creative angle, we started by setting up two hard-panned
individual band-pass filters. By automating frequency moves in opposite
directions, we got some pretty cool results from this configuration. Next, we
added in some directional moves, sweeping the filters to opposite sides and
back. Finally, automating some high Q settings completed the effect. Used in
this way, there’s no doubt an overall dry/wet mix control would be very handy.
|
Info
§ Price:
$39
Verdict
§ For A good idea well implemented
Flexible filter options Very affordable Can be used as a panner Capable of
spreading mono sounds
§ Against Uninspired graphics Needs a
mix control for creative use
§ DirectionalEQ
does what it claims to and works really well as both a corrective tool and a
creative effect
|