Need to get your latest track to the
band in a hurry and can’t afford a courier? We show you the many ways to
transmit huge files
Occasionally we all need to send large
files to other people, and email isn’t up to the task. Many email services
restrict you to attachments of less than 10MB, which is hopeless for many
audio, video or image files.
Luckily, there are many ways to send large
files without having to resort to a DVD in the post, and some of the best ones
are free. In this month’s Advanced Projects we’ve covered our favorite
services, a combination of which is sure to meet your needs.
Web-based services
The most obvious way to send large files is
to use a web-based service. Unfortunately, this is a bit of a minefield. A web
search throws up a huge selection of companies, and many are a pain to use.
YouSendIt (www.yousendit.com) is probably
the best known, but this now requires you to sign up to use it.
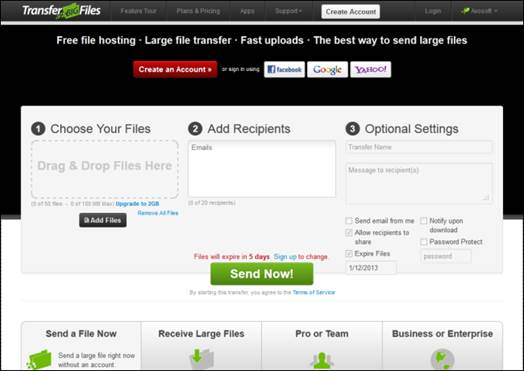
TransferBigFiles
is a goof free web service, but it has its limitations
We prefer www.transferbigfiles.com. To send a
large file, you just drag and drop it on to the Choose Your Files box, enter an
email address in the Add Recipients box and click Send Now. Your contact will
receive a link to the file and can then download it to their PC.
A big advantage of this kind of service is
that you don’t have to sign up to anything to use it, and so have no username
or password to remember. The disadvantages of the free service are that file
sizes are limited to 100MB and the download link expires after five days.
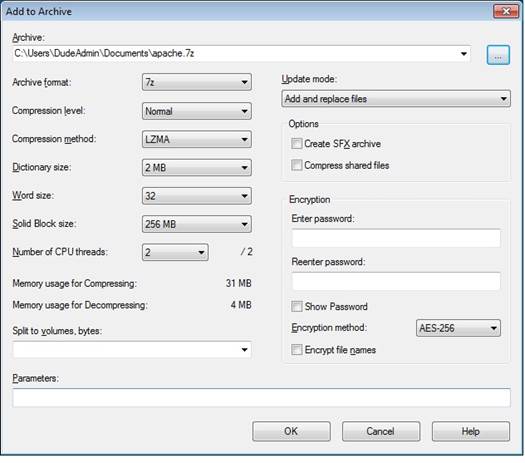
If
you’re worried about security, encrypt any files you send with a password
Some people worry about the security of
sending private files over a free and open service. If you’re concerned about
this, we’d recommend adding the file you’re sending to a Zip archive and
protecting it with a password. Download and install the 7-Zip archive manager
from www.7-zip.org (make sure you get the
right version depending on whether you’re running 32-bit or 64-bit Windows).
7-Zip will install a shell extension, which
makes it easy to add files to an encrypted Zip archive. Right-click on your
file and select 7-Zip from the context menu, then click ‘Add to archive’. In
the Encryption section, enter your password, then click OK. You will need the
password to extract any files from the Zip archive, so make sure you
communicate this to your file’s recipient.
Cloud storage services
A more flexible option, and one that will
let you store and send much larger files for free, is to use a cloud storage
service. There are several of these available, and they all have their various
advantages. Which you choose depends on your specific needs, but there’s
nothing to stop you using a combination of services to cover all the bases.
Google Drive
To start, we’ll look at a couple of cloud storage
services that let you upload and share large files without the need to install
anything. The first is Google Drive. This is available to anyone with a Google
account, and is very powerful.
The Google Drive service is a combination
of Google’s online office software, which gives you simple but functional web
browser-based and drawing applications, and a cloud storage service. For this
reason, it’s a good service to choose if you want more than just a place to
store your files online, but it does have one significant disadvantage: anyone
with whom you want to share a file has to have a Google account as well.
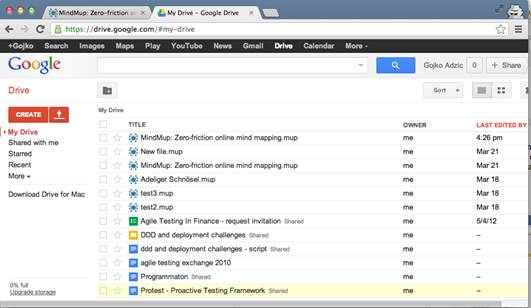
The
Google Drive service is a combination of Google’s online office software
If you don’t already have a Google account,
sign up for one at www.google.co.uk by
clicking the Sign in button then clicking Sign up. Once you’ve created your
account and are signed in, click on Drive at the top of the Google homepage.
Next to the Create button, which lets you create documents in Drive’s built-in
editors, is the icon to upload files. Click this and choose your file in the
standard Windows file browser to upload it.
Once your file is uploaded, right-click on
it, select Share from the menu and click Share. The Sharing settings box gives
you a link you can give to people to download the file, but before they can
access the file you need to add them as collaborators. To do this, enter their
email address in the Add people box *this address will need to be linked to a
Google account). Leave the Notify people via email box ticked, and click ‘Share
& save’. Your contacts will receive an email with a link to the file, and
will able to able to download it once they sign into their Google account.
The free version of Google Drive has a 5GB
storage limit, and there is a 10GB file size limit (which you will clearly
never hit if you use the free version).