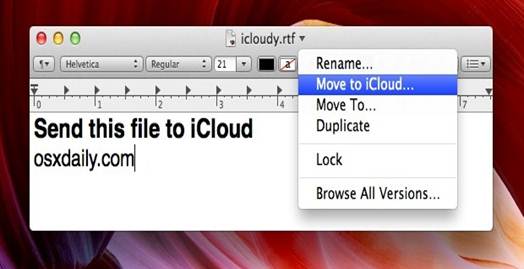
Moving files
The title bar’s drop-down, menu also makes
it easy to move files between iCloud and your Mac. If a file already exists on
your Mac, you can choose Move to iCloud; if it’s already in the cloud, select
Move To Mac and pick a destination on your hard drive. Note that when you do
this, the file disappears from its current location. (That’s why the command is
Move rather than Copy). If you’ve chosen to move it from iCloud, for example,
it’s now available only on your Mac.
The
title bar’s drop-down, menu also makes it easy to move files between iCloud and
your Mac
If you save a file and then edit it without
saving, you can revert back to the last saved version by selecting the Last
Opened command from this menu. If you’ve saved the file more than once and want
to find an older version, you can invoke Browse All Versions. Doing so brings
up a Time Machine-like interface that will seem familiar to Lion users. (Keep
in mind that the file’s previous versions aren’t actually stored in Time
Machine, but on your Mac).
The return of save as
A final convenience offered in this menu is
the Rename command. Select it to highlight the name in the title bar. Type in a
new name and press the Return key, and your document instantly bears that new
name.
Attractive as these features may be, the
one that the greatest number of people are likely to welcome is the return of
the Save As command. Under Lion, users wanting to save a copy of a file under a
different name had to duplicate the file and rename it. Now you can just hold
down the Option key and choose Save As from the File menu (or press
…-Shift-Option-S). Regrettably, Apple has stubbornly reserved the familiar
…-Shift-S shortcut (which once invoked Save As) for the Duplicated command.
Reminder
Why should the iPhone and the iPad have all
the fun? In Mountain Lion, Apple continues its process of porting the most
appealing features from iOS to the Mac. Among those is an app that debuted with
iOS 5: Reminders.
Editing
tasks: TO edit a task, select it. Then double-click it, Control- or right-click
it and select Show Info
Reminders, of course, is a tool for
recording and storing to-do lists, tasks, and any other little bits of whatever
you want to remember. And if you’re familiar with the Reminders iOS app, you’ll
feel right at home working with the Mountain Lion version – it is a near perfect
clone.
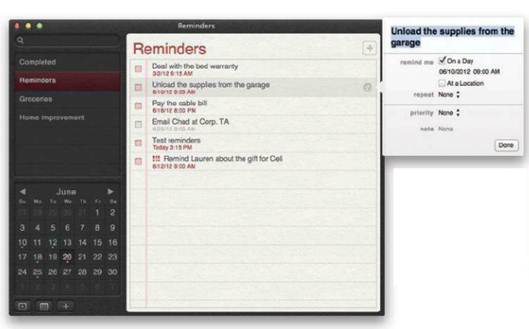
Lists
Like the iPad version of Reminders, the Mac
application divides your tasks and notes into lists. You can base a list on a
task category (Work vs. Personal, for example) or on context (Groceries, say).
However you define them, lists are visible on the left side of the app window;
to the right appears a faux sheet of wide ruled loose leaf paper, where you’ll
see the items for the currently selected list.
To create a new list, you have three
options: You can choose File > New List; you can double-click a blank
section within the lists sidebar; or you can click the plus-sign button (+) at
the lower left of the reminders window. The other buttons down there toggle the
list sidebar and a small calendar that indicates the dates for which you have
reminders scheduled.
To delete a list, Control click (or right
click) it and then choose Delete. You can also use the contextual menu to open
a list in its own window or to rename it.
To navigate between lists, you click them.
If you use a Multi-Touch input device, you can also use two-finger swipes left
and right to navigate across your lists.
Location
based tasks: You can specify either a place associated with a Contacts record
or a street address.
Because Reminders can sync via iCloud, your
Mac and your iOS device can share a common set of to dos. They do so via
accounts: Instead of the standard Preferences option in the Reminders menu,
you’ll find one called Accounts. Selecting that opens the Mail, contacts &
Calendars preference pane. There, you can add any iCloud accounts you’d like to
use for syncing Reminders. Reminders also works with CaIDAV services including
Google Calendar and Yahoo Calendar; you can similarly add those accounts in
System Preferences.
Tasks
When you’re ready to start adding tasks,
you again have multiple input options: Choose File > New Reminder; click the
next blank line on your list; double-click anywhere below the last task on your
list; or click the plus-sign button at the upper right of the Reminders window.
As you type in a new task, or after you
hover over any task with the cursor for a moment, and I ions appears on the right;
click it to configure extra details for your reminder. You can double-click a
task to accomplish the same thing.
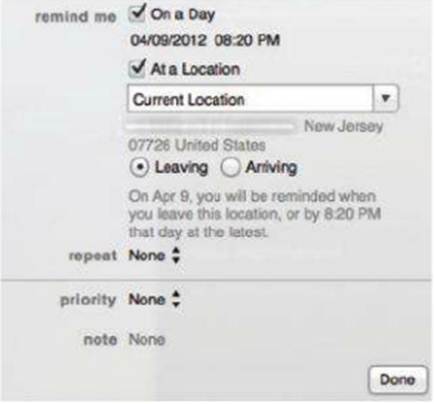
After creating a task, you can specify when
or where Reminders should prompt you about it –either at a particular time and
date or in a designated location.
If you check the At A Location checkbox,
Reminders prompts you to provide details about the location you’d like to use.
You can enter either a contact’s name (provided that the contact has an
associated address in Contacts) or a street address. You then indicate whether
you wish to be reminded when you arrive at or when you depart from that place.
(In iOS 5, location based reminders work only with addresses linked to specific
contacts; App says iOS 6 will offer an improved capability).
Other per-reminder options include
recurrence and priority level. You can also attach notes. Adjusting priorities
doesn’t change where tasks appear in your list, but it does add an
exclamation-point icon to indicate especially important tasks. You can drag and
drop to rearrange tasks, or even drag tasks between lists.
Regardless of how you define these
reminders, they will appear in Notification Center on your Mac. You can snooze
them or close them when they pop up. Snoozing a reminder cause it to reappear 15
minutes later – not just on your Mac, but on any of your iCloud-synced iOS
devices.
Keyboard navigation friends, take note: You
can use the Tab key to navigate between lists, tasks, and the search field.
When you’re in the tasks to select it and then press  -I to edit it. Similarly, when you’re in
the lists pane, type the first letters of a list to select it.
-I to edit it. Similarly, when you’re in
the lists pane, type the first letters of a list to select it.
To mark a task as complete, you can click
its checkbox (or, with the task selected, press the spacebar). You can view all
of your completed tasks, across all your lists, by choosing the Completed list
in the sidebar. To see the finished tasks for a specific list, scroll above the
first item in that list; there you’ll find a Completed section.
Though iCloud offers support for shared
Reminder lists, you can’t create such lists in the desktop app instead, you’ll
need to add them via the iCloud website.

Keyboard
navigation: Use the Tab key to move from the lists pane to tasks to the search
field; use arrow keys or type the first letters of an item to navigate up and
down through lists and tasks.
Reminders includes an integrated search box
at the upper left of its window. Search results appear in real time as you
type, with incomplete tasks listed first, ordered from those due soonest to
those due latest. Below those entries is a similar list of completed tasks;
oddly, they’re listed with older due dates first, so you see completed tasks
from long ago before more-recent ones.
In short, Reminders on Mountain Lion
faithfully re-creates the iOS version of the app, and offers a straight-forward
way to add, edit, and check off to-do list items. Seamless syncing with your
iOS devices gives a relatively simple app some serious power; typing your
shopping list on your Mac and accessing it immediately from your iPhone turns
out to be pretty great.
Seamless syncing with iOS devices
gives a relatively simple app some serious power.