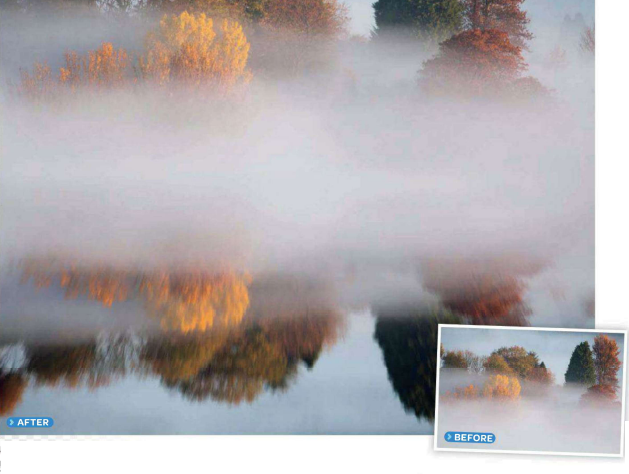
We reveal how to use the Transform tools and
filters to recreate reflections in water
Get
reflective with Photoshop
What you’ll need
Photoshop Elements 9 or above
What you’ll learn
How to copy, flip and distort a landscape to
mimic the presence of a reflective water surface
It only takes
15 minutes
As painters like Constable and Turner
demonstrated in many of their masterpieces, water can enhance a landscape. On a
calm day the ripple-free surface of a lake creates a natural mirror that adds a
pleasing sense of symmetry to a scene. However, sometimes the weather
conditions aren’t ideal and the water’s reflective properties are diminished by
elements like wind. By using Photoshop Elements’ clever tools and filters you
can add photo-realistic computer-generated water to any landscape reflective
properties. Here, we’ll demonstrate how to extend the canvas of a
landscape-oriented shot and then copy and flip the scene to creat a mirror
image. You can then use layers to transform the copied pixels’ shape and
position to create a reflection. Next, you’ll take control of the elements by
rippling the reflecting using filters. This enables you to produce a realistic
reflective surface without obscuring your view of the reflection. You’ll then
tweak the reflection’s tones using Levels to make it less dominant and apply a
brush tip to an Adjustment Layer’s mask to hide the join between the reflection
and the original image.
1. Increase the canvas size

Click on the link to download reflection_before.jpg,
then double-click on the Background thumbnail to unlock it. Go to
Image>Resize>Canvas Size and set Height to 48cm. Tick the top middle
Anchor box to make the canvas extend below the current image.
2. Flip the image
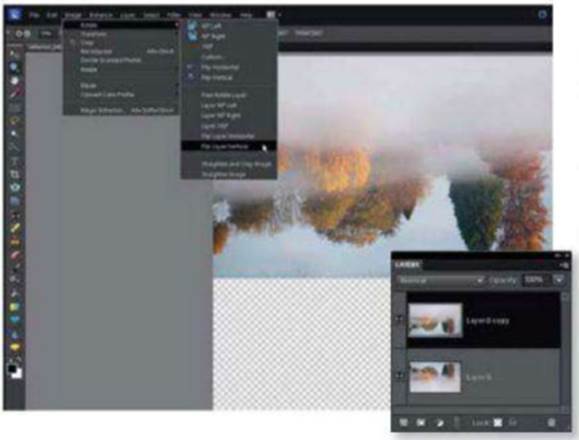
Click OK, then click on the Layer 0
thumbnail in the Layers palette. Press Cmd/Ctrl +J to duplicate the layer (or
choose Layer> Duplicate Layer). Click on the duplicated layer’s thumbnail to
target it. Go to Image>Rotate>Flip Layer Vertical to create a mirror
image.
3. Move and transform
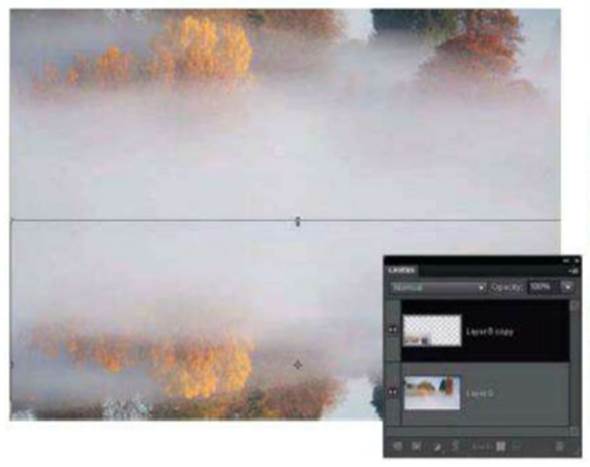
Choose the Move tool and tick the Show
Bounding Box option. Drag the flipped reflection down to the bottom of the
frame. Click on the bounding box’s top middle control handle and drag it down
by 85% to slightly squash the reflection. Hit Return.
4. Add perspective

To create the illusion of a
three-dimensional watery surface, go to Filter>Blur>Radian Blur. Drag
upwards in the Blur Centre window so that the blur extends towards the bottom
of the frame. Set Amount to 3, Blur Method to Zoom and Quality to Beast. Click
OK.
5. Create ripples

To add a rippling texture to the watery
plane, go to Filter>Distort>Glass. Set Distortion to 3, Smoothness to 12
and Scaling to 80%. Set the Texture drop-down menu to Blocks, then use the Zoom
tool to zoom in on the preview window and see the new rippling effect. Click OK
to confirm your changes.
6. Darken the reflection

Choose Layer>New Adjustment
Layer>Levels, then click OK. Next, go to Layer>Create Clipping Mask. Drag
the grey midtone adjustment slider under the histogram to 0.75. Grab the Brush
tool and choose a black tip with a Size of 600px. Click on the Adjustment
Layer’s mask and spray to hide the join.
Expert tip
“Once you’ve extended the canvas size in
step 1 you won’t be able to see all of the enlarged image until you zoom right
out. To do so quickly, choose the Zoom tool from the Tools palette and tick the
Fit Screen button in the options bar. Alternatively, right-click on the image
and choose Fit on Screen from the context-sensitive pop-up”.
Learn the lingo
Clipping
Mask
When you add a Levels Ajustment Layer to
the Layers palette in step 6 it will change the tones of all of the image
layers below it. By using the Clipping Mask command (Layer>Create Clipping
Mask) you can clip the Adjustment Layer to the reflection layer, so that it
will darken the reflection but leave the original layer alone.