In our previous reviews about Gigabyte
mainboards, we discussed many times about the 3D BIOS functionality of Gigabyte
and the default “3D Mode”. In the mode, we can see the images of the mainboard
installation as a schematic layout, with the key knots highlighted one by one,
attracting the users to click them. They work as hint images for inexperienced
users, supporting them how to adjust the processors, memory modules, the
voltage regulators on their computer.
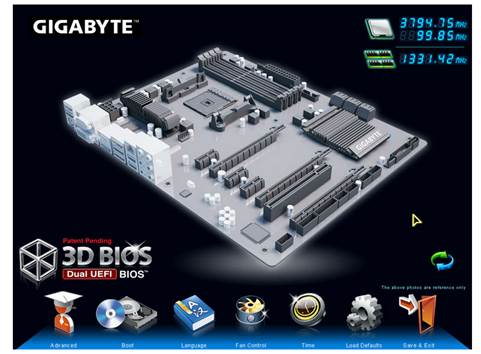
3D
BIOS
In some cases, it is very useful to work in
the visual “3D Mode”, but the “Advanced Mode” brings more values, which we will
briefly check out again.
When you turn on the “Advanced Mode”, you
get into the “M.I.T” (MB Intelligent Tweaker), this contains all parameters
relating to overclocking process and optimizing the performance. Its main
screen lists all the sub-sections and reports the basic data of the system.

GIGABYTE
– UEFI DualBIOS
Next, we will see a small section with all
information about the current status of “M.I.T”, showing you the contemporary
parameters of the system.

The
contemporary parameters of the system
The small “Advanced Frequency Setting”
section allows you to adjust the frequencies, multiples and has other special
parameters which can be adjusted also.

Advanced
Frequency Setting
The configuration goes together with the
technology of the processors, the detail adjustments of the clock frequencies
and saving power mode will be processed specifically in a particular page
called “Advanced CPU core Features”.

Advanced
CPU core features
“Advanced memory setting” section allows
you to adjust the system features of the memory.
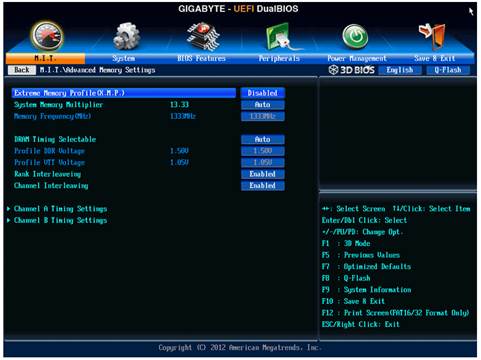
Advanced
memory setting
Parameter controlling memory timings is in
a specific page. You can set up the timings as well as separating them for each
memory kit.

Advanced
memory setting
The “Advanced voltage setting” section
allows you to work with different voltage levels. Unlike Intel’s mainboards,
there are fewer values here, but they all suitable for every single screen.
This is very convenient. CPU cores can be locked in some values or you can add
some values to turn back to the default mode. The voltage can be increased or decreased
in nominal mode, which can usually be useful. For instance, you may need it if
CPU is in the lower mode than the nominal frequency or if you are using
low-profile memory modules. It will be very convenient when the current values
of all auto-installed voltage are displayed on the right next to the
corresponding parameters.
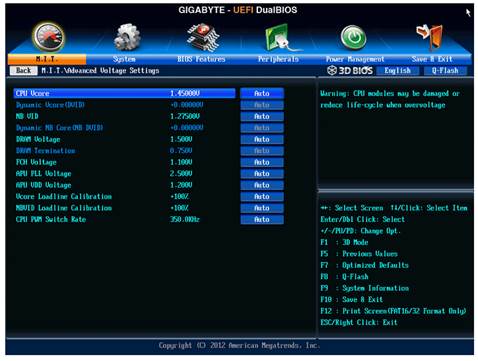
Advanced
voltage setting
The small “PC health status” reports the
current status about voltage, temperature and fan speed. The speed of four out
five fans can be adjusted. You can change CPU’s fan speed and three system fans
separately. You can choose one among two modes which is preset – normal or
silent- or adjust manually the fan speed according to your preference. The
speed of the four system fans is controlled by cannot be adjusted. The only
feature of Gigabyte mainboard is the ability to adjust the 3-pin fans processor
speed. Mainboards that can offer the same advantages only come from ASRock.
Unfortunately, if you are using three-pin fans, only the speed of processor
fans and the first system case fans can be reduced normally, the others will no
longer be compatible with three-pin fans if you change the rotation speed.

PC
Health Status
The “system” section is the same as the
“Standard CMOS features” in the previous BIOS. It will reveal the system
information and list the drives which connect with “ATA port information” page.
You can change the date, time and language interface here.

System
parameters
“BIOS features” section will be the place
where you can see the sequence of starting system, allowing images startup,
parameter and technology adjusting, for example virtualization and access
password.

BIOS
features
The “Peripherals” is about the external
devices and additional onboard controllers. The chipset-specific technologies
the same as Intel Rapid Start and Intel Smart Connect are also used here.

“Peripherals”
The “Power Management” includes normal
parameters relating to the power source for the mainboard and start-up process.

Power
management
To apply or ignore your change, choose
“save and exit” section. Here, you can restore the default setting. This also
brings you two parameters relating to the BIOS setting profile management. You
can save or open up to 8 BIOS configurations, giving them names to describe each
of them. You can again save profiles to external media and load from them.
Profiles will also be automatically saved after a successful start-up.

Way
of saving profiles
Some of the functional keys still work as
the same way. As before, press F9 for the system information.

System
information
Applications built in Q-Flash for the
process of capturing BIOS can be installed by pressing the namesake button or
the hot key F8. It helps the working process and now figures out the
contemporary BIOS version or the new one you are trying to update. However,
they still cannot work with NTFS disks and the current BIOS version is saved in
the root folder of the disk but not your chosen place.

Q-Flash
Utility v1.05
The software research team, people who work
for Gigabyte 3D BIOS, receives many respect and praise. In a quite short period
of time, they tried to implement the transform from the old Award BIOS to the
new AMI UEFI BIOS. Moreover, they tried to install almost all of the currently
outstanding features on the new BIOS. The configuration management feature,
which was strictly limited in the beginning, now returns with the fullest form,
including the ability to work with external devices and the latest
configuration setting automatic saving ability after the successful start-ups.
They offer a simple and useful way to select which BIOS mode would work. If you
set your system to work in the 3D mode, this will be the mode you see in the
next visit to BIOS setting section, and if the latest setting is in “Advanced mode”,
you will see it again in the next visit. As the result, after some improvements
and enhancements, the new Gigabyte 3D BIOS offers a punch of all parameters of
the operating performance optimization, overclocking and all simple but useful
experiences of the users.