Get your exposures spot on in
different lighting conditions using exposure compensation
Deciding whether to increase or decrease
the exposure of your shot can be puzzling, as the adjustment you need to make
is often the opposite of what you might at first expect. Here’s how to use your
camera’s Exposure Compensation function to lighten or darken your image.
Light subject
If the subject contains mostly light tones
you may find that your camera will under expose your image. In this situation,
you need to press and hold the Exposure Compensation button, increase the
exposure by turning the dial right to enter a value of +1, then take the shot
again.
Dark subject
If shooting a mainly dark subject, your
camera is likely to over-expose the scene, so you may need to reduce the
exposure. Press and hold the Exposure Compensation button as before, but this
time turn the dial left to enter a value of -1.
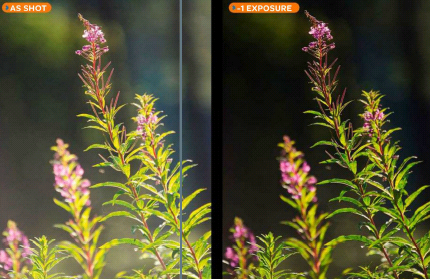
The
dark background has caused the camera to over-expose the shot. Dialling in
negative exposure compensation rectifies this.
Decipher the histogram
The easiest way to check the exposure of
your shots is to use the histogram display on your camera's rear screen when
reviewing your images. This shows the distribution of tones in your shot, so
you can check exposure as you shoot. To get the most from this handy tool you
need to recognise the characteristics of under and over exposed shots.
Over exposed: There is a gap to the left of the histogram, and the graph goes off
the right-hand side.
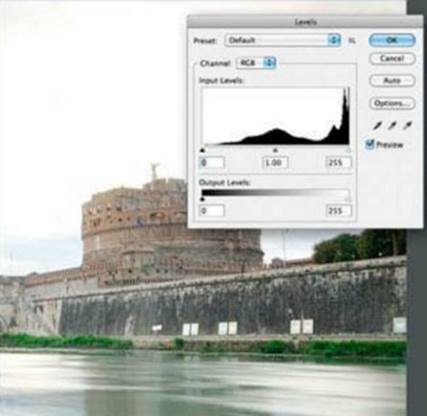
Over-exposed
Under-exposed: There is a gap to the right of the histogram, and the graph goes off
the left-hand side.
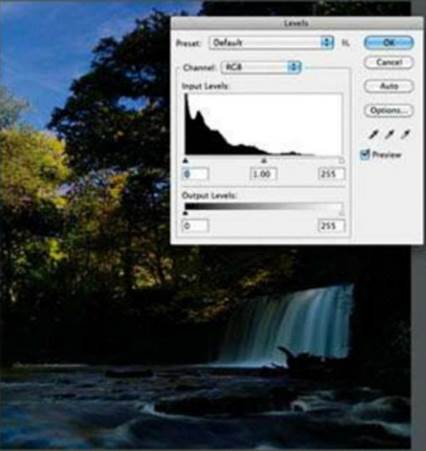
Under-exposed
Skill 5: Deal with high contrast lighting
Master the techniques to deal with
high-contrast lighting and capture the maximum range of tones.
Using your SLR’s Exposure Compensation to
adjust the overall exposure is fine for many subjects, but there are also times
when the brightness range of the subject is too large for your camera to
capture detail in both the shadows and highlights.
This range is known as the camera’s dynamic
range, and while it does vary between different models, it’s pretty common to
find scenes where the contrast is greater than even the best cameras can cope
with.
With practice, you’ll often be able to
recognise these conditions before you start shooting, but the easiest way to
spot the situation is by reviewing your shot and checking the histogram and
highlight warnings.
Start by taking a shot and checking that
the shadows reach the left of the graph. You can now activate the highlight
warning display. If the display blinks to indicate that there are highlights
without any detail, then your camera can’t record the whole brightness range.
When you are faced with this situation,
there are a number of ways to deal with the problem. If you are shooting in
JPEG mode, many cameras offer built-in systems to capture more highlight and/or
shadow detail than normal images. The Nikon system is called Active D-lighting,
while the Canon version is Auto Lighting Optimiser.
Filters
The traditional solution for dealing with
high-contrast lighting is to use an ND grad lens filter. These filters are half
dark and half clear, so you position the dark area of the filter to reduce the
brightness of the lightest area of the scene. This is fine where a large area
of the scene is brighter than the rest, such as the sky in an open landscape.
However they are less useful for subjects containing smaller bright areas, such
as windows or sunlight through trees, because the filter will darken the areas
around these highlights too.
High dynamic range
High Dynamic Range (HDR) has become a
popular technique for capturing images that would otherwise have burnt-out
highlights, no shadow detail, or both. To achieve true HDR images you need to
take at least three shots, one under-exposed, one correctly exposed and one
over-exposed. These images are then combined using either the Merge to HDR tool
in Photoshop or software such as HDR Efex Pro 2 or Photomatix.

We
shot one image at -1 exposure compensation, and another at+1. Combining the
under-and overexposed shots gives an image with detail in both highlights and
shadows.

Shooting
with -1 exposure compensation to retain highlight detail means that shadow
detail is lost, but this gives the best result for this scene.
Recovering detail
Shooting in raw will allow you to capture
more highlight and shadow detail than in JPEG mode. But even in raw it’s easier
to recover more detail from the shadows than the highlights. For this reason,
when shooting high-contrast subjects set the exposure so that you capture as much
highlight detail as possible.
Skill 6: Position your subject
Where to place a subject for maximum
impact and balanced composition
Besides choosing what to shoot and the best
settings to use, learning the basics of composition is one of the fundamental
ways to improve your results. There are plenty of rules and theories about what
makes the perfect composition, but the key thing that you should think about
when taking your shots is where to position the main subject in your image.
Rule of thirds
It’s tempting to put the subject in the
centre of the frame, but this can produce static-looking compositions. It’s
often much better to put the subject just off centre. The classic approach is
to use the rule of thirds, which is defined by imaginary ‘lines’ that divide
each side of the image into three equal-sized areas. You then position the main
subject on one of these lines, or where they intersect.
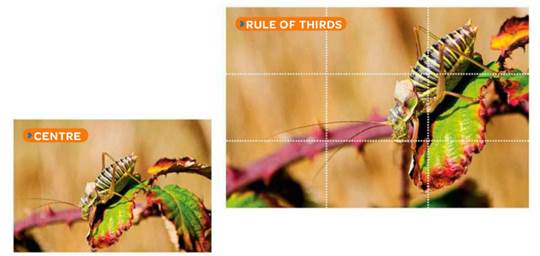
Positioning
the main subject centrally in your shots can often give a very static and
boring composition. However simply moving your subject to one side creates a
far more balanced image.
Super tip: Use live view overlays
SLRs allow you to superimpose a grid on the
rear screen when you're shooting in Live View - some even allow you to show one
in the viewfinder. Use this to position a subject off-centre, and ensure that
horizons are level.