PowerPoint likes
In PowerPoint, you can now add audio that
will pay continuously across all the slides in your presentation, which is
useful for a gathering or interval presentation. A gathering presentation is
one that you keep onscreen while your audience is arriving, maybe giving brief
details about the main presentation, or perhaps your firm’s show reel of
related topics, or just a set of teaser images to whet the audience’s appetite.
An interval presentation is one you’d show during a break as people come and go
from the buffet, which may recap what’s been said so far, hint at what’s to
come in the next section, or might be another corporate show reel.

Audio
can play across many sides in PowerPoint
Setting up one of these automated
presentation types is easy. First set all your slides to automatically advance
to the next after a set period: on the Transitions tab, set the Timing to
Advance Slide After and set the duration to a value such as ten seconds (00:10.00)
and click Apply To All. (Don’t include any “on-click” animations in your slides
or they won’t happen. Everything must be automatic.) Next, click Slide Show |
Setup Slide Show and set the slide show to loop continuously until Esc is
pressed.
Now insert your audio on the first slide
and in Audio Tools | Playback | Audio Styles, click Play in Background. The
default settings will cause the audio to restart from the beginning every time
the first slide in the presentation is shown, but if your slideshow isn’t the
same length as the audio, you might need to change this so the audio is started
manually with a click event – that way, the audio and the slides will loop
independently of each other.
Remember that you should make sure you have
the appropriate rights to any audio content you’re going to play in a public or
commercial setting, and you’ll also want to check that your audio sounds
alright on the equipment you’re going to be using for the presentation. Most
laptop speakers probably won’t sound too great in a large room in front of tens
of people, and there may be better speakers in the projector or conference room
you’re using, so make sure you have the right cables to connect to them, and
that you know how to switch your sound output from internal to external
speakers if necessary.
Preparation is key here, as flailing about
cluelessly in front of an expectant audience isn’t a nice experience.
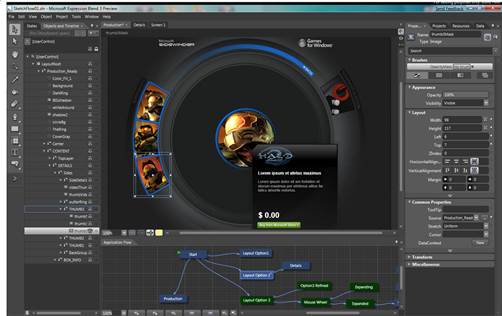
Microsoft ditches Expression

Expression
Blend is now bundled into Visual Studio 2012, but currents works with only
Windows Store projects
In another fit of “simplifying things” out
of existence, Microsoft has “rationalized” its Expression range of products for
designers. These are products for authoring and editing vector graphics,
images, video and UI design elements. Expression Web grew out of FrontPage –
Microsoft’s old website design tool – after it was split in half, with the rest
of the product going on to become SharePoint Designer. Expression Design is a
graphics editor that lets you draw complicated vector graphic images for
websites or other applications. Expression blend merges the world of the
designer and the programmer, by enabling the programmer to employ standard
controls such as buttons and list boxes in their Visual Studio projects, while
the designer employs Expression blend to style these controls exactly the way
they want them to look.
As part of the changes Microsoft is now
implementing, the Expression Studio product bundles disappear completely and
Expression Design and Expression Web become free products – with no technical
support and no new development. New versions of Expression Blend will ship
bundled with only Visual Studio. Only Expression Encoder, the video encoder and
editor, remains a separate, paid-for product.
If you’ve already bought any of these
discontinued products, you’ll still be entitled to technical support. If you’ve
recently paid for Expression Design or Expression Web and want your money back
because they’re now free, you should contact your retailer first and then
Microsoft if the retailer refuses to refund the purchase price. The current
Expression Blend shipping with Visual Studio 2012 works with only HTML and XAML
projects for Windows Store apps on windows 8. WPF, Silverlight and SketchFlow
projects are still handled by the previous version, Expression Blend 4,
although there’s a beta available that brings those projects into Blend for
Visual Studio 2012. That beta will finish when Update 2 for Visual Studio 2012
is released, probably in Q2 2013, as Update 2 will include RTM code for those
project types.
Infragistics Indigo Studio
If you’re serious about application
development, you’ll know one of the worst things you can do is jump straight
into writing code – you’ll almost always get what the programmer finds easiest
to write, rather than what the user finds easy to use, or even what they need
the software to do. Even if you do have a comprehensive “statement of
requirements” from management, this probably isn’t going to include even half
of the things you really need to know. (Unless the application is going to be
used exclusively by the managers, they won’t actually know what’s involved in
doing the job.) The first thing you need to do as an application designer is to
spend time with the users, observing how they do their job, where the pressure
points are, where the proposed application can help them by being slick and
easy to use, and where it needs fine control so they can tweak things to be
just right.

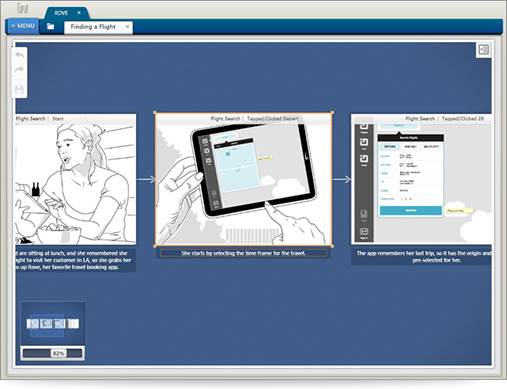
Indigo
Studio makes storyboards for prototype applications, including interactive
screens to show how it will work
Even after you’ve gathered all this
knowledge, resist the urge to start designing a database schema or coding a
prototype. First, sketch several possible UIs, and by this I mean three or
more. By all means start with the obvious one, the one you’d write because it’s
easiest to code and most logical. Then try for one that’s perhaps more “off the
wall”, but slick and easy to use. Gather all these sketches together and try
them out on your colleagues, then refine them a little and show them to the
users. You don’t have to keep any one of these designs, and you can combine
elements from any of them into a further UI sketch that better fits the needs
of the users or the ability of the programmers. Alternatively, you may come up
with a radically different design as a result of talking through the options
with other people. Only after you’ve been through this process can you be sure
you have enough information to settle on a UI design, start writing a full
specification and estimating costs and timescales. Then you can start coding.
One of the traditional ways to present
these initial UI sketches is as pencil drawings on paper, which are quick and
easy to do but can lack finesse and clarity (especially if your drawing skills
aren’t terribly hot). If you’re designing interaction between the user and the
application, you’ll often have to make multiple sketches of the same screen
that vary in a particular detail, as you simulate the way the user will
interact with the application by clicking, tapping or dragging objects. You’ll
also have to write down the logic of which sketch follows which, after the user
clicks what.
Now Infragistics, a company better known
for its suites of UI controls, has released a free tool called Indigo Studio to
help with creating storyboards for proposed applications. You can start from
scans of your pencil sketches, or from blank screens to which you can quickly
add buttons, text, images, lists and so on, and you can simulate interactivity
by adding animations and state changes without having to duplicate the entire
screen. If you start from a pencil sketch you can replace as much or as little
of it with Indigo controls as you want, and you can also add scene-setting
pictures from a library of images such as “Frowning man looking at laptop” or
“Woman holding tablet in restaurant”.
Add some captions, hotspots or annotations
to explain your design, and finally you can present your prototype over the
internet by publishing it to Infragistics’ servers and sending other people a
link to it. By concentrating on the basic user experience of such a prototype
you can quickly try out different UI models in Indigo Studio without committing
yourself to any particular language or technology, then present those options
to the users and managers involved to get further feedback in order to refine
the design.