
Shake the can up and down vigorously for
five minutes – a ball inside will mix the paint. If it’s cold outside, leave
the can indoors overnight; the paint will dry faster and you’ll end up with a
better finish. Don’t leave it near a radiator or naked flame though. Once it’s
mixed, test-spray it on some newspaper or a spare case. Get used to the flow of
paint and practise moving from left to right in sweeping movements.
10.
Mask up

You’ll need to mask certain areas to
prevent paint from getting into them. Masking is also great for adding details,
such as go-faster stripes. Masking tape edged with fine-line vinyl tape is good
for sharp edges, while polythene dust sheets are great for larger areas, such
as side panels – a 3m x 3m sheet costs around $1.5. Don’t use newspaper; this
can leave residue on surfaces and your fingers.
11.
Clean the areas to be painted

Before each coat, and after sanding, use a
damp cloth or sanding dust cloth to clean the areas you’ll be spraying. This
will remove any surface dust that’s settled in between coats. Be sure to use a
lint-free cloth or something that won’t leave hairs behind, such as a tissue. A
microfiber cloth is ideal, but you can also buy sanding dust cloths for around
$1.5 that are specifically made for the purpose.
12.
Position your case

Find a platform on which to place your case
when spraying it. The ideal option is to hang the parts from a jig, booth or
ceiling. This means that you can cover all the surfaces at the same time, so
there won’t be any joins in the paintwork as you move it. Another option is to
use a pasting table, which will raise the case off the ground, but you’ll still
be able to obtain good results if you have a clean and clutter-free work area.
13.
Apply primer

Primer is key to obtaining a blemish-free
finish. Thankfully, it dries quickly, so you won’t be left hanging around for
long. Apply a single, thin coat of primer, taking care not to cover the same
area too many times, as this can make the paint run. Use long sweeping strokes
as you spray, and spray in one direction, rather than in circles. In warm
conditions, the primer will dry in 10-15 minutes.
14.
Sand the primer

Sand the layer of primer until it’s smooth
using wet and dry sandpaper. It might sound strange to use sandpaper on your
fresh coat of paint, but by adding more coats, then sanding them, you’ll build
up a super-smooth surface and fill in any imperfections in the case’s surface,
ready for the final coat. You shouldn’t need more than four or five coats of
primer-just enough so that you can’t see the original paintwork.
15.
Wash off the debris

As the process of sanding the panel will
leave dust and paint particles behind, you’ll need to wash the case again with
a clean sponge or damp cloth. You’ll need to do this after each coat of
primer-it’s a laborious process, but it will result in a wonderfully smooth
primer coat when you’ve finished.
16.
Apply the colour coat

The main coat rests on top of the primer,
and is key to the final look of your new paint job. Applying primer will be
good practice here, as the main coat will be very prone to running. Apply at
least four or five coats, one coat at a time, allowing an hour or so between
each coat for it to dry - don’t be tempted to get it all done in one go. If any
of the coats end up with a rough or rippled surface, then go to step 21.
17.
Apply masking tape and line tape
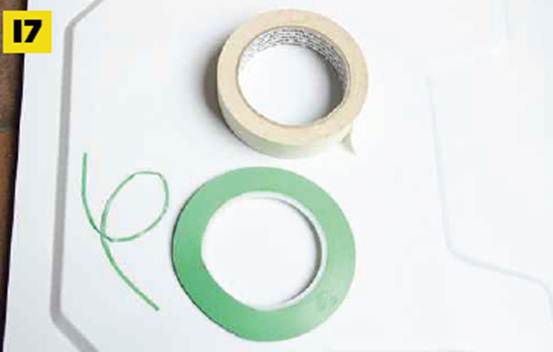
Don’t be tempted to use masking tape for
painting straight edges. Spray paint can seep into its sides, creating what’s
called ‘paint creep’, ruining any straight lines. For straight edges, you’ll
need vinyl line tape - not only is this waterproof, but it can also be bent
into curves as well as straight lines. This flexibility makes it perfect for
creating go-faster stripes, plus elaborate details such as curved flames or
logos.
18.
Mark up details

With a coat of gloss white paint applied to
our case on top of the primer, we opted to create some go-faster stripes on our
case. By masking sections of the white paint, all you then have to do is paint
the whole case the final colour - a glossy red in our case. We used masking
tape to fill the centre of the lines, and then applied vinyl line tape to mask
the edges.