‘Re-fry’ a PDF for a smaller file size
If you need a quick way to shrink a PDF
down to a more manageable file size, here’s something you can do with nothing
more than the free Acrobat reader. Just open the file, start the Print
dialogue, and under Printer, choose Adobe PDF to create a new file. You’ll get
a smaller file that should still be totally legible.

Windows
Tip Of The Month
Create Stunning Animations from Video Clips
You’ll need this cliplets
Cliplets: Cliplets is a free
cinemagraph-making program from Microsoft Research, available at bit.lv/yluu7v.
A Video Clip: cinemagraphs are best made
from videos taken with a stationary camera.
When you’re on vacation, taking a day trip,
visiting friends, or just out and about, you’ll probably be carrying either
your camera or a phone that can be used to shoot video and photos. When the
time comes to show off your pictures and videos, you might gather the family
around a computer, upload files to a social network, or create a gallery on
your own website. These are all great ways to share your favorite images, but
what if you’re looking for something a little different?
Microsoft Research Cliplets is a stunning
free program that can be used to create "cinema- graphs.’’ These are
essentially still images with sections that are animated. It’s a lot of fun
transforming your videos into something a little different, and the results
never fail to impress. Give it a try for yourself, and you’re sure to be
amazed.
Download and Install
To download Cliplets, visit the Microsoft
Research page at research.microsoft.com/cliplets. On the right of the page
click the "Download for 32-bit Windows” or "Download for 64-bit
Windows” button that’s displayed - only one will be visible - and then click
the Download link to save the file to your hard drive.
Run the installer. If you don’t already
have the Visual C++ 2010 Runtime Libraries installed, you’ll be prompted to
download them - just click Yes and you’ll be taken to the download page. You
can then continue with the main installation, which takes just a few moments.
There’s no need to change any of the default settings.
Configure your Video Clip
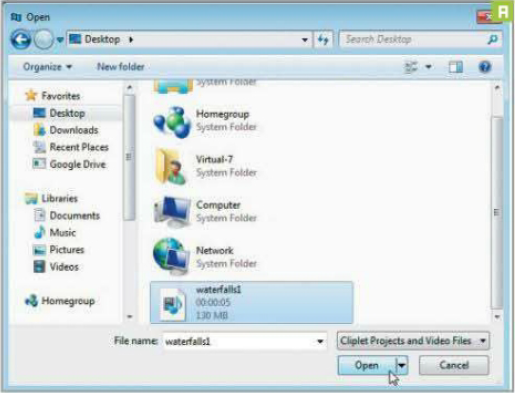
After launching the program, click the
Open button in the upper right of the window and then select a video file you
would like to work with (image A) - most of the popular formats are supported,
including MP4 and AVI. Having selected a video file, click the Open button to
load the file into the program. Alternatively, you can drag and drop a video
file onto the program window.
image
A
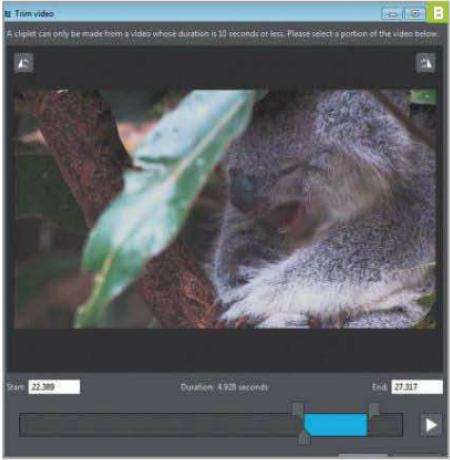
Cliplets has been designed to work with
video clips that are 10 seconds or less in length. If you’ve opened a longer
video, you’ll need to select a portion of it to use. Beneath the video preview,
drag the first of the upper sliders to the start of the section you’d like to
use and the second to the end (image B). You can drag the blue bar back and
forth to choose a different area.
image
B
Click OK to import your video selection
into the program. It’s possible you might have shot video footage that’s on
its side. If this is the case, just click either the "Rotate
counterclockwise” button in the upper left of the view preview, or the
"Rotate clockwise” button in the upper right of the video preview window.
You’re now ready to start working on your first Cliplet.
Create your Cliplet
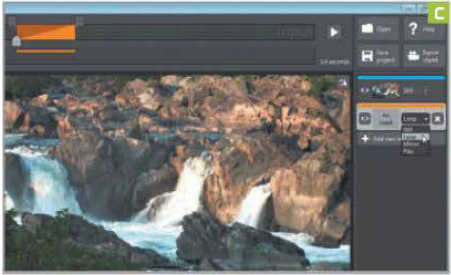
The next thing you need to do is define the
areas of your video that should be static and those that should remain dynamic.
To do this, move the playback slider at the top of the screen to a suitable
point in the video clip and click the "Add new layer” button to the right
of the program window. Make sure Loop is selected from the drop-down menu
that’s displayed (image C).
image
C
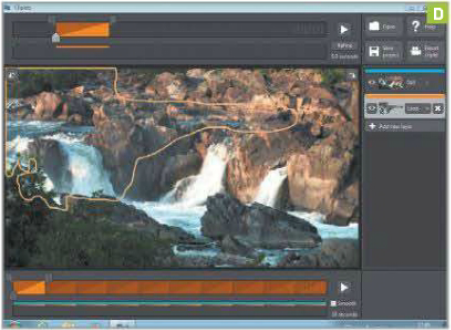
The mouse cursor will now change into a pencil,
which you can use to draw around the area of your video that you would like to
retain movement. Keep the left mouse button pressed while you draw around the
relevant area and release the button when you’re done (image D). If you make a
mistake, just click the X next to Loop at the right of the screen and repeat
the last two steps.
image
D
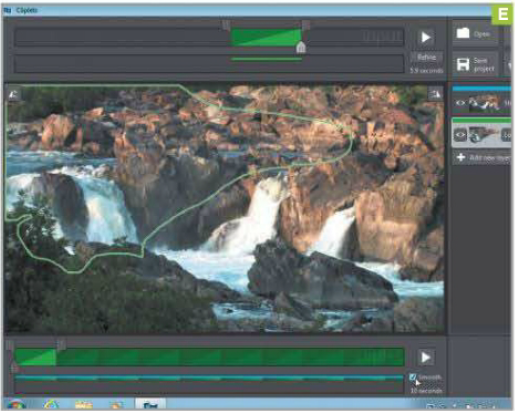
In the Playback bar at the top of the
screen, drag the colored bar left and right to position it with the preferred
static background. You can also move the start and end points of the slider to
determine the loop of the video (image E) and check the Smooth box beneath the
video window to ensure that the video loop appears completely seamless.
image
E