Antony Leather shows you how to use the
greatest hardware from this month's mini-ITX Labs test to build a water-cooled
pocket rocket.
As a motherboard and case form factor,
mini-ITX has been around for years, but its past has mainly been spent in the
low-powered market, often with embedded CPUs, and even those with CPU sockets
lacking the overclocking options of their full-sized ATX siblings. However,
mini-ITX motherboards have spent the past year or so becoming increasingly
capable, both in terms of features and overclocking potential. In fact, this
month’s Labs test proves that, for the first time, they’re now able to compete
on almost equal terms with larger motherboards.
This is fantastic news; if you’re prepared
to live with limited expansion due to the limited number of SATA and PCI-E
ports, there’s no longer any need to use a large tower case to house an
overclocked powerhouse. This has already had significant ramifications in the
motherboard and case markets, as more manufacturers are climbing on the
mini-ITX bandwagon. We’ve seen plenty more Z77-based mini-ITX motherboards
waiting in the wings, and loads of new cases too.
However, as our mini-ITX case Labs test
shows, there are significant hurdles when dealing with an overclocked CPU in a
confined space - it isn’t like building a standard desktop PC. In this feature,
we show you how to build your own mini monster system using some of the best
hardware from this month’s Labs test.
The hardware
Step 1
Our case of choice is BitFenix’s Prodigy.
It’s been designed to house enough cooling equipment to cope with toasty
hardware, and has room for a mid-range water-cooling systems too, including
all-in-one dual 120mm liquid coolers such as Corsair’s H100. It’s by far the
best choice if you’re looking to build the fastest and coolest mini-ITX system
possible.
We’ve opted for a single water-cooling
loop, with a full-height dual 120mm-fan radiator in the roof cooling our
graphics card and CPU. It would be possible to fit another radiator in the
front of the case if you need more cooling, or use a thinner radiator in the
roof. However, it’s unlikely that you’ll be able to use the 5.25in bay, as this
is situated in the roof where your radiator will sit.
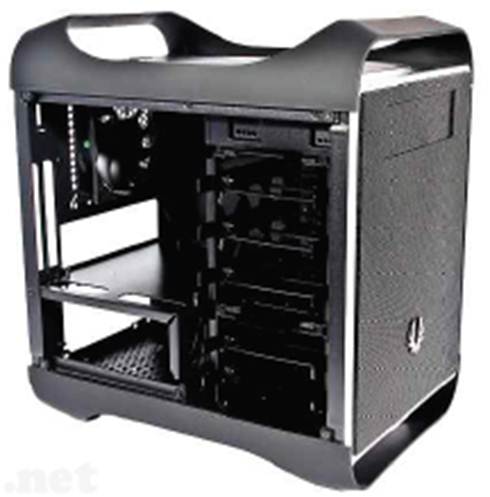
Our
case of choice is BitFenix’s Prodigy.
Step 2
Dismantling a
case can be quite an arduous process involving drilling out rivets and dealing with plastic
flanges. However, some cases use screws to hold everything together. While the
Prodigy isn't entirely bound using screws, you can strip it back to its bare
shell using little more than a screwdriver. Your first job is to remove the top
fan cover by opening the latch on the top and levering it out.
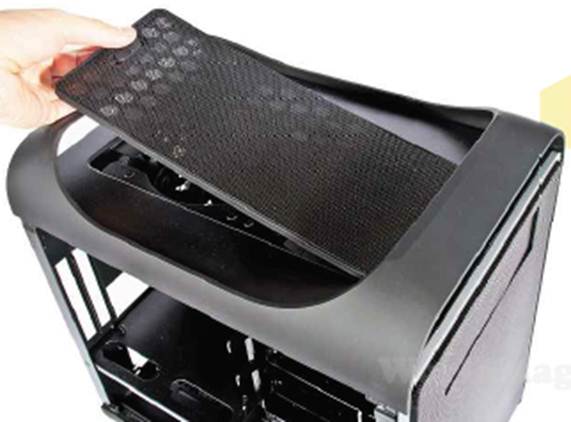
Dismantling
a case can be quite an arduous process involving drilling out rivets and
dealing with plastic flanges.
Making room
Step 3.
We’ll only be using an SSD in our blind,
secured with Velcro or double-sided tape, so we’re removing all the hard drive
cages. A 256GB SSD now costs around $225, which is enough space for all the
essentials, bar gargantuan amounts of videos and photos. However, if you opt
for a different pump, radiator and reservoir combination from the one we’re
using then you might be able to keep the lower 3.5in driver cage if you want to
add a hard drive. There are two screws on either side of the top of the case
that enable you to release the top 3.5in drive cage.

We’ll
only be using an SSD in our blind, secured with Velcro or double-sided tape, so
we’re removing all the hard drive cages.
Step 4.
You now need to remove the front fascia of
the case. Inside the case’s front, the fascia secures to the frame of the case
with four plastic flanges. Bending these outwards allows you to push them
forwards, releasing the entire fascia from the case. Meanwhile, screws on the
front fascia and side of the case enable you to remove the single 5.25in drive
cage. With this removed, leave the fascia off for the time being, as this will
make life easier when installing the water-cooling hardware.
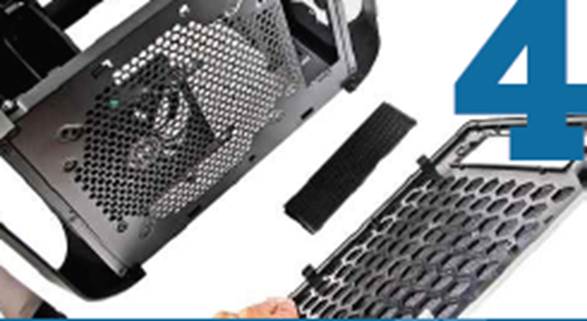
You
now need to remove the front fascia of the case.
Step 5.
Remove the lower 3.5in drive cage and
you'll be left with a bare chassis just begging for some water-cooling gear. We
recommend waiting until this stage before ordering your water-cooling hardware.
Unless you’re mimicking a setup someone else has built with an identical case,
you won’t have a good enough idea about the exact amount of space that will be
available until you’ve stripped everything out. The Prodigy has room for a
full-height double 120mm-fan radiator in the roof - we’ve also seen a couple of
examples of 200mm radiators being used in the front fan mount.

Remove
the lower 3.5in drive cage and you'll be left with a bare chassis just begging
for some water-cooling gear.