Step 6.
Your choice of radiator will depend on the
hardware you need to cool. A full-height dual 120mm-fan radiator (we used a
Phobya G-Changer 240, ($67.5 from www.aquatuning.co.uk) is the minimum we'd
recommend to cool a quad-core Ivy Bridge CPU, and a graphics card such as a
GeForce GTX 680 3GB or AMD Radeon HD 7970 3GB. However, if you're thinking
about applying some extreme overclocks then it's worth considering using high-speed
fans, or installing an additional radiator in the front of the case.

Your
choice of radiator will depend on the hardware you need to cool.
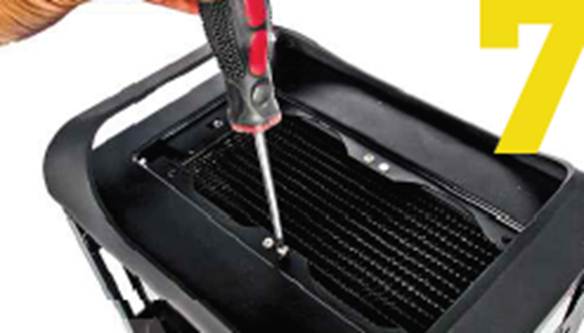
Step
7.
Use the screws that were included with your
radiator to mount the fans. Make sure they both point in the same direction,
and that they're located on the correct side, depending on whether you want to
have them drawing in air or exhausting it through the radiator. We've opted for
a pushing setup, with the fans pushing air through the radiator and out of the case.
The Prodigy has mounting holes for fans or radiators in the roof, so once
you've installed your choice of tube fittings, line up the radiator and secure
it in place.
Use
the screws that were included with your radiator to mount the fans.
Step 8.
The tubing size doesn’t affect cooling, so
it’s worth using 3/8in internal-diameter tubing as opposed to the 1/2in tubing
that’s popular in larger PCs (we used 3/8in ID Masterkleer tubing from
www.aquatuning.co.uk, $10.5 for 10ft). This is because the 3/8in tubing has a
much tighter bend radius, enabling you to squeeze it around corners without
kinking. This is essential in the tight confines of a mini-ITX case. To this
end, we opted for Alphacool3/8in compression fittings for use with 3/8in ID
tubing ($6 each from www.aquatuning.co.uk).

The
tubing size doesn’t affect cooling, so it’s worth using 3/8in internal-diameter
tubing as opposed to the 1/2in tubing that’s popular in larger PCs.
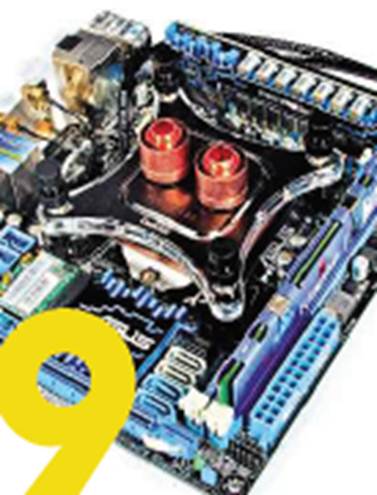
Step
9.
We're using this month's Labs-winning
mini-ITX motherboard, the Asus P8Z77-I Deluxe. Thanks to a VRM daughterboard,
it has lots of room around the CPU socket; our XSPC Raystorm CPU waterblock
($75 from www.aquatuning.co.uk) fitted with plenty of room to spare. It's also
worth securing the fittings to the block prior to mounting-doing this
afterwards can place undue pressure on the mounting mechanism and motherboard.
We're
using this month's Labs-winning mini-ITX motherboard, the Asus P8Z77-I Deluxe.
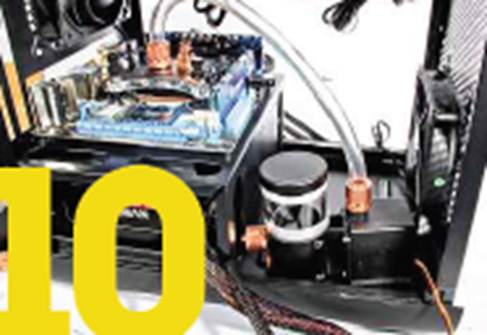
Step
10.
With the motherboard mounted, you now need
to decide on a location for the pump. In our case, this is the only variable;
our radiator needs to be located in the roof, and we're using a combined pump
and reservoir. You can also see our tubing bends easily under the radiator-
this wouldn't have been the case with thicker tubing.
Pumps come in many shapes and sizes, but as
we're just cooling the CPU and GPU, and using just six barbs, we opted for a
Phobya DC12-220 & EK-Reservoir Combo DCP 2.2 Bundle ($73.5 from www.aquatuning.co.uk).
This isn't as powerful as a Laing DDCorD5pump, but the combined pump and
reservoir can fit into tiny spaces. It also costs less than $75, while a Laing
pump costs over $90 on its own.
With
the motherboard mounted, you now need to decide on a location for the pump.
Step
11.
To cool our GeForce GTX 680 3GB, we opted
for our Labs-winning GPU full-cover waterblock, the XSPC Razor GTX 680. We
routed the tubing to it from the CPU, and the loop then heads back down to the
pump, with the radiator being fed directly from the pump's outlet. We left
enough slack in the tubing so that we could easily remove the graphics card,
without having to drain the loop first. Depending on which way you route the
tubing, you could also opt for 90-degree angled fittings to keep tubing out of
the way, particularly on the GPU waterblock's outlet.

To
cool our GeForce GTX 680 3GB, we opted for our Labs-winning GPU full-cover
waterblock, the XSPC Razor GTX 680.