If you’ve decided that Office 2013
isn’t for you, find out how to uninstall it from your computer safely
In the previous issue of Computeractive we
showed you how to download and install the consumer preview version of
Microsoft Office 2013. Having had a chance to play about with the software, you
may have decided that it is not for you; or you may have installed iton a
desktop computer and laptop only to decide that you no longer want ¡t installed
on your main PC. Read on to find out how to safely uninstall and deactivate the
programs.
1. Removing Office 2013 Preview from a
Windows PC is similar to uninstalling other programs, but there are some key
differences. The first thing to bear in mind is that Microsoft only allows each
person to install the software on up to five computers. Whenever Office 2013 is
installed and you subsequently sign into a Microsoft account, the computer will
be registered. To check how many installations you have made, go to www.snipca.com/6740and
enter your email address and password if prompted to log in
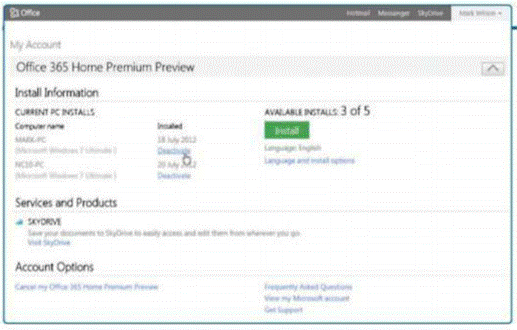
2. Look In The Install Information section
to the left of the page and find the entry that relates to the computer from
which you are planning to uninstall Office 2013 you may be able to identify the
computer by the name that is listed or by the date of installation. When the
correct computer has been identified, click the Deactivate link to the right.
In the pop-up message that appears, click OK and you're ready to move to the
next stage of uninstallation.
When
the correct computer has been identified, click the Deactivate link to the
right. In the pop-up message that appears, click OK and you're ready to move to
the next stage of uninstallation.
3. The Message In The Previous STEP pointed
out that 'deactivating' this computer at the Office website will not actually
remove Office 2013 from the computer's hard disk. The software will still be
present and can be used to open existing files, but it will not be possible to
edit them or create new ones. So, to remove the program completely, click the
Start button followed by the Control Panel link before clicking the Programs
and Features icon to view a list of installed applications.
4. Locate The Entry For Office 2013 it will
be labeled 'Microsoft Office 365 Home Premium Preview en-us'. Select it and
then click the Uninstall button at the top of the window. A pop-up window will
appear asking if you are sure that you would like to remove the software.
Assuming that you haven't changed your mind, click Uninstall to continue. The
process of removing Office is mostly a hands-off affair, but you will have to
wait for a few moments while the uninstaller performs a few checks before
starting to remove the software.
5. There Are Five Stages to the
uninstallation, but user input isn't required at any point you can just leave
the uninstaller to run its course. Once all of Office 2013's files have been
removed a message will be displayed letting you know the process is complete
and you need to click the Close button to complete the uninstallation. To
ensure that any remnants of Office have been completely removed, follow the
advice in the 'Done uninstalling' dialogue box to restart the PC.

There
Are Five Stages to the uninstallation, but user input isn't required at any
point you can just leave the uninstaller to run its course.
6. V open at the moment, take the time to
close them down before continuing; this includes closing any web browser
windows in addition to open files. Once this has been done, click the Start button
and then click the arrow to the right of the Shutdown button. Select the
Restart option from the menu that appears and once Windows reloads all traces
of Office 2013 will have been removed. When the PC restarts, any previously
installed version of Office should be automatically re-associated with Office
file types