Safari secrets
45.
Manage saved passwords
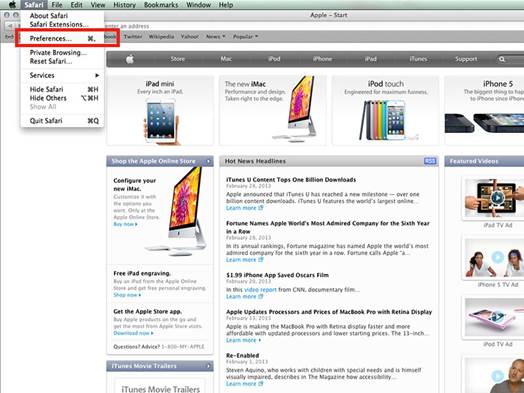
Open Safari’s Preferences window and choose
Passwords from the tabs along the top to view all the passwords currently saved
by the app. You can remove individual passwords by highlighting them and
choosing Remove Password, or remove them all in one go to start afresh.

46.
Reopen windows from last session
Choose History>Reopen All Windows from
Last Session to restore your previous browsing session.
47.
Customize Safari toolbar
Right-click the Safari toolbar to customize
the buttons that appear within it.
48. Gesture between tabs
If you have a track-pad you can pinch to
zoom out on any page to access the tab viewer (there’s also a button on the
right of the Bookmarks bar). This enables you to swipe between tabs with a
multi-touch gesture, which is perfect for those that simply want to use the
mouse or track-pad to navigate around the web.
49.
Customize Top Sites
Top Sites is the grid of sites that appears
when you open a new window or tab; you can customize this with your favorite
sites by choosing Edit and pinning your favorites.
50.
Open link in new tab
To open a link in a new tab, hold Cmd while
you click the link.

51.
Add snippet to Dashboard
You can add a section of a favorite website
to your Dashboard via a snippet thanks to this handy tip. Choose File>Open
in Dashboard and you can select an area of the website you are viewing to
appear on your Dashboard. Now you won’t need to open Safari every time you want
to see that part of the page.
52.
Manage website notifications
Open Preferences in Safari and choose
Notifications to alter how websites show alerts in Notification Center.
53.
Limit font sizes
If you’re having trouble reading particular
areas of the web, you can ensure that Safari only shows text at a certain size.
Open Preferences and choose the Advanced tab. Under Accessibility you’ll see a
checkbox that lets you limit the minimum text size. Somewhere around 11-12 is
probably the best, but experiment until you find a setting you like.
54.
Send clean webpages in Mail
You can share websites via email, but to do
so without ads and other messy distractions, open the site in Reader and email
from there.
Mail secrets
55.
Redirect messages
If you’ve received a message that was meant
for someone else but don’t wish to show that the message has been forwarded,
you can use a clever little feature to redirect it to the required person.
Simply choose Message>Redirect from the menu bar, or hit Cmd+Shift+E to send
the message onto another person without them even knowing you’ve ever laid eyes
on it.

56.
Switch back to classic layout
If you don’t like the new Mail viewing
system that was introduced in OS X Lion, you can return to the old, classic
view within Preferences. Choose Viewing, then check the box at the top of the
list to revert it back to the old way.
57.
Rename flags
Flags are great for picking out important
messages, but many Mac users don’t realize flags can be renamed for different
purposes. To do this, you need to apply two different colored flags to two
messages to bring up the Flagged mailbox. If you don’t see it, enable the
sidebar with Cmd+Shift+M. Click on the arrow next to Flagged to open the list
of each flag, and then right-click and choose Rename Mailbox to give it one of
your choosing.
58.
Save space when composing emails including
photos
Usually, adding a photo to your email will
move all text out of the way and the entire screen will be filled with your
snap. This is often quite frustrating, but if photos are becoming unmanageable
in a message, you can shrink them down easily. Right-click the photo and choose
View As Icon to see it in a shrunk-down format.
59.
Add Calendar events from messages
Mail enables you to add Calendar events
without leaving the app. If a date or time is written in a message, your Mac
will recognize it and offer a drop-down box. You can click this and use it to
add an event in Calendar on the date written. It’s quick and easy, and you
won’t need to change apps.
Safari shortcuts
60.
Home

61.
Open Downloads list

62.
Move to next tab

63.
Move to previous tab

64.
Move cursor to Address Bar

Mail shortcuts
65.
Go to Inbox

66.
Go to Sent

67.
Attach file

68.
Reply to Mail

69.
Get New Mail

iPhoto secrets
70.
Edit images side by side
It’s not a widely known fact, but you can
edit two photos simultaneously in iPhoto, side-by-side, simply by selecting
them both then hitting Edit. Changes are applied to one at a time, but
comparing is a real bonus.
71.
Set up iPhone import options
Plugging in your iPhone will usually open
iPhoto automatically. You can disable this in Image Capture – search for this
app in Spotlight and plug in your phone. Click the small arrow in the
bottom-left to see an extra panel, then choose the application you want to open
when you connect your smartphone.
72.
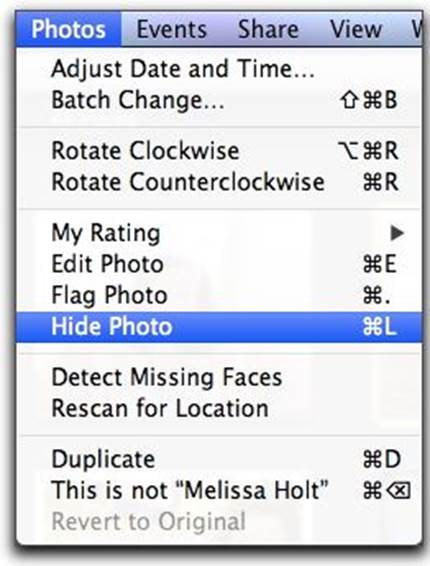
Hide photos in iPhoto
It’s possible to hide unwanted photos in
iPhoto – the shots won’t be deleted from your library, but they won’t be
visible unless you specifically choose to show them again. This is a really
helpful tool if you want to clean up your iPhoto library without removing
photos completely.

73.
Preview original image when editing
While you’re applying effects and edits to
a photo, it’s often a good idea to check the original shot regularly to ensure
you’re not completely ruining what it looked like. You can do this through the
menu bar, but a much quicker option is to tap and hold Shift.
74.
Batch edit photos
To change the names, dates or other
information in a large number of photos, you can use the Batch Change option in
the Photos section of the menu bar.